
Si j'ai été capable de modifier les Ableton GUI même un peu, la conception Id une lumière pour briller comme les rayons bas du ciel sur quelques-uns des différents plug-ins qui viennent avec Ableton parce qu'ils sont des changeurs pur jeu!
Un de ceux-ci seraient l'effet Grain Delay, qui est peut-être l'un des plus sous-estimée. Son emballage plaine cache le fait qu'il est capable de créer des textures et des sons surprenants de tout ce que vous lui lancez. En fait, Ive a utilisé pour générer aléatoirement des sons qui ont laissé les gens perplexes tard en termes de comment je réellement fait de leur création.
Une technique que j'aime serait d'utiliser le Grain Delay de randomiser frappe du tambour différents en temps réel, et d'enregistrer ce processus au sein d'Ableton en utilisant la fonction Rééchantillonnage, puis éditer les sons générés aléatoirement pour toute une nouvelle série.
Laissez-moi vous montrer ce que je veux dire:
Etape 1 - Trouver un patch Synth partir
Im va démarrer avec un simple, boucle de batterie self-made que j'ai fait dans Ableton Live avec un rack de batterie. N'hésitez pas à utiliser ma boucle comme un fichier audio, ou essayer de le recréer, si vous voulez, avec votre propre batterie.
[Audio id = "9459"]

Ne sentez comme vous avez besoin de passer beaucoup de temps sur le temps, car on va le déchirer!
Étape 2 - Ajouter un effet Grain Delay
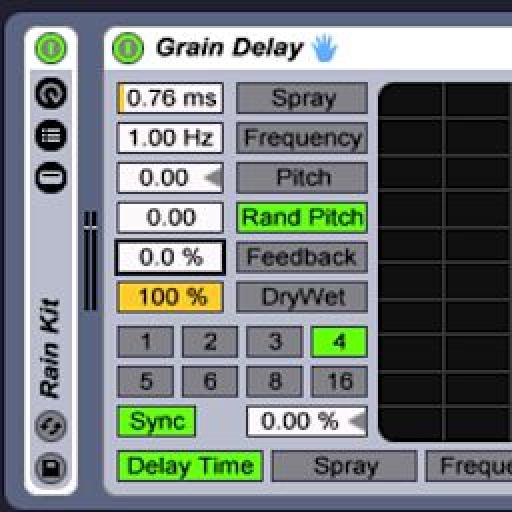
Bon, maintenant bien déposer un retard de grains sur notre piste de boucle de batterie. C'est là que le plaisir commence. Le Grain Delay est essentiellement un kit d'outils temps réel pour la destruction.

Dans cet exercice, allaient avoir le bouton Dry / Wet tout le chemin jusqu'à. Normalement, vous ne devriez pas faire cela, car lorsque vous exécutez n'importe quoi par un retard dans le mode mouillée pleine, vous obtenez une latence graves. Toutefois, ne sont que l'enregistrement ce qui faisait, et de l'agriculture de l'enregistrement des sons; nous n'avons pas besoin d'être précis!
Etape 3 - Mise en place d'une piste Rééchantillonner
Presse

Étape 4 - Enregistrez vos Tweaks Grain Delay
Enregistrement permettra à votre suivi Rééchantillonner, et ensuite commencer à jouer votre battement de tambour. Lorsque vous êtes prêt, lancez l'enregistrement sur votre piste Rééchantillonner.
Remarque: Personnellement, j'aime aller à un rythme faible de sorte que j'ai une possibilité d'obtenir des sons individuels traités avec un peu d'espace entre les deux. Cela rend plus facile pour éditer plus tard!

[Audio id = "9461"]
Pendant l'enregistrement, voici quelques commandes de navigation sur le Grain Delay qui font vraiment de cette session presque comme conduire:
- Spray: Adds random delay changes and can be used for smearing and noise. Between this, Frequency and Random Pitch, I rely on this function for creating textures and distorted beats. At low levels with Frequency, this will slow down the speed of your signal to some degree...very cool.
- Random Pitch: At low levels, adds a slight pitch randomization. At higher levels it produces random destruction. I sprinkle this in here and there as I tweak.
- Frequency: The higher you increase this setting, the faster the spray and Random Pitch begin to modulate. Experiment with these three for textures, dirty beats and sounds.
- Pitch: Not to be confused with Random Pitch! This setting changes the complete pitch of your incoming signal. I usually oscillate around with this.
Gardez à l'esprit, il n'ya pas de réglages parfaits sur ce point. Juste tordre et amusez-vous!
Étape 5 - Terminer et Chop, Chop!
Une fois que vous êtes fini avec votre session d'enregistrement, arrêtez l'enregistrement et la copie de votre travail dans la fenêtre d'arrangement. De là, il est facile de morceaux copie soit de votre enregistrement à leurs propres clips, faites glisser les segments en Impulse ou simple

Voici deux sons que j'ai obtenu pour mon nouveau kit!
[Audio id = "9458"]
[Audio id = "9460"]
Regardez de plus près à Ableton Live avec notre gamme complète de tutoriel vidéos ici .

Discussion
"Thanks for posting a link to this article. In the end I didn't hear that he got much that was useable - but I guess that depends on his application. It was interesting from a sound design perspective how he altered and cut the sounds up."
My response...
I have been enjoying grain delay on its own merits for a while now. It is just so (wonderfully) random in its effect at times. I think if you are looking for glitching up a beat or a sound this effect is one way to get there (rather than manipulating slices or using Izotope stutter edit, etc.). But you bring up a REALLY important point... all of these techniques are really cool but how to apply them musically is really the key point (at least for me).
In my audio project from last week sounds were sourced from a speaker plugged into a pre-amp and then into Live, harvested from classmates drum racks and a pass of the groove through stutter edit let me have some fairly interesting and original sounds in the project. Making them musical as opposed to noise was certainly part of the challenge. I just kept playing them (repetitive improvisation) until that part of the mind that seeks to impose order on chaos figured out what was supposed to happen and that was the take I went with.
In the article Mr. Childs didn't really slice up the resultant audio but that struck me as a logical next step so that the audio could be easily recomposed into a musically useful sequences.
I'm going to have one of the variations requested in this weeks project use the technique in this article just to see what happens.
It should be cool! :)
Very useful article.
Want to join the discussion?
Create an account or login to get started!