
If I was able to modify the Ableton GUI even a little bit, I'd design a light to shine down like rays from heaven on a few of the different plug-ins that come with Ableton because they are pure game changers!
One of these would be the Grain Delay, which is possibly one of the most understated. Its plain packaging hides the fact that it is able to create some amazing textures and sounds from anything that you throw at it. In fact, I've used it to randomly generate sounds that have left people scratching their heads later in terms of how I actually did create them.
One technique that I love would be using the Grain Delay to randomize various drum hits in realtime, and record this process from within Ableton using the Resampling function, then edit the randomly generated sounds for a whole new set.
Let me show you what I mean:
Step 1 - Find a Starting Synth Patch
I'm going to start off with a simple, self-made drum loop that I made in Ableton Live with a Drum Rack. Feel free to use my loop as an audio file, or try recreating it, if you like, with your own drums.

Don't feel like you need to spend a lot of time on the beat, because we're going to be tearing it up!
Step 2 - Add a Grain Delay
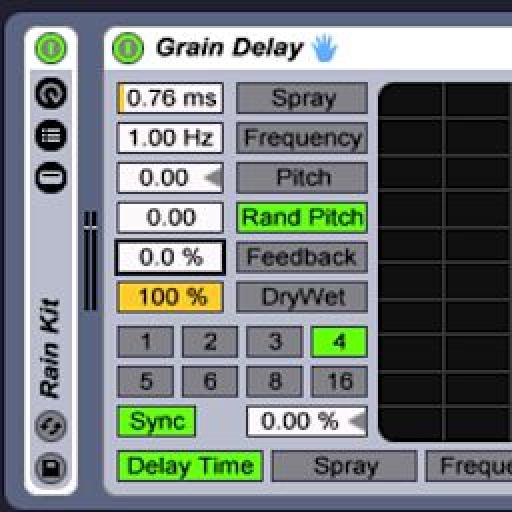
Alright, now we'll drop a Grain delay onto our drum loop track. This is where the fun begins. The Grain Delay is basically a realtime tool kit for destruction.

In this exercise, we're going to have the Dry/Wet knob all the way up. Normally, you wouldn't do this, because when you run anything through a Delay in full wet mode, you get serious latency. However, we're only recording what we're doing, and farming the recording for sounds; we don't need to be accurate!
Step 3 - Set up a Resample Track
Press Control-T to create an Audio track, and then from the Audio From drop-down menu, select Resampling. This routes all of Ableton's audio back into this one track, so that you can record its main output in realtime. This will allow you to record your tweaks in Grain Delay in realtime, too.

Step 4 - Record your Grain Delay Tweaks
Record enable your Resample track, and then start playing your drum beat. When you are ready, start recording on your Resample track.
Note: Personally, I like to go at a low tempo so that I have a possibility of getting individual sounds processed with some space in between. This makes it easy for editing later!

While recording, here are some navigational controls on the Grain Delay that really make this session almost like driving:
- Spray: Adds random delay changes and can be used for smearing and noise. Between this, Frequency and Random Pitch, I rely on this function for creating textures and distorted beats. At low levels with Frequency, this will slow down the speed of your signal to some degree...very cool.
- Random Pitch: At low levels, adds a slight pitch randomization. At higher levels it produces random destruction. I sprinkle this in here and there as I tweak.
- Frequency: The higher you increase this setting, the faster the spray and Random Pitch begin to modulate. Experiment with these three for textures, dirty beats and sounds.
- Pitch: Not to be confused with Random Pitch! This setting changes the complete pitch of your incoming signal. I usually oscillate around with this.
Keep in mind, there are no perfect settings on this. Just tweak and have fun!
Step 5 - Finish up and Chop, Chop!
Once you're finished with your recording session, stop recording and copy your work into the Arrangement View. From here, it's easy to either copy pieces of your recording to their own clips, drag segments into Impulse or Simpler

Here are two sounds I got for my new kit!
Take a closer look at Ableton Live with our full range of tutorial-videos here.

Discussion
"Thanks for posting a link to this article. In the end I didn't hear that he got much that was useable - but I guess that depends on his application. It was interesting from a sound design perspective how he altered and cut the sounds up."
My response...
I have been enjoying grain delay on its own merits for a while now. It is just so (wonderfully) random in its effect at times. I think if you are looking for glitching up a beat or a sound this effect is one way to get there (rather than manipulating slices or using Izotope stutter edit, etc.). But you bring up a REALLY important point... all of these techniques are really cool but how to apply them musically is really the key point (at least for me).
In my audio project from last week sounds were sourced from a speaker plugged into a pre-amp and then into Live, harvested from classmates drum racks and a pass of the groove through stutter edit let me have some fairly interesting and original sounds in the project. Making them musical as opposed to noise was certainly part of the challenge. I just kept playing them (repetitive improvisation) until that part of the mind that seeks to impose order on chaos figured out what was supposed to happen and that was the take I went with.
In the article Mr. Childs didn't really slice up the resultant audio but that struck me as a logical next step so that the audio could be easily recomposed into a musically useful sequences.
I'm going to have one of the variations requested in this weeks project use the technique in this article just to see what happens.
It should be cool! :)
Very useful article.
Want to join the discussion?
Create an account or login to get started!