
Si yo fuera capaz de modificar el Ableton GUI aunque sea un poco, el diseño de una identificación que la luz brille abajo, como los rayos del cielo a algunos de los diferentes plug-ins que vienen con Ableton, porque son los cambiadores de puro juego!
Uno de ellos sería el Grain Delay, que es posiblemente uno de los más subestimados. Su embalaje plano oculta el hecho de que es capaz de crear unas texturas increíbles y sonidos de cualquier cosa que le eches. De hecho, he utilizado para generar aleatoriamente los sonidos que han dejado a muchos rascándose la cabeza más adelante en términos de cómo en realidad se los crea.
Una técnica que me encanta estaría utilizando el retardo de granos al azar a varios golpes de batería en tiempo real, y registrar este proceso desde el Ableton utilizando la función de volver a muestrear, y luego editar los sonidos generados al azar de un conjunto completamente nuevo.
Te voy a enseñar lo que quiero decir:
Paso 1 - Encuentra un parche sintetizador partir
Im que va a comenzar con un simple bucle, un tambor hecho a sí mismo que he hecho en Ableton Live con un Drum Rack. Siéntase libre de utilizar mi ciclo como un archivo de audio, o tratar de volver a crearlo, si se quiere, con su batería propia.
[Audio id = "9459"]

No se siente como que necesita pasar mucho tiempo en las calles, porque se van a estar arrancando!
Paso 2 - Añadir un retardo de Granos
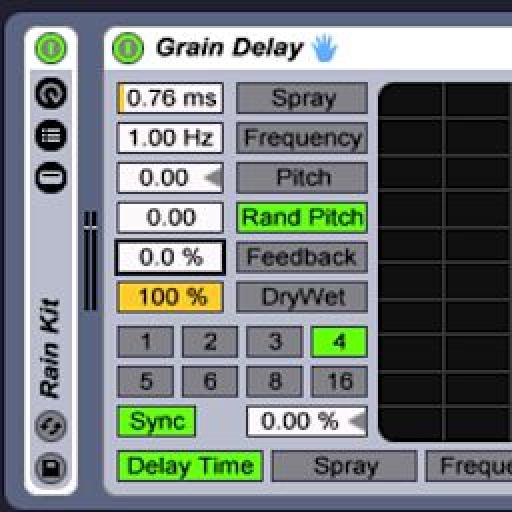
Bien, ahora bien soltar un retraso de granos en nuestra pista de loop de batería. Aquí es donde comienza la diversión. El retardo de granos es básicamente un conjunto de herramientas en tiempo real para su destrucción.

En este ejercicio, se va a tener el mando de Dry / Wet todo el camino hasta. Normalmente, usted no haría esto, porque cuando se ejecuta cualquier cosa a través de un retardo en el modo de húmeda completa, se obtiene una latencia graves. Sin embargo, sólo grabar lo que estaban haciendo, y la agricultura de la grabación de sonidos, que no necesita ser exacta!
Paso 3 - Creación de una pista Volver a muestrear
Prensa

Paso 4 - Graba tus Ajustes Grain Delay
Active para grabación la pista Volver a muestrear, y luego empezar a jugar su golpe de tambor. Cuando esté listo, empezar a grabar en la pista Volver a muestrear.
Nota: Personalmente, me gusta ir a un ritmo bajo de modo que tengo una posibilidad de conseguir los sonidos individuales procesadas con un poco de espacio en el medio. Esto hace que sea fácil para la edición de tarde!

[Audio id = "9461"]
Durante la grabación, aquí hay algunos controles de navegación en el Grain Delay que realmente hacen que esta sesión casi como conducir:
- Spray: Adds random delay changes and can be used for smearing and noise. Between this, Frequency and Random Pitch, I rely on this function for creating textures and distorted beats. At low levels with Frequency, this will slow down the speed of your signal to some degree...very cool.
- Random Pitch: At low levels, adds a slight pitch randomization. At higher levels it produces random destruction. I sprinkle this in here and there as I tweak.
- Frequency: The higher you increase this setting, the faster the spray and Random Pitch begin to modulate. Experiment with these three for textures, dirty beats and sounds.
- Pitch: Not to be confused with Random Pitch! This setting changes the complete pitch of your incoming signal. I usually oscillate around with this.
Tenga en cuenta, no hay configuración perfecta en este sentido. Sólo modificar y diviértete!
Paso 5 - Finalizar y Chop, Chop!
Una vez youre terminado con su sesión de grabación, detenga la grabación y copia de su trabajo en la vista Arrangement. A partir de aquí, es fácil de copiar una de las piezas de la grabación de sus propios clips, arrastre los segmentos en impulsos o simples

Aquí hay dos sonidos que tengo para mi equipo de nuevo!
[Audio id = "9458"]
[Audio id = "9460"]
Eche un vistazo a Ableton Live con nuestra gama completa de tutorial-videos .

Discussion
"Thanks for posting a link to this article. In the end I didn't hear that he got much that was useable - but I guess that depends on his application. It was interesting from a sound design perspective how he altered and cut the sounds up."
My response...
I have been enjoying grain delay on its own merits for a while now. It is just so (wonderfully) random in its effect at times. I think if you are looking for glitching up a beat or a sound this effect is one way to get there (rather than manipulating slices or using Izotope stutter edit, etc.). But you bring up a REALLY important point... all of these techniques are really cool but how to apply them musically is really the key point (at least for me).
In my audio project from last week sounds were sourced from a speaker plugged into a pre-amp and then into Live, harvested from classmates drum racks and a pass of the groove through stutter edit let me have some fairly interesting and original sounds in the project. Making them musical as opposed to noise was certainly part of the challenge. I just kept playing them (repetitive improvisation) until that part of the mind that seeks to impose order on chaos figured out what was supposed to happen and that was the take I went with.
In the article Mr. Childs didn't really slice up the resultant audio but that struck me as a logical next step so that the audio could be easily recomposed into a musically useful sequences.
I'm going to have one of the variations requested in this weeks project use the technique in this article just to see what happens.
It should be cool! :)
Very useful article.
Want to join the discussion?
Create an account or login to get started!