
私は変更することができた場合、 Abletonの彼らは純粋なゲームのチェンジャーであるため、さらにGUI少し、IDデザインAbletonのに付属するプラグインを別のいくつかの上に天からの光線のように下を照らすために光を!
これらの一つは、おそらく最も控えめの一つであるグレインディレイ、となります。その平野包装は、それはあなたがそれで投げることが何よりも驚くほどのテクスチャやサウンドを作成することができるという事実を隠します。実際には、IVEは、ランダムに私が実際にそれらを作成していないかの点で、後に頭を悩ま人が残っている音を生成するためにそれを使用。
私が愛することの一つの手法は、リアルタイムで様々なドラムヒットをランダム化し、リサンプリング機能を使用してAbletonの内からこのプロセスを記録するために穀物の遅延を使用される、そして全く新しいセットのためのランダムに生成された音を編集する。
私は私の言いたいことをお見せしましょう:
ステップ1 - 始動シンセのパッチを検索
イムは、私がドラムラックでのAbleton Liveで作られたシンプルで、自作のドラムループとオフを開始する予定。オーディオファイルとして私のループを使用すること自由に感じ、またはお好みなら、独自のドラムで、、それを再作成してみてください。
[オーディオのid ="9459"]

あなたがそれを引き裂くこととしていたので、ビートに合わせて多くの時間を費やす必要があるように感じてはいけない!
ステップ2 - 穀物の遅延を追加する
さてさて、今も私たちのドラムループのトラックに穀物の遅延をドロップします。これは楽しみが始まるところです。穀物の遅延は、基本的には破壊のためのリアルタイムツールキットです。

この演習では、ドライ/ウェットノブのすべての方法を持っているつもりでした。通常は、あなたがwouldntのこれを行うには、フルウェットモードで遅延を通して何かを実行すると、深刻な遅延を得るため。しかし、唯一やって、そして音の録音を耕作されたものを録音した、我々は正確である必要がいけない!
ステップ3 - リサンプルトラックを設定します
を押し

ステップ4 - あなたの穀物の遅延アレンジを記録
あなたのリサンプルトラックを使用可能に記録して、ドラムのビートの再生を開始します。準備ができたら、あなたの再サンプルのトラックに録音を開始します。
注:個人的に、私は私が間にあるスペースで処理された個々のサウンドを得る可能性を持つように低いテンポで行くのが好き。これは後で編集するための簡単に行うことができます!

[オーディオのid ="9461"]
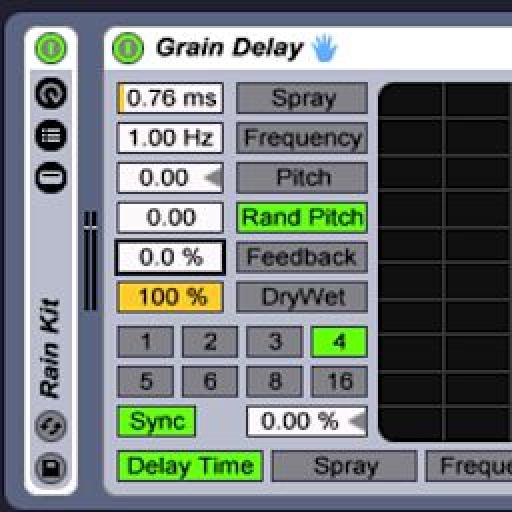
録音しながら、ここでは本当にほとんど運転するようなこのセッションを行うグレインディレイいくつかのナビゲーションコントロールは、次のとおりです。
- Spray: Adds random delay changes and can be used for smearing and noise. Between this, Frequency and Random Pitch, I rely on this function for creating textures and distorted beats. At low levels with Frequency, this will slow down the speed of your signal to some degree...very cool.
- Random Pitch: At low levels, adds a slight pitch randomization. At higher levels it produces random destruction. I sprinkle this in here and there as I tweak.
- Frequency: The higher you increase this setting, the faster the spray and Random Pitch begin to modulate. Experiment with these three for textures, dirty beats and sounds.
- Pitch: Not to be confused with Random Pitch! This setting changes the complete pitch of your incoming signal. I usually oscillate around with this.
覚えておいて、この上なく完璧な設定はありません。ちょうど微調整すると楽しい時を過す!
ステップ5 - アップ完了とチョップ、チョップ!
一度レコーディングセッションを終了youreの、録音を停止し、アレンジメントビューに作業をコピーしてください。ここから、それは自分用のクリップへの記録のコピーの部分のどちらかに簡単に、インパルスまたはよりシンプルにセグメントをドラッグ

ここに私の新しいキットの私が得たつの音です!
[オーディオのid ="9458"]
[オーディオのid ="9460"]
をよく見てくださいここでチュートリアル-ビデオの私達のフルレンジでAbleton Liveを 。

Discussion
"Thanks for posting a link to this article. In the end I didn't hear that he got much that was useable - but I guess that depends on his application. It was interesting from a sound design perspective how he altered and cut the sounds up."
My response...
I have been enjoying grain delay on its own merits for a while now. It is just so (wonderfully) random in its effect at times. I think if you are looking for glitching up a beat or a sound this effect is one way to get there (rather than manipulating slices or using Izotope stutter edit, etc.). But you bring up a REALLY important point... all of these techniques are really cool but how to apply them musically is really the key point (at least for me).
In my audio project from last week sounds were sourced from a speaker plugged into a pre-amp and then into Live, harvested from classmates drum racks and a pass of the groove through stutter edit let me have some fairly interesting and original sounds in the project. Making them musical as opposed to noise was certainly part of the challenge. I just kept playing them (repetitive improvisation) until that part of the mind that seeks to impose order on chaos figured out what was supposed to happen and that was the take I went with.
In the article Mr. Childs didn't really slice up the resultant audio but that struck me as a logical next step so that the audio could be easily recomposed into a musically useful sequences.
I'm going to have one of the variations requested in this weeks project use the technique in this article just to see what happens.
It should be cool! :)
Very useful article.
Want to join the discussion?
Create an account or login to get started!