
So you have produced this great track. You're happy with the verse and chorus sections but something seems to be lacking. Some dynamics? Some contrast? What I found is really helpful is to create buildups between your different sections in your songs. What works incredibly well for this is using a white noise sample in a sampler. Using Ableton's Simpler and some side-chain compression you can create interesting buildups transitions between sections and keep the interest of the listener active.
Step 1 '" Find a White Noise Sample
I have a verse and chorus section that I am happy with, but its feels like it needs something more in between the two sections.

Here is what my track sounds like before I add the build-up section:
I am going to use Simpler with a white noise sample to create a buildup section between the two sections. I have used a white noise sample from my sample library folder. I have attached the file if you wish to use it, or you can use any white noise sample. Drag this sample into the Simpler.

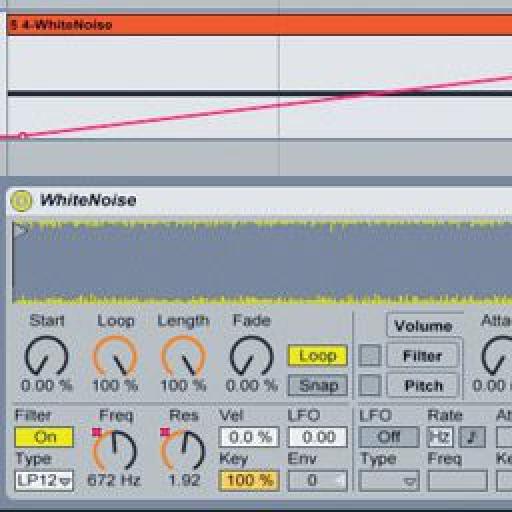
Using the Ableton Simpler Filter section you can fine tune the sample and filter out frequencies you do not wish to include in the sample. I have cut back the frequency to 2.67 kHz and the Res to 2.35. I am going to automate these features later anyway to bring the higher frequencies back.

For more information on working with Simpler check out Laura Escudé's in-depth tutorial.
Step 2 '" Side-Chain that Noise
I have programmed a simple drum pattern. What is key here is the kick: I will be using this kick as the monitoring source for the side-chain in the compressor.
Place a Compressor after the Simpler. Then expand the compressor so that you can see the side-chain source (click the arrowhead next to the bypass button on the compressor to show the Sidechain features). Activate the Sidechain button. From the Audio From choose the kick channel.
Start bringing down the threshold till you begin hearing the white noise creating a pumping effect. You can also tweak the attack and release times to create a suitable pumping effect for the track.

Between the verse and chorus I have added a 4-bar white noise sample. I have dropped the synths in the build-up section to create space for the white noise section.

Step 3 '" Filter the Noise
To create movement with the white noise I have inserted an EQ Eight after the Compressor. Select the Low Cut: I am going to cut the low frequencies and raise the Q at the same time. I will be automating this over the course of 2 bars. This will create the tension in the buildup section.

Step 4 '" Automate the Noise
To bring this sound to life we need to add some automation. Switch to the Arrangement view select the EQ Eight low-cut band. Draw in a curve over the 2 bars so that you introduce the high frequencies back into the mix.


Step 5 '" Automate the Effects
What you can also do is add a reverb and delay and also automate these during the buildup. Go crazy and be inventive. You may find a phaser also does the trick quite well.
I have automated the Filter and Resonance section on the Simpler.


I have also added a PingPong Delay after the EQ Eight, and have setup a Reverb on the Send channel. I have automated the Delay Wet setting.


Automating the Volume levels of the White noise between sections is also another great way for the listener to anticipate the section to come.

I have also automated the Reverb send level to increase as the volume increases until it reaches the pinnacle point at the end of the 4-bar buildup.


Here is how the track sounds with the buildup between the respective verse and chorus sections.
Conclusion
Buildups are important techniques that allow us as producers to hint to the listener that an important part of the song is coming up. By creating these tensions between the sections we can really keep the listener actively listening to the track and wanting more.
For further Ableton producing techniques check out Olav Basoski and Brian Cass's tutorials:
Discussion
Want to join the discussion?
Create an account or login to get started!