
Have you ever wished you could control multiple parameters in various plug-ins on the same channel strip simultaneously? The environment is the key and to do this we need to connect a fader to some transformers which are then connected to the channel strip.
Sound scary? Read on to find out how easy it can be.
In this tutorial we'll be creating a nice dubby effect on a drum loop by sweeping filters and increasing delay return using only one fader. The loop I'm using is called Downtempo Rider Beat 02.
Step 1 - To The Environment…
Using key command Command-8, open a new environment window.

Use the menu triangle at the top left to get to the Mixer window.
To stop things getting too cluttered, I always do things like this in a separate layer, so highlight the Downtempo Rider Beat 02 channel strip and cut it using Command-X. Go back up to the menu triangle in the top left and select Create Layer from the drop-down.

In that newly created layer, use the Command-V paste command and your channel strip will reappear. Once you have done this, it's worth renaming your layer something useful.

Renaming as you go helps you keep track of things in busy projects.
Step 2 - Identify Your Intended Parameters
So, I've loaded a Channel EQ and an Echo plug-in on the channel strip. What I'd like to do is control a Hi and Low Pass filter sweep and increase the Echo plug-in wet signal at the same time.
To make this happen, we need a monitor object to show us what signals these parameters will respond to. So from the local menu, choose New > Monitor and drag the newly created object to the right of the channel strip. Drag a cable from the channel strip to the monitor object.

Open up the EQ plug-in and turn on the Hi Pass filter, now sweep the frequency of the Hi Pass. Notice how the monitor starts to list data when we do this? That's the stuff we're interested in. Take a note of the letter and the first two numbers, mine is showing "F 2 1 x". Repeat with the Lo Pass, mine shows "F 2 29 x"
Now open the Echo plug-in, ensure the dry slider is set to 100% then slide the Wet slider all the way back and forth and take note of the info in the monitor. Mine shows "F 3 20 x"

Don't worry if your monitor is giving you slightly different info, as long as you are getting something along the lines of "F x x x" that's ok. We'll need all that info in the next couple of sections.
Step 3 - Creating a Fader and Transformers
From the local menu, select New > Fader > Vertical 1 and drag the newly created fader to the far left of the window and then set the fader parameters to be the same as the image below.

Set Fader parameters like this.
You can also rename the fader at this point.
Now we'll prepare the transformers. From the local menu, select New > Transformer and double-click the new object. In the window which opens up, use the drop-down menus to set up the mode and conditions the same way as in my picture.

Transformer Settings.
As the conditions remain the same for 3 of the transformers we require, we can simply Option-drag to make 2 duplicate transformers. Arrange them in a vertical line to the right of the fader and drag cables from the fader into each transformer. It's worth renaming the 3 transformers at this point.

Try to remember to rename as you go.
Step 4 - Setting Transformers
A transformer will take a set of input events and according to definable conditions, transform them into something else. We've already defined the conditions, so now we need to define the operation, in order for us to do that we'll need to refer to the notes from Step Two.
Starting with the Hi Pass I can see I have written "F 2 1 x" in my notes, double-click the Hi Pass transformer and set the operations row up like I have in the following image with whatever info you wrote down in Step Two.

Operation settings for Hi Pass Transformer.
Repeat this for the Lo Pass and Delay transformers.
One thing to keep in mind is that I want the Lo and Hi Pass to function the opposite way each other, as the Hi Pass sweeps up I want the Lo Pass to sweep down and vice versa. This is achieved by simply selecting Reverse for Operation Data Byte 2.

This setting will allow Hi and Lo Pass filters to sweep in opposite directions.
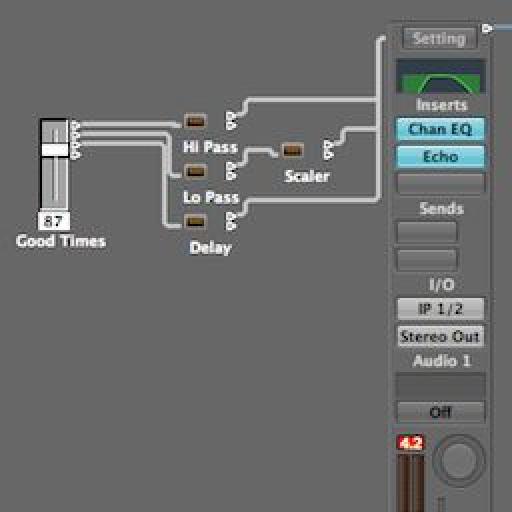
At this point we can connect the transformers up to the channel strip, play the loop and move the slider to hear the results of our work…

That sounds cool and everything is working as expected, but, I think it needs a bit of tweaking to give us finer control of the filter sweeps
Step 5 - Final Tweaks
I felt the filter sweeps were too severe and I would like a finer degree of control over the entire length of the fader travel, luckily for us that isn't too difficult to set up.
For the Hi Pass simply double-click the Hi Pass transformer and in Operation Data Byte 2 select Scale from the drop down then change the next row down to 0.5

Scaled Hi Pass settings.
Unfortunately we've used up all our options for the Lo Pass transformer - however, there's nothing to stop us adding another transformer into the chain between the Lo Pass and the channel strip.

From the local menu, select New > Transformer rename the new object something like Scaler and drag it between the Lo Pass and the channel strip, select and delete the cable running from the Lo Pass transformer then drag a new cable from it into the new Scaler. Complete the chain by dragging a cable from the Scaler into the channel strip.

Set this new transformer to allow all events through but set Operations Data Byte 2 to scale with the next row set to 0.5 and I've set it with an offset off 63.
It's time to check how that sounds,
I think that's much better. Now if only there was a way to automate that fader…
(Optional) Step 6 - Automating The Fader
You might enjoy just manually adjusting the fader to your hearts content, but there might be a time when you would prefer to automate it. Read on to find out how.
Simply drag the fader from the environment window, drop it in a blank space in the Arrange Windows tracklist and select Create from the pop up window. Enlarge the newly created track by selecting it and using key command Control-Z then press A to open the automation lane. Control-click in the automation lane and from the menu select Automation Parameter > MIDI Control 0 - 63 > 9 - Ctrl 9 (Remember setting that when we first created the fader?)

Now just draw in your automation and as long as your automation mode is set to Read, you will hear your automation take effect as fader movements when you play your project.

Fader track with automation.
Although the above walkthrough deals with EQ and Delay plug-ins, the technique is not exclusive to just those plug-ins. The best thing about the Logic Environment is its flexibility; try experimenting using different plug-ins and FX chains to see what you can come up with.
Have fun!!
Discussion
What did I miss?
T.
this doesn't work out very well for me.
the monitor doesn't show any information i.e. step number 3 doesn't work.
could you please re-evaluate this article and see if there is something missing.
thx & cheers
Hjalmar; Stockholm,Sweden
The only step I think Ruari missed explaining was how to setup the transofrmer for the Echo plugin. The parameters (if you wish to control the wet value of the Echo) should be:
F 3 20 X
Make sure all the transformers are cabled to the channel strip.
Also make sure the mode of each transformer is set to:
"Apply Operation and filter non-matching events" as shown in the screenshots.
I completely understand how this is easier to see being done in a video... which is why Steve H's Logic TNT 1, 2 and 3 series of video courses are soooo popular ;-)
Hope this helps thought,
R
Want to join the discussion?
Create an account or login to get started!