
Plucked synth sounds are commonly used in several genres of music today like progressive house, trance, big room and more. In this article I'll show you how to easily create them. We'll use both ESP and ES2 to build the sound itself, then we'll process the sounds with reverb and a limiter to get that perfect upfront sound.
Open ESP and Adjust its Envelope
So what does “plucked” actually mean from a sound design perspective? Basically the initial sound plays a short spike at the start and either fades away immediately, or sustains to a much lower level volume. Let's start by opening an ESP. Without even changing the default preset, head straight for the envelope. Set the decay slider about a 1/4 to 1/3 of the way up from the bottom. Play on your keyboard in the 3 and 4 octave range… you should already have a quick blip of a sound. In the oscillator area slide the sawtooth wave all the way up.

Adding Reverb
Add a Space Designer as an audio FX below ESP. Some of my favorite Space Designer settings for plucks are “Clear Space, Long Passage, and Concrete Basement” under the Large Indoor Spaces. Another more experimental one I like is “On the Open Field” under the Large Outdoor Spaces. You'll want to adjust the reverb level slider right away depending on how big of a sound you intend to create. At times you want to strip away the weight of the Reverb itself (and not the sound). Turn on the Filter with its power button at the bottom left corner. Try switching the filter selector to either HP or BP types. Now adjust the reverb decay to the pace/tempo of your track. Do this by clicking and pulling the bottom right corner of the volume envelope in, and to the left while the song is playing. If you don't hear an immediate change, release the mouse for 2 seconds. Space Designer needs a moment to generate the new envelope shape.

Adding a Limiter
Let's add a limiter at this stage. Depending on the velocity level you play, this sound we just made will clip the master Output channel. Below Space Designer, add Logic's Limiter plug-in. Pull the level back to around -3 to -4 decibels, then raise the gain parameter to taste. Depending on how “plucky” you want your sound, try turning off the Softknee and adjusting the Lookahead. The lower the Lookahead is, the more plucky it will sound. Higher values anticipate the spike to contain it more smoothly. Logic's Limiter plug-in is pretty good… but there are other better limiters out there that have very little impact on a sounds transients. Waves L1 and FabFilter's Pro-L are great limiter replacements for Logic's built-in one.

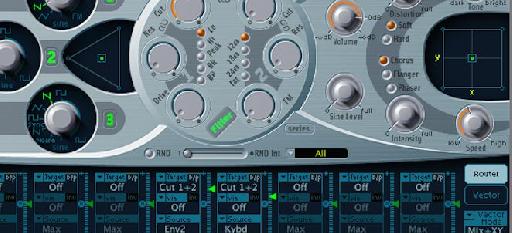
Open ES2 and Adjust its Envelope
Now let's jump to ES2. Duplicate the track you're currently on and swap out the ES1 for the ES2. This way we can use the same Reverb and Limiter from the ESP sound we made above. Again, we'll just use the default sound from ES2, and go straight for the Decay to pull it way back. The volume in ES2 is handled by Envelope 3. Lower the Sustain all the way down, then lower the Decay to taste (try around 1/4 of the way up).

Use Envelope 2 to Shape the Filter
Unlike the ESP, ES2 has more than one ADSR Envelope. This default setting we've started in is set to alter the Filter via Envelope 2. Pull Filter 1 (the left filter) all the way down, and in the Router, slide the green triangle all the way up (the 6th Router slot over). Now go to Envelope 2, pull the Sustain all the way down, and adjust the Decay to taste.

Try out different Oscillator Waveforms
Now let's head straight for ES2's Oscillator area. Start trying out different waveform shapes like triangle, saw and square. Remember too that you can choose from 100 digital wave forms by turning the oscillator selection knob all the way down and to the left. Right-click the waveform name (it currently reads “sine” in the default setting). A very nice list of digital waves will you appear that you can choose from.

Wouldn't it be cool if you could just press a button to randomly swap the waveforms? Directly below the large circular filter area are some randomization parameters. Click the menu that currently reads “All” and a menu will appear. Select “Waves” then slide the percentage slider (directly to the left of the menu) all the way to 100%. You can now simply press the “RND” button for a random selection of waveforms!

Adjust the Volume Level of Oscillators
Adjust the oscillator level triangle. Each point of the triangle represents the volume level for each of three oscillators. Simply drag the small square toward each side to raise or lower the levels of the corresponding points. For example if the square is centered, all three oscillators have equal volume.

Finishing Touches
In ES2, try adjusting each oscillator's fine tuning for a detuned type of feel, or try out different intervals/transposition on each oscillator's tuning knobs. Try setting ES2's “Osc Start” menu at the top right corner to hard or soft for a tighter more predictable sound. In Space Designer, click onto the Filter Envelope button and create interesting envelope shapes.
Thanks for reading! Here's a sample of a few I made from this article:

Discussion
Want to join the discussion?
Create an account or login to get started!