
In the last article, we focused on the basics of what Ableton has to offer Hip-Hop artists in terms of the overall features, as well as importing audio, and turning the audio in to loops. In this article, I'd like to continue our foray in to Ableton loops, while also having a good look at Ableton's interface.
Recording Loops
Remember how easy it was to bring in that audio, in the last tutorial, and turn it in to a loop? Without a doubt, that's one of the many functions that makes Ableton a lot of fun to work with. But, what we haven't talked about at all is what it's like to actually record your own loops in Ableton.
This is actually one of the best parts of Ableton, because loop recording, arranging, and creation are, from the beginning, the biggest features of all for Ableton. In fact, you can actually start your song by simply recording loops, edit those loops, arrange those loops and produce those loops without ever having to work with a linear arrangement window if you don't want to.
The ability to work this way is made possible by the first way of looking at Ableton, in terms of program views: the Session View.

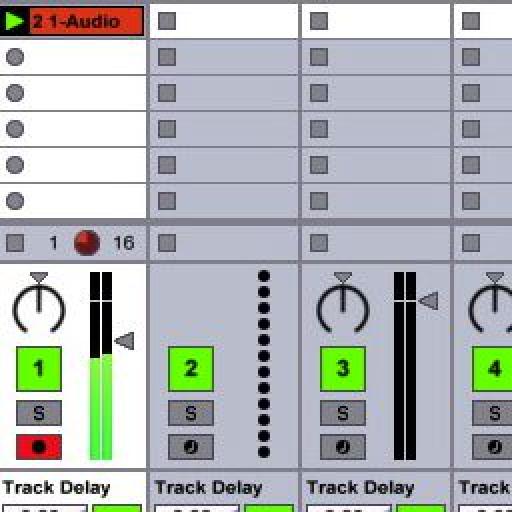
You'll notice that this view is predominantly made up of a grid, with regular mixer pots, and faders below. Granted, there's more in this picture, but lets keep it simple for the moment. Inside each grid box, you'll notice that there are small squares. And, in one of the grid rows, or tracks, you'll notice that I still have that loop, or clip from the last tutorial. It's the small, yellow box with the green arrow. This is how all loops appear within the Session View.
You'll also notice on track three, labeled Rain Bass, there is a record arm button, in red, enabled. Because of this, in the grid column descending from the Rain Bass title, instead of squares, there are circles.
So, squares, circles, and green arrows, what does it all mean? Glad you asked!
- Squares (Clip Stop Button) = Stop buttons, which appear at the base of each column, and in empty squares.
- Green Arrows (Clip Launch Button) = Play buttons, that appear only on clips, and in what are known as Scene launch buttons on the far right of the session view, labeled as 'Master', for Master Channel.
- Circles (Clip Record Button) = Record Buttons only appear in columns where the audio track that corresponds with the column is 'Armed'. You'll notice that in the Rain Bass track, again, the track is armed with the small, red button. So, all the clips 'slots' in that column can be queued to record by simply clicking the record button for that particular clip slot.
Now that we have a better understanding of the Session View anatomy, in terms of what the grid slots do, why don't we try recording something?
Step 1 - Setup to Record (Clip)
Because I still have a loop that I brought over from the previous article, I already have some rhythm. In fact, the loop sounds like this...
A little bit of synth, and a little bit of drums. A great starting point for any song. I'll go ahead and press the space bar to start playback of the song I'm working on. The loop will automatically start playing because the Green Arrow also means that it's cued to play.
Now is a good time to set my audio track up to record some vocals.
I'll use track 1 as the track for my vocals as it's already an audio track, and there's nothing on it. If I wanted to make another audio track, I'd use the Command-T shortcut and an audio track would appear. As I don't need to do this, I'll simply record enable track 1.

Because I'm only using a laptop with no audio interface, I immediately get a signal, as you can see. If I needed to choose a different audio source, I'd select a different input from the 'Audio From' section.
Also, it's important to note that I have headphones on at this point. When I record enable a track on a laptop, because the speakers and mic are all built-in, I need to make sure that the speakers don't feedback in to the mic. Try doing this without your headphones plugged in, and you'll see what I mean.
Step 2 - Record a Loop
Now that I'm set up, I'll press the Record Clip button on the first Clip Slot of track 1. I could actually choose any clip slot, and the recording would still take place with the loop that I originally started with. However, I'd like to keep the two loops in the same 'scene' or row, for the time being.
I press the Record Clip button for slot 1, and because I already started the song in the last step, by pressing the space bar, recording begins immediately, with the exception of a few tiny white flashes to let me know where pre-roll and actual recording begins. The clip that appears has a red arrow on it now. This means that when I'm ready to stop recording, I can press this red arrow, and Ableton will play back my recording while the beat continues. And, make sure you do press the red arrow! If you simply stop the session, the loop points will be off in timing. If you press the red arrow while the song is playing, Ableton stops recording at the nearest loop point.

So, I do just that. When I finish with my vocals, I press the red arrow, and it turns green. This lets me know that recording has ended and it's just playing along with the beat that I began with.

If I don't like the loop I just created, I can delete it. Even while the song is playing, then press the record clip button again to start recording my vocals again. If I like the work I did, and want to add more, I can press the record clip button in the slot below...

In fact, I can continue to add more and more clip slots until I have a full song worth of lyrics... And, I haven't even arranged anything yet.
Conclusion
So, I never pressed the stop button the entire time I was recording my vocals, along with that one simple loop. What a great way of working!
In the next article, we're going to get in to adding in effects and take a look at how to mend loops that may have been recorded a little... off.
Quick links to the jump to each article in the series:
Hip Hop in Ableton, Part 2 (you're here!)

Discussion
Want to join the discussion?
Create an account or login to get started!