
Oscillator Tuning
We have most of the working components of an oscillator section but it would be nice to have some kind of pitch control. Later on in this article we will be duplicating the oscillator section, so it would be nice to have the ability to tune them differently.
Currently the pitch is controlled by the NotePitch object, but we can add or subtract the data coming from that object with a constant value to offset the pitch. Let’s say we want to change the pitch to an octave above the played note. All we need to do is add 12 to the NotePitch data and the resulting pitch will be transposed an octave above.
Right-click in the background of the structure view and select Built-In Module > Math > Add. Right-click one of the inputs of the Add module and select Create Control. As we now know, Reaktor will create a dial. In this case it named it Add. Double-click the name of the dial and rename it to Coarse. This will be our coarse tuning control. Connect the NotePitch output to the other input of the Add module and connect the output of the Add module to the P input of all the three oscillators (Image 19).
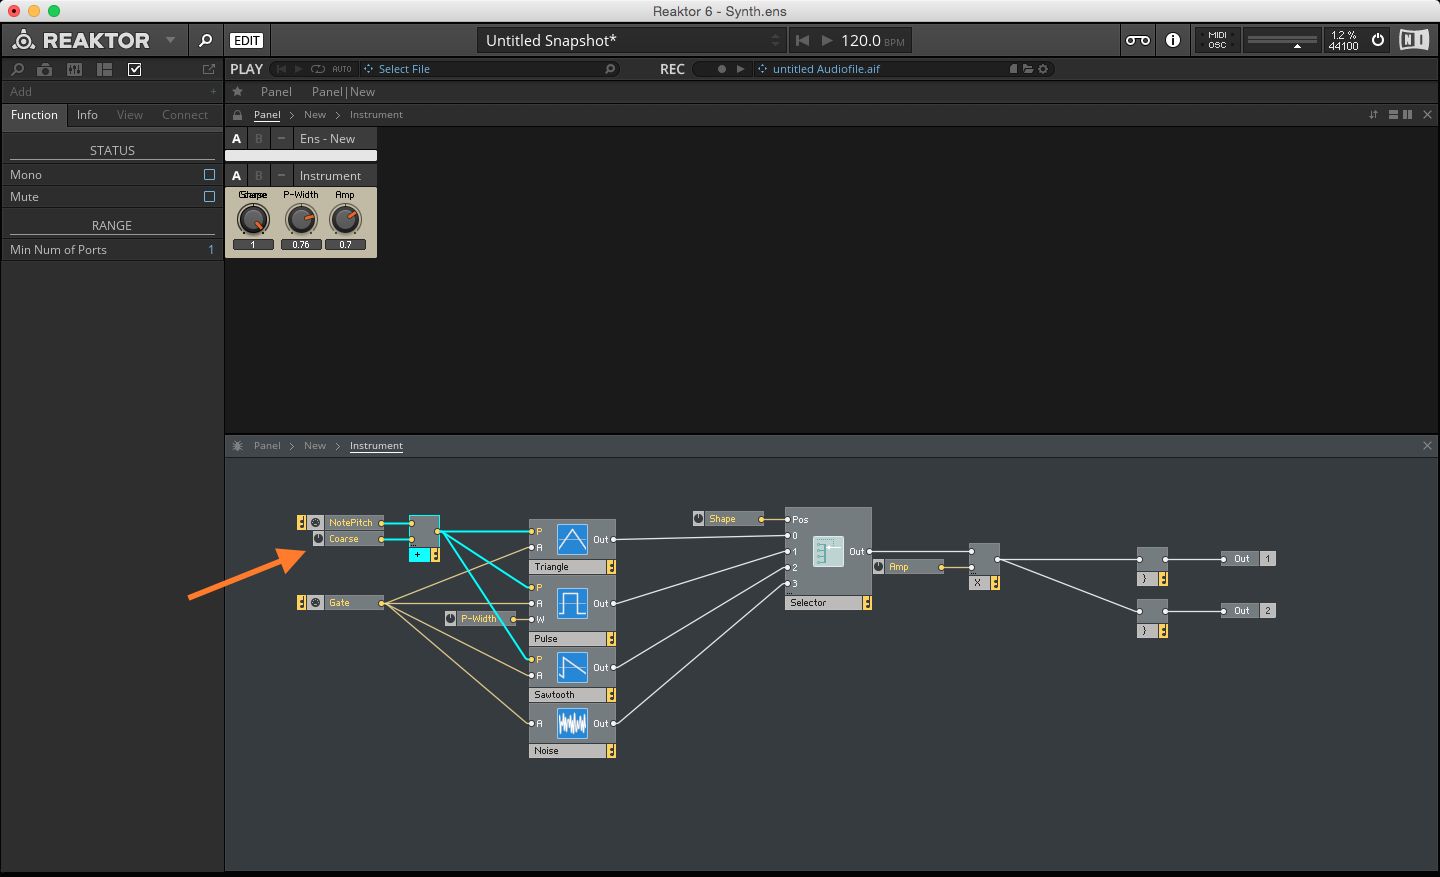
Image 19
You will notice that all the direct connections from the NotePitch module to the P input will automatically be removed. This is because there can’t be more that one signal on any one input. Adding a new signal will replace the previous.
We need to now adjust the range of the Coarse dial so it is more useful. Select the Coarse dial and in the Properties tab under Function, set the Max & Min to 24 & -24 respectively (Two octaves above and below). Also set the Step Size to 1. In the panel view this Coarse dial is overlapped with the Shape dial, so unlock the panel by hitting Command-E and move the Coarse dial to the bottom (Image 20). Hit Command-E again to lock the panel and now you can test the coarse tuning control.
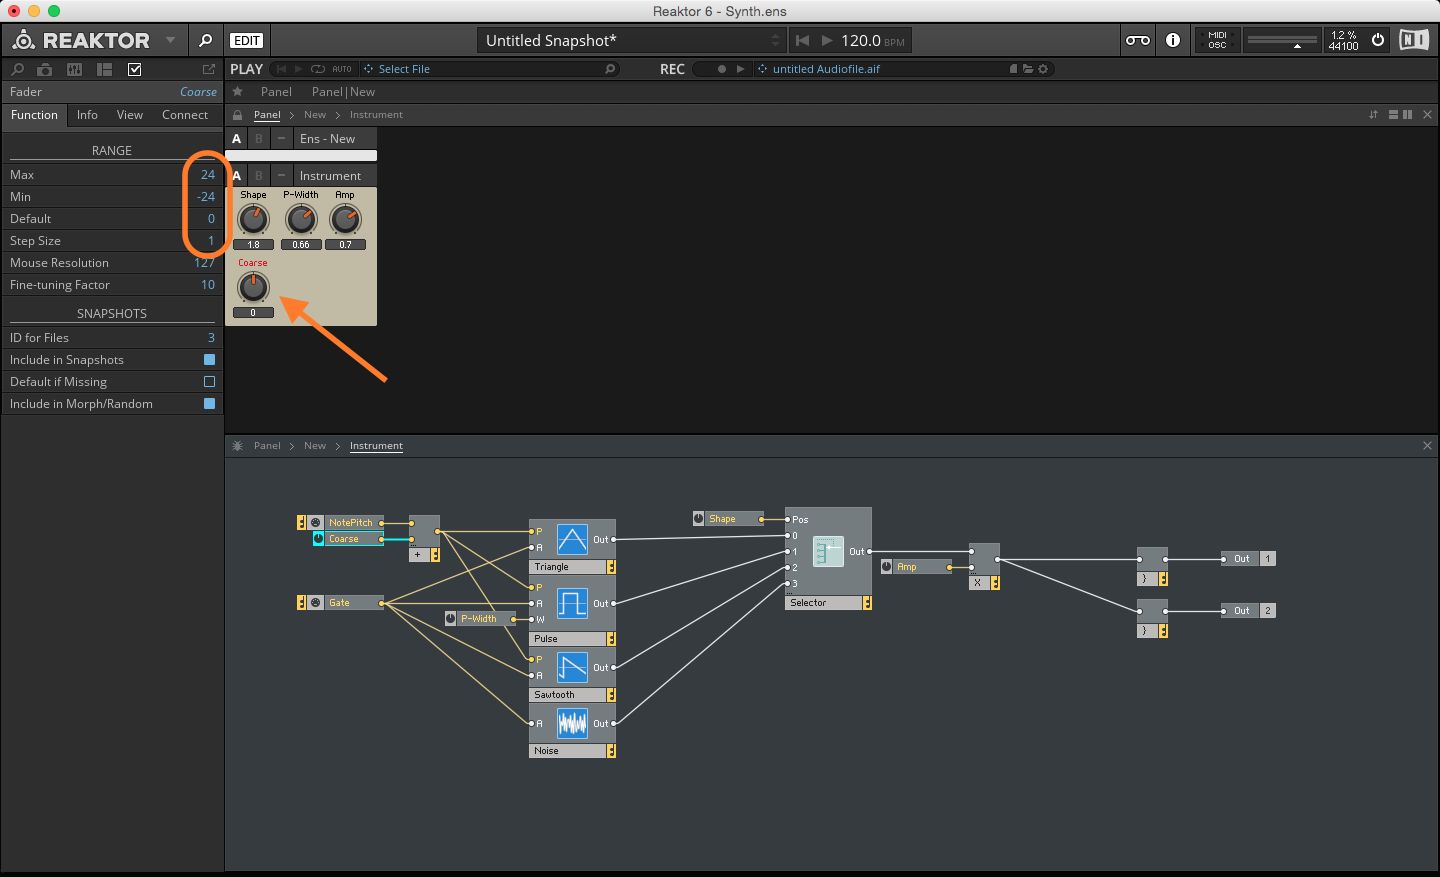
Image 20
Now that we have a coarse tune control, it would only make sense to add a fine tune control. Right-Click in the background of the structure view and select Built-In Module > Panel > Knob.
We need to connect the output of this knob to the Add module but the Add module only has two inputs and they both are already connected. We know that multiple signals can’t be connected to the same input so that wouldn’t work. Fortunately, the Add module can have more than two inputs. Select the Add module and in the Properties tab, under Function, you will find the Min Num of Ports option. Set that to 3. Now we can connect the knob to the Add module (Image 21).

Image 21
Rename this knob to Fine. We don’t have to adjust its range as the default range of 1 to -1 works perfect as a fine tune control. Unlock the panel view as shown earlier and move the Fine dial to the right of the Coarse dial (Image 22). Lock the panel and try out the controls.

Image 22
Oscillator Macro
Now comes the fun part. We will consolidate this oscillator section into a macro and duplicate it three times to create a three oscillator synth.
Select all the modules in the structure view except the NotePitch, Gate, the two Audio Voice Combiners & the two Out modules. An easy way to do this is to select all modules by hitting Command-A and then Command-click on the modules you want to unselect. Now hit Command-X to cut the selected modules. Now Right-click in the background of the structure view and select New Macro (Image 23).

Image 23
Double-click on this macro to enter its structure view. Now hit Command-V to paste the modules in here. If you play your MIDI controller you will notice that the synth does not work anymore. This is because we have broken the input and output connections. If you double-click in the background of the structure view to go back one step, you will notice that the macro has no inputs or outputs. We can remedy this by adding Ins and Outs in the macro.
We need an input each for the NotePitch & Gate modules and one output. Back inside the macro, we can add the two In and one Out module. A quick way to do this is to hit the Enter key and type in the name of the module you are looking for. Type ‘In Port’. Even before you finish typing, the module should be visible in the list (Image 24).

Image 24
Click on In Port to load it. Select the In Port module and hit Command-D to duplicate it. Hit the Enter key and search for ‘Out Port’ and load it in. Rename one of the In modules to ‘P’ and the other In module to ‘G’. Connect the modules back to the various inputs and outputs as shown in the image (Image 25).
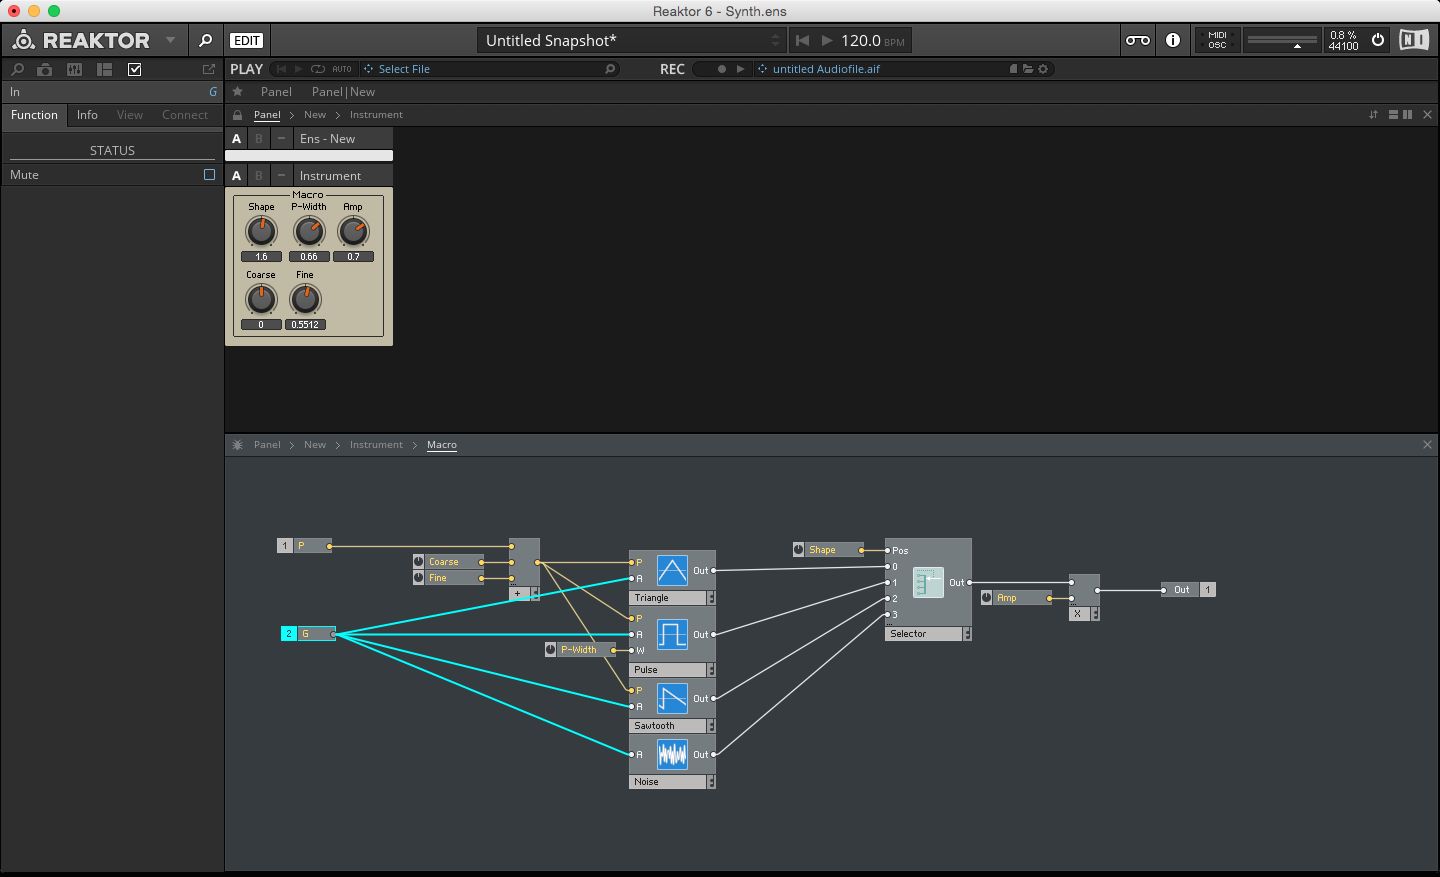
Image 25
Going back out of the macro you will now see the inputs and outputs. Connect the NotePitch to the P input and the Gate to the G input and the Out of the macro to the two inputs on the Audio Voice Combiners (Image 26). Double-click on the name of the macro and rename it to OSC A.
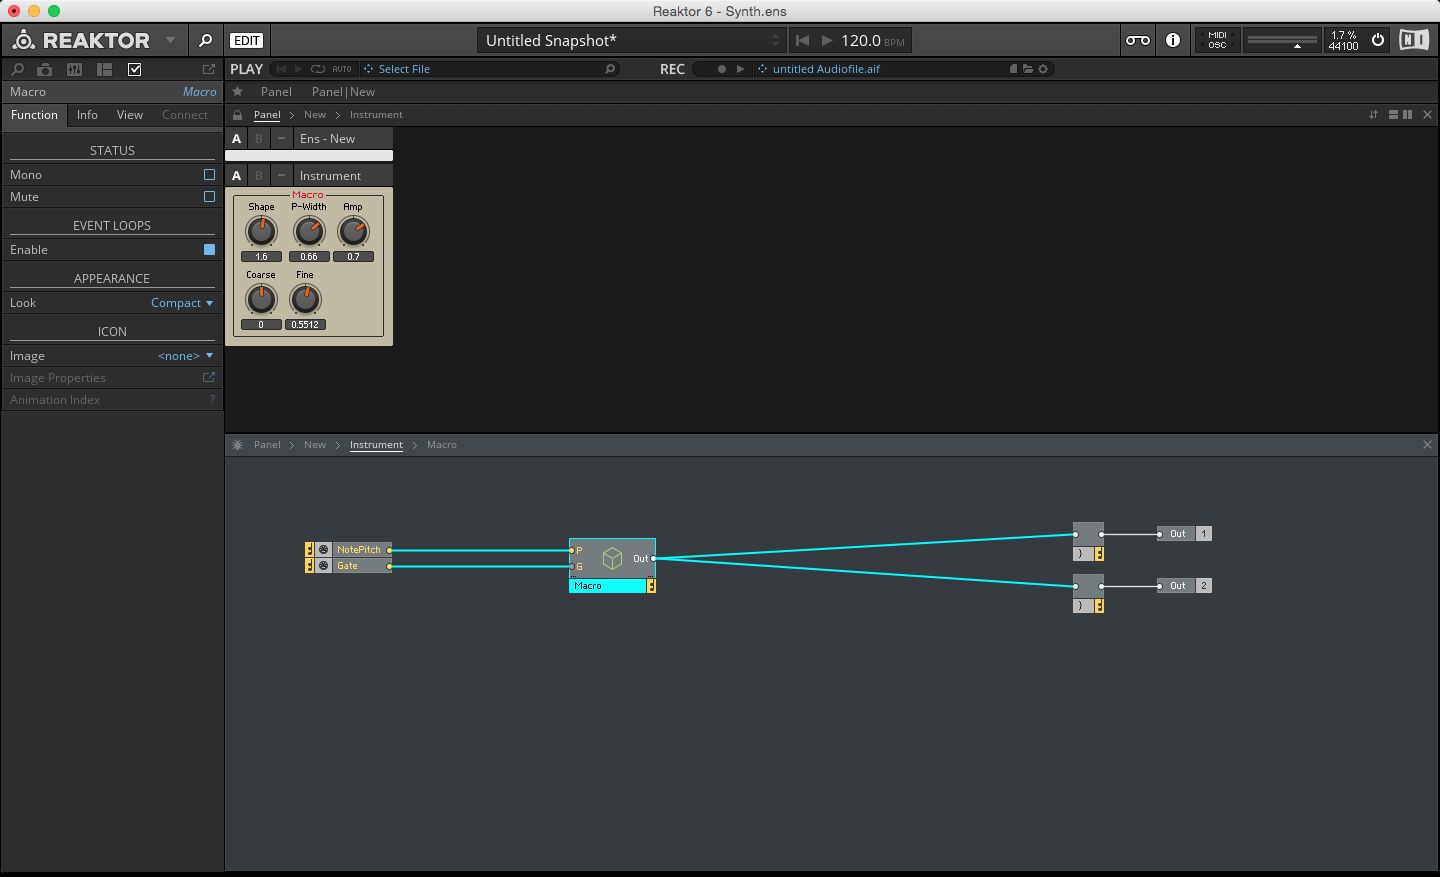
Image 26
Select macro ‘OSC A’ and duplicate it twice using the key command Command-D. Rename the other two macros to OSC B & OSC C respectively. You will notice that the input connections remain on the duplicated macros but the outputs are not connected (Image 27).
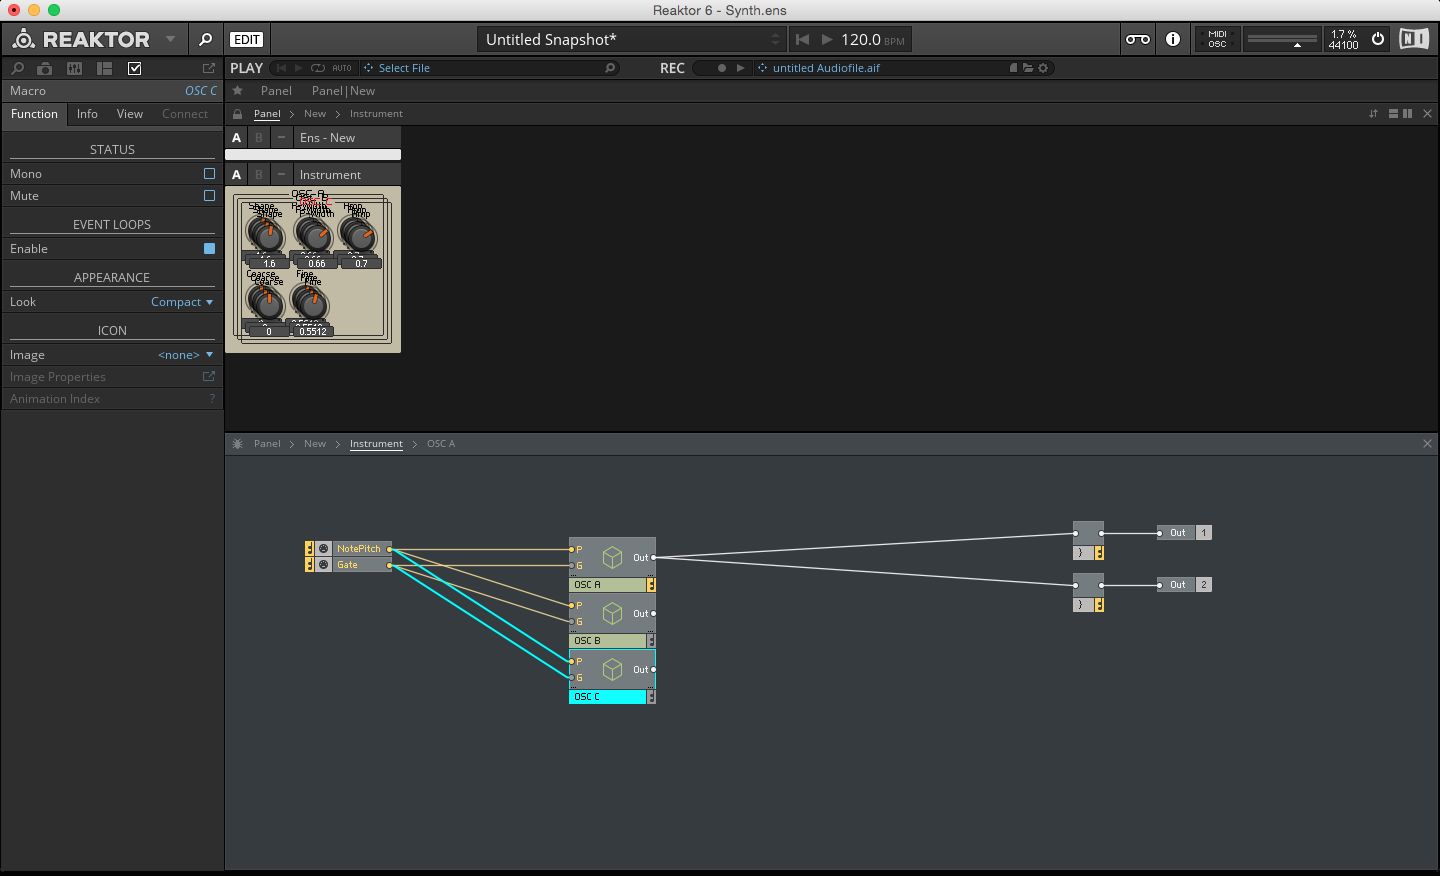
Image 27
The panel is also a mess as all the macros are placed on top of each other. Unlock the panel with the key command, command-E and rearrange the macros so they are better laid out (Image 28).
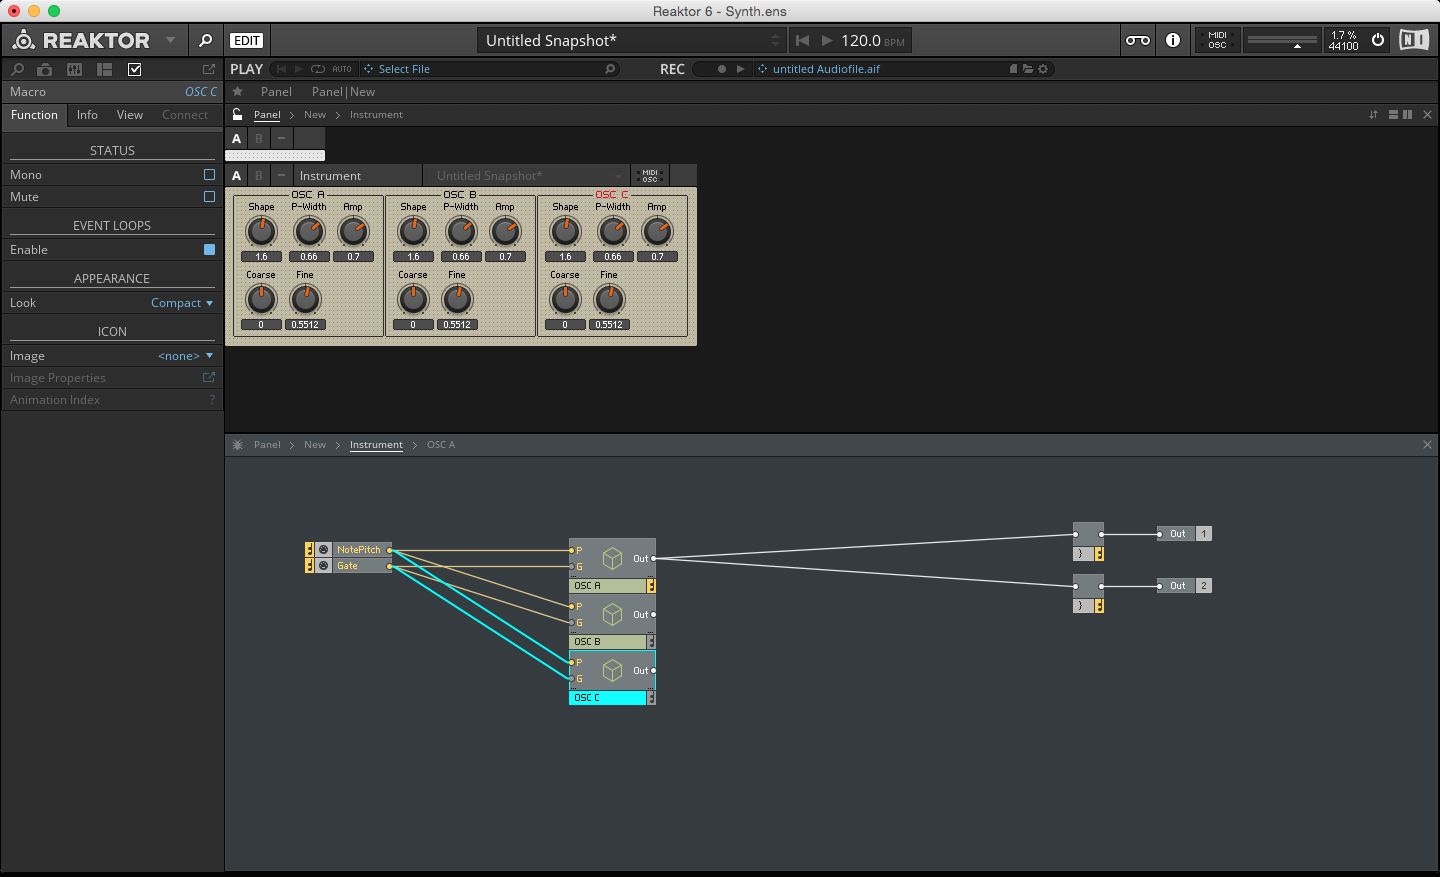
Image 28
Now we already know that we can’t have more than one signal going into an input, so the output from the macros will have to be combined before it is sent to the Audio Voice Combiners. We can use the Add module with 3 inputs to combine the macro signals before sending it to the Audio Voice Combiners. Right-click in the background of the structure view and select Built-In Module > Math > Add. Select the Add module and in the Properties tab under Function set the Min Number of Ports to 3. Now connect the 3 macros to the 3 inputs of the Add module and connect the output of the Add module to the Audio Voice Combiner inputs. (Image 29)
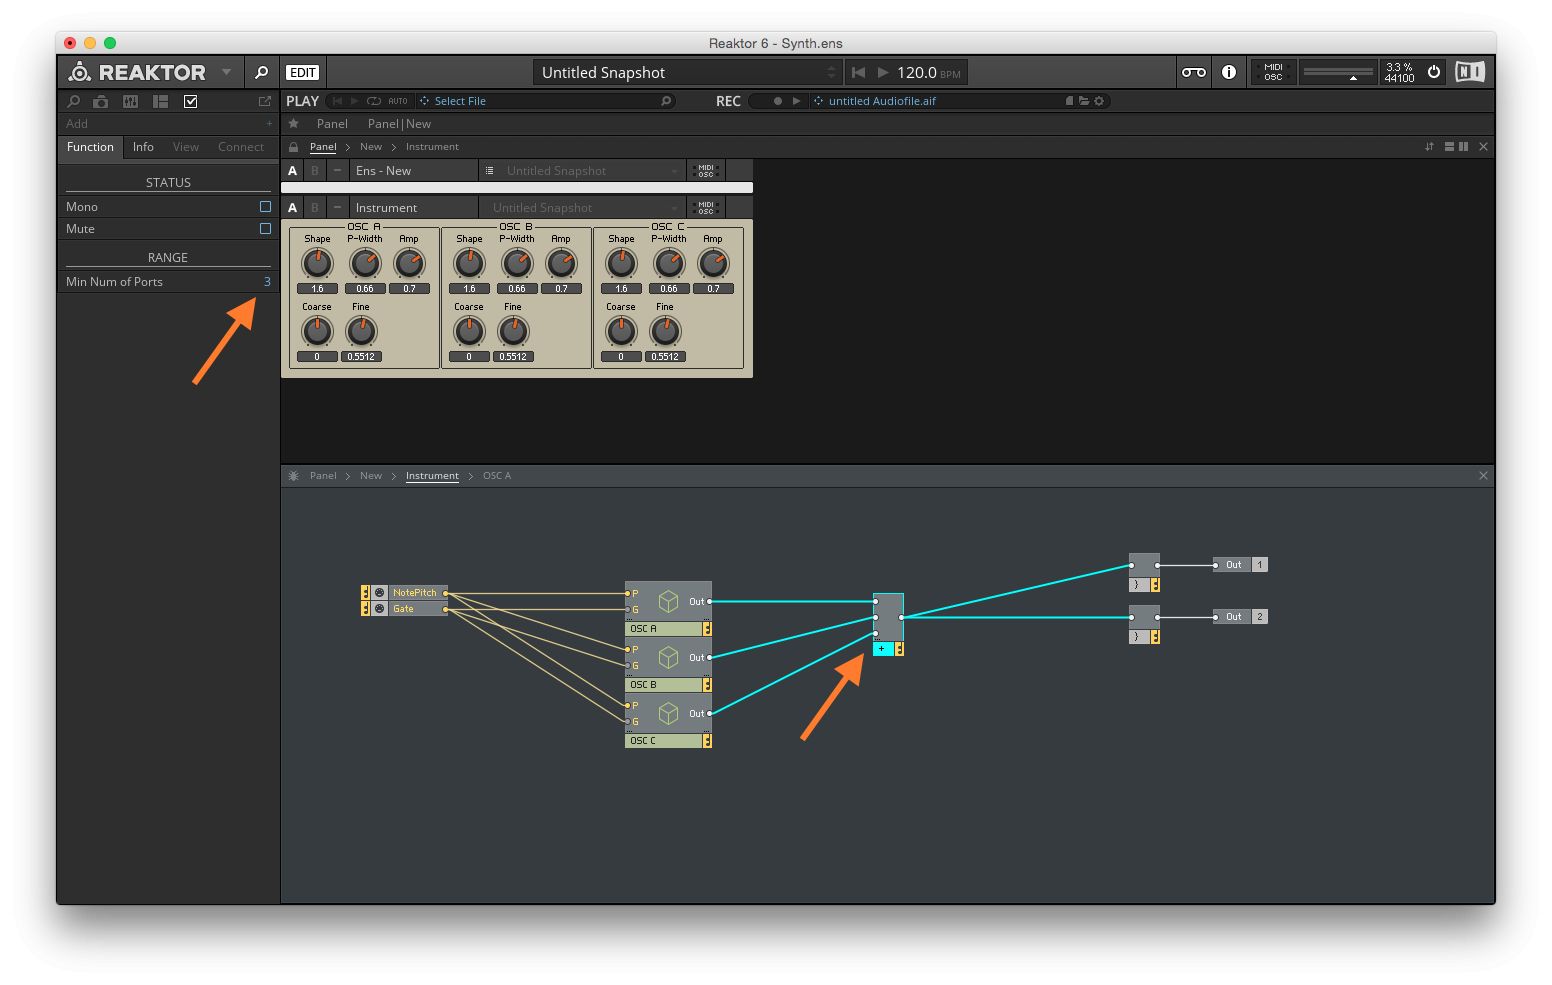
Image 29
Bring down the master level and play the synth. You should be able to tweak all the 3 oscillators and hear them.
Amplitude Envelope
Believe it or not, we are still working on the oscillator section. Unlike an analog synth or a Eurorack system where you have a dedicated VCA, in Reaktor the amplitude can be controlled directly on the oscillator module itself, like we have already seen. Now when the amplitude is triggered by the Gate object, when you play a note the amplitude of the oscillator jumps to the maximum. You may not always want this. An envelope will give you more options to shape the amplitude in different ways. The most common envelope being the ADSR envelope.
Make sure you’re on the Instrument page, then right-click in the background of the structure view and select Built-In Module > LFO, Envelope > ADSR. Connect the Gate output to the G input on the ADSR Env, then right-click on each of the 4 inputs (A,D,S & R) and select Create Control. (Image 30) So now the gate triggers the envelope and we have 4 UI controls for the envelope.

Image 30
The panel view has a bunch of new dials and they are messing up the layout. We will address that later. For now, let’s setup the connection between this newly create ADSR Env and the 3 oscillator macros we have created.
Connect the output of the ADSR Env to the G input of the 3 oscillator macros. Now it doesn’t make sense to still call this G, so double-click on the letter ‘G’ in each of the 3 oscillator macros and rename it to A. (Image 31)
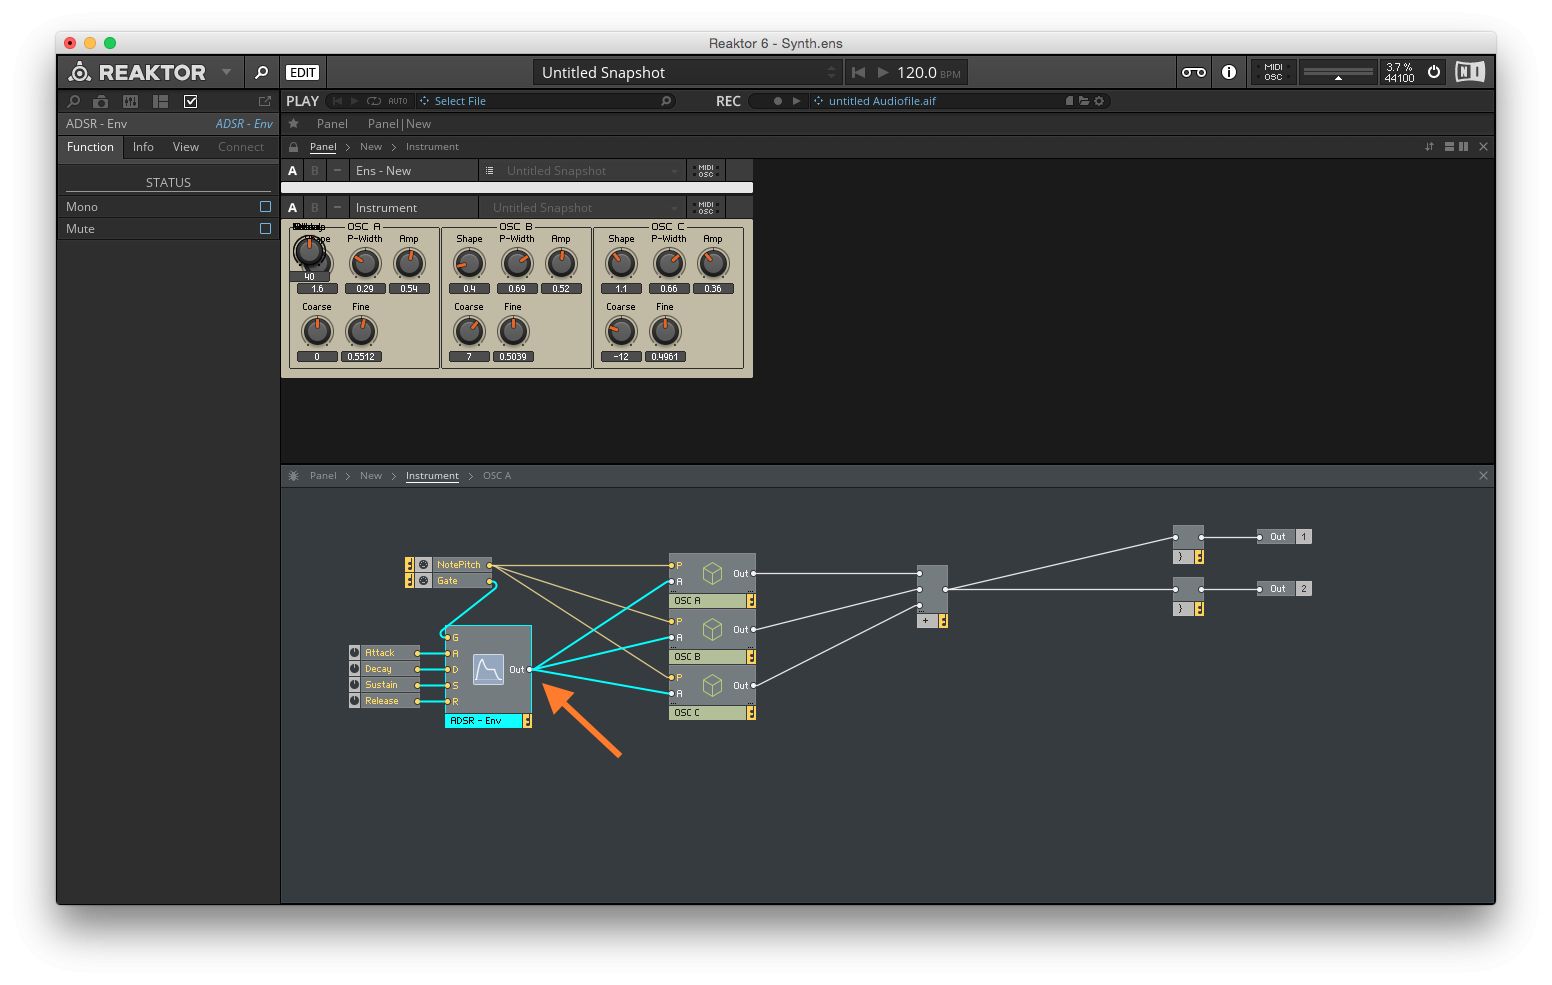
Image 31
Now let's address the panel view issues. Unlock the panel by hitting Command-E or clicking on the lock icon. Now select the 4 new dials and move them to the bottom so they are out of the way of the oscillator controls. To make this look a bit more fancy we can enable the graph view of the envelope. Select the ADSR Env in the Structure view and in the Properties tab under View, select ON in the VISIBLE category. Now you see the ADSR graph. You can turn off Show Label to remove the text above the graph. In the SIZE category, you can make adjustments to the height and width of the graph. I’ve set it so that the graph matches the width of the 4 ADSR dials. (Image 32)

Image 32
Lock the panel and try out the controls of the ADSR envelope. The dials should respond and affect the amplitude shape of all the 3 oscillators as one whole. While you tweak the controls of the ADSR envelope you should also see the graph update in real time.
We are finally done with the oscillator section. It has taken quite some time and effort but the result is worth it because we now have a very powerful and practical oscillator section.

Discussion
Want to join the discussion?
Create an account or login to get started!