
A NonLinear Educating Company
谈及老式玩具钢琴变成一个MIDI控制器使用的Arduino
Liam Lacey on Jul 31, 2015 in DIY & Hacking | 25 comments
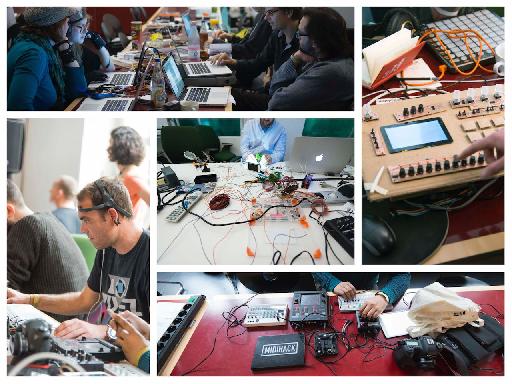
2015年5月,我参加MIDI哈克
如果你读了我的前一篇文章 ,你会知道,我强烈推荐的Arduino平台的DIY制作MIDI控制器。我选择了Arduino的这个项目在为它提供了大量的控制权来处理输入/输出数据什么其他建议的平台,但它仍然是非常友好的初学者与很多官方的支持和指导。本指南是针对个人谁是完全初学者在电子,软件开发和Arduino的。
这里是东西,你需要为这个项目的清单。这里提到的所有电子元件可以从任何良好的DIY /电子爱好者商店购买,如SparkFun。
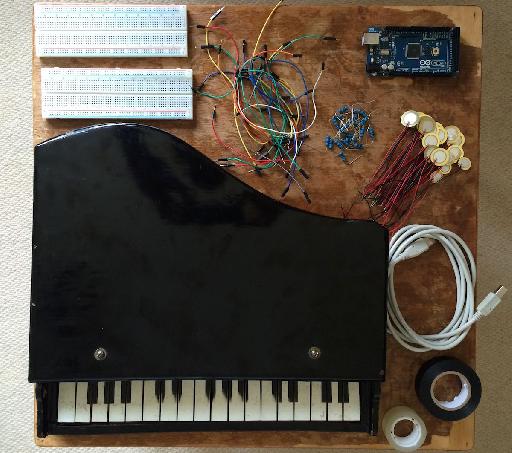
What You Will Need for this Project
- 声学木制玩具钢琴 。我购买了我的玩具钢琴关闭易趣为15美元左右,在那里通常有几个可用的,但是你也可以偶尔会发现他们在慈善商店和跳蚤市场。该项目是根据各地的钢琴与机制,使按键导致锤子罢工某种共鸣的对象;利用电子玩具键盘不会在这里工作。
- Arduino板 。这是微控制器,就可以
- 压电元件 。压电元件传感器用于检测振动和敲击,并且是受欢迎的组件尤其使用在DIY及商业鼓触发产品。我们将利用这些从键检测机,您将需要其中之一为每个键。你需要考虑你所需要的压电体的基础上的槌头琴内的大小尺寸
- 1M欧姆的电阻 。电阻在电路的最基本和公用元件,并且用于抵抗电力的流动。您将需要其中之一为每个键/压电式。
- 电线 。 Arduino的线路板和友好的电线,也被称为男性对男性的跳线,将是最容易使用,我们将利用这些来连接所有部件到Arduino。您将需要2额外的每个键/压电,以及少数。
- 焊接少面包板 。焊接少面包板允许你创建电子电路,而无需焊接得不得了。您可能需要几个这些取决于有多少键你的玩具钢琴有。
- USB电缆
- 双面胶带
- Arduino的软件 。 Arduino的软件用于编程Arduino板做我们想做的事情。这是免费提供的软件Arduino的网页 ,并可以在OS X,Windows和Linux上运行。您还需要下载Arduino的MIDI库。
- 串口至MIDI和虚拟MIDI端口的软件 。您将需要一些串行到MIDI软件转换出来Arduino的进入MIDI信息的消息。我推荐的免费无毛MIDI到串口网桥的应用,但是也有一些人可用。您还需要使用虚拟MIDI端口,无毛的输出连接到你的DAW或MIDI乐器的输入。为此,我建议在Windows loopMIDI,或在OS X上,你可以使用其内置的驱动程序IAC。可替代地,也可以
- MIDI软件 。你
Step 1—Prepare your Piano
在你开始插入电子到您的钢琴,你将需要删除的声音棒,或者修改它们,以便您可以安装压电体给他们。该组在我的钢琴棒被拧到顶部的下面,所以我只需打开他们删除它们,然后在木材,我可以系压电传感器的拧块。另一种选择是将固定的薄平片材料(例如,硬纸板,木材)可在该压电体可以被固定到该杆的下侧,但你会发现它更难东西附着到棒,加你也可能会发现试图插入电子时,将棒的方式获得。
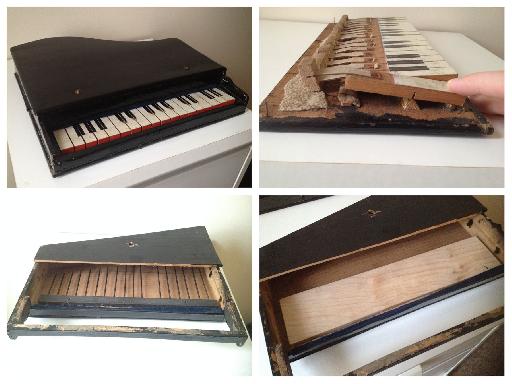
从左上角顺时针
你可能需要做的,你的钢琴的另一个修改是增加了穗/点,这将打击该压电体锤子的表面。如果槌头比他们可能不会触发传感器正常压电体的内圆较宽,所以要解决这个问题,我的钢琴我录制焊接的小球上的锤子来创建一个凸起的点。
Step 2—Attach the Piezos
现在,我们将放置压电传感器到钢琴,其中锤机构通常会撞击声棒当键被按下的顶部的下侧。如果你的钢琴是手工制作的像我一样,你可能会发现锤子阿伦
一旦你
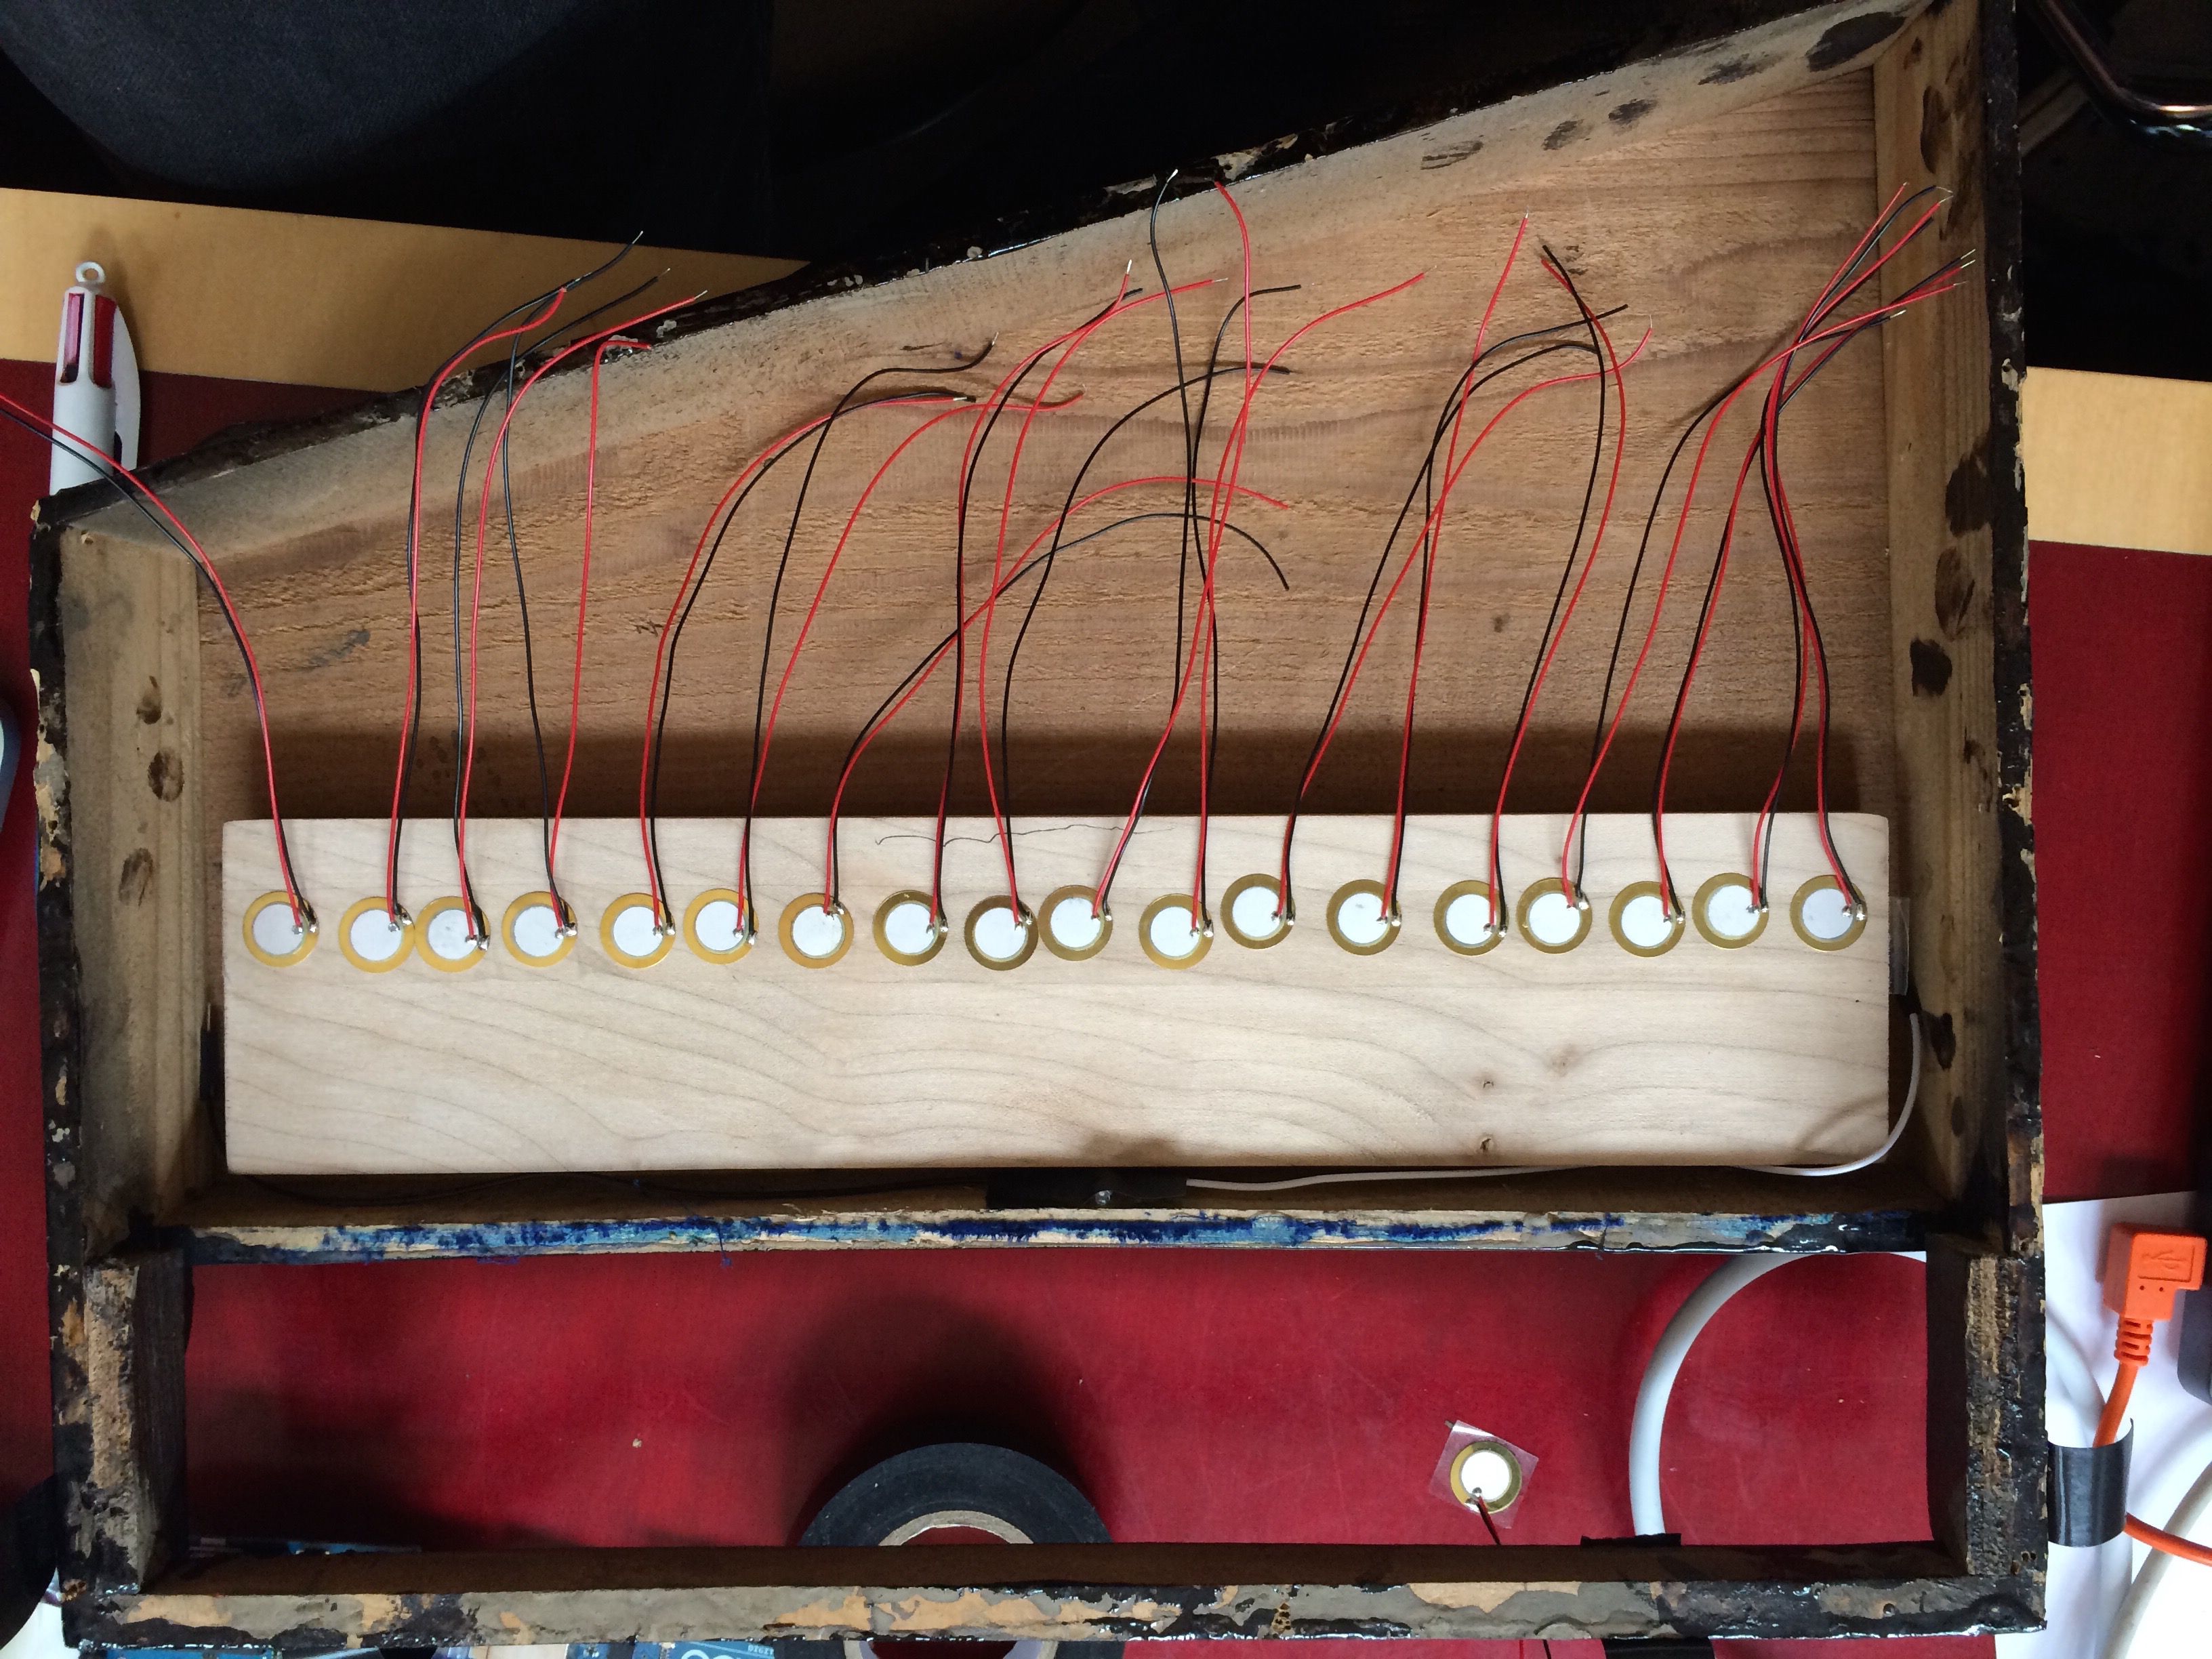
所附的压电传感器
Step 3—Complete the Circuitry
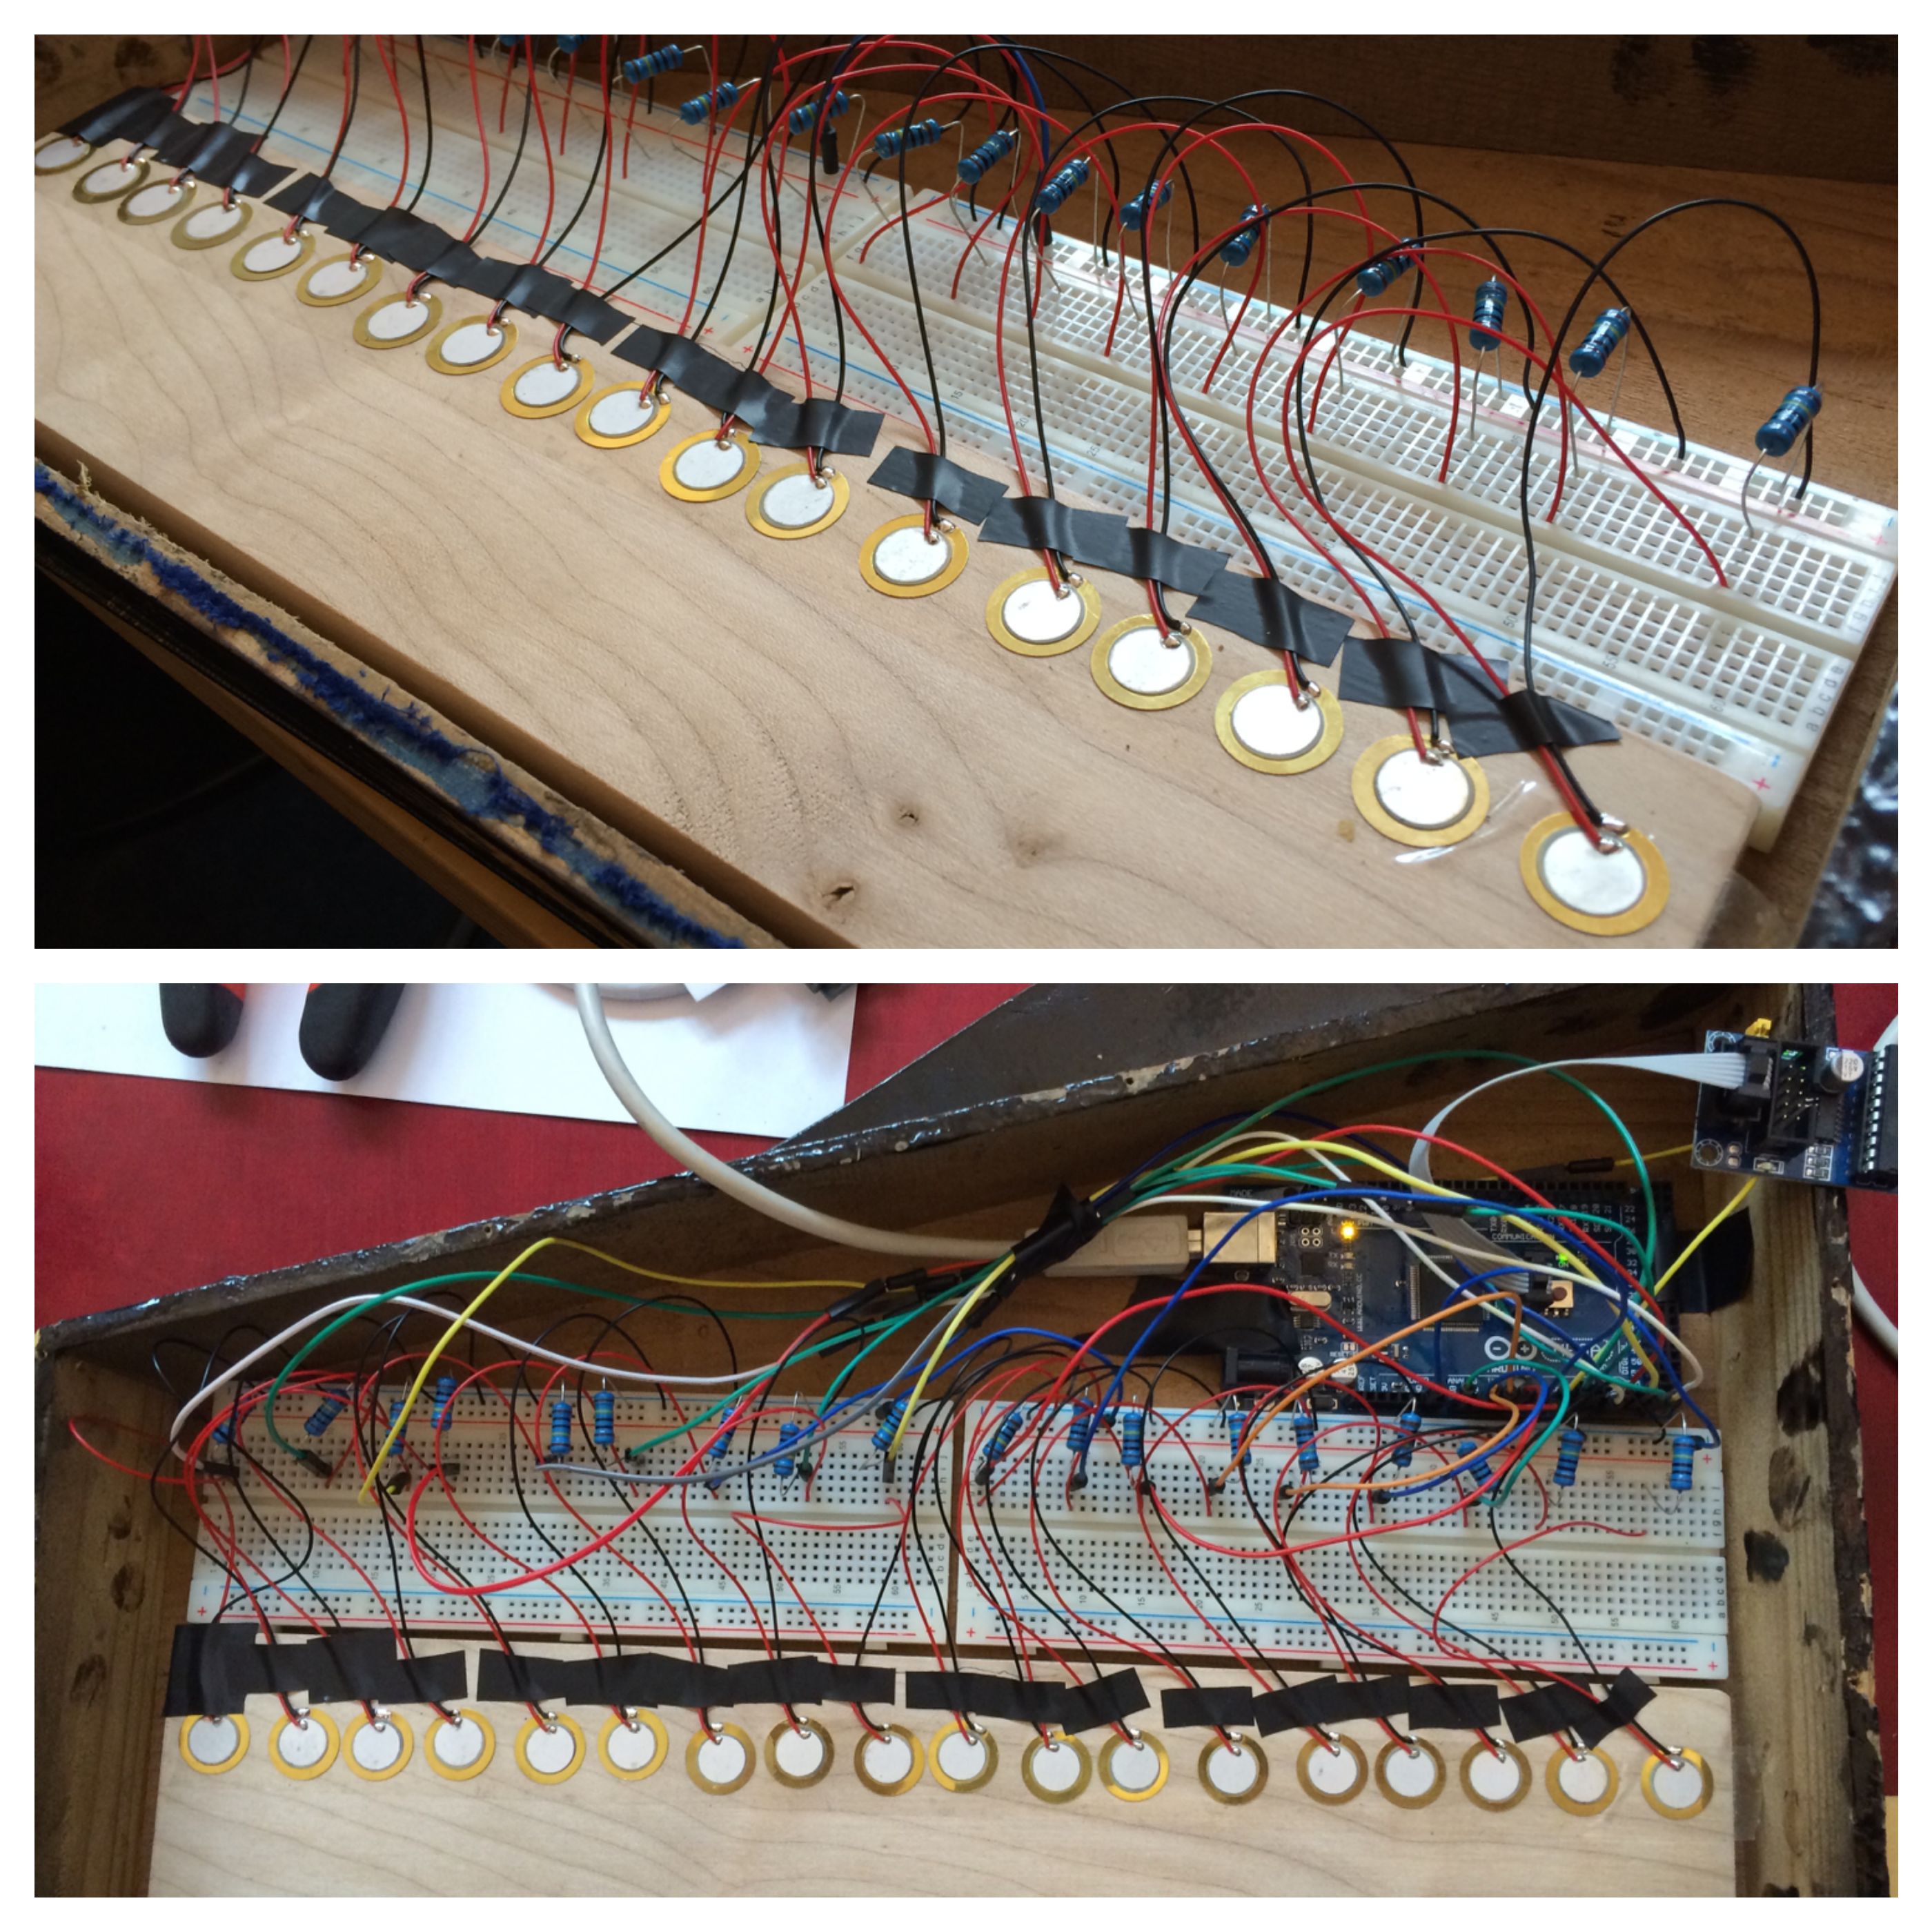
为了完成电路,你首先需要将线路板/ s和Arduino板连接到钢琴的内部。如果你打开钢琴从底部像我那样,你可能需要粘板顶端的底部,但是如果打开琴从顶部你很可能只是通过在放置底部的电路板,而不需要坚持完成项目下来。将线路板/ s的最接近压电体,与Arduino的另一边。
接下来,你需要将这些组件连接到线路板/秒。有两个主要部分,以最面包板(下图中为示出)
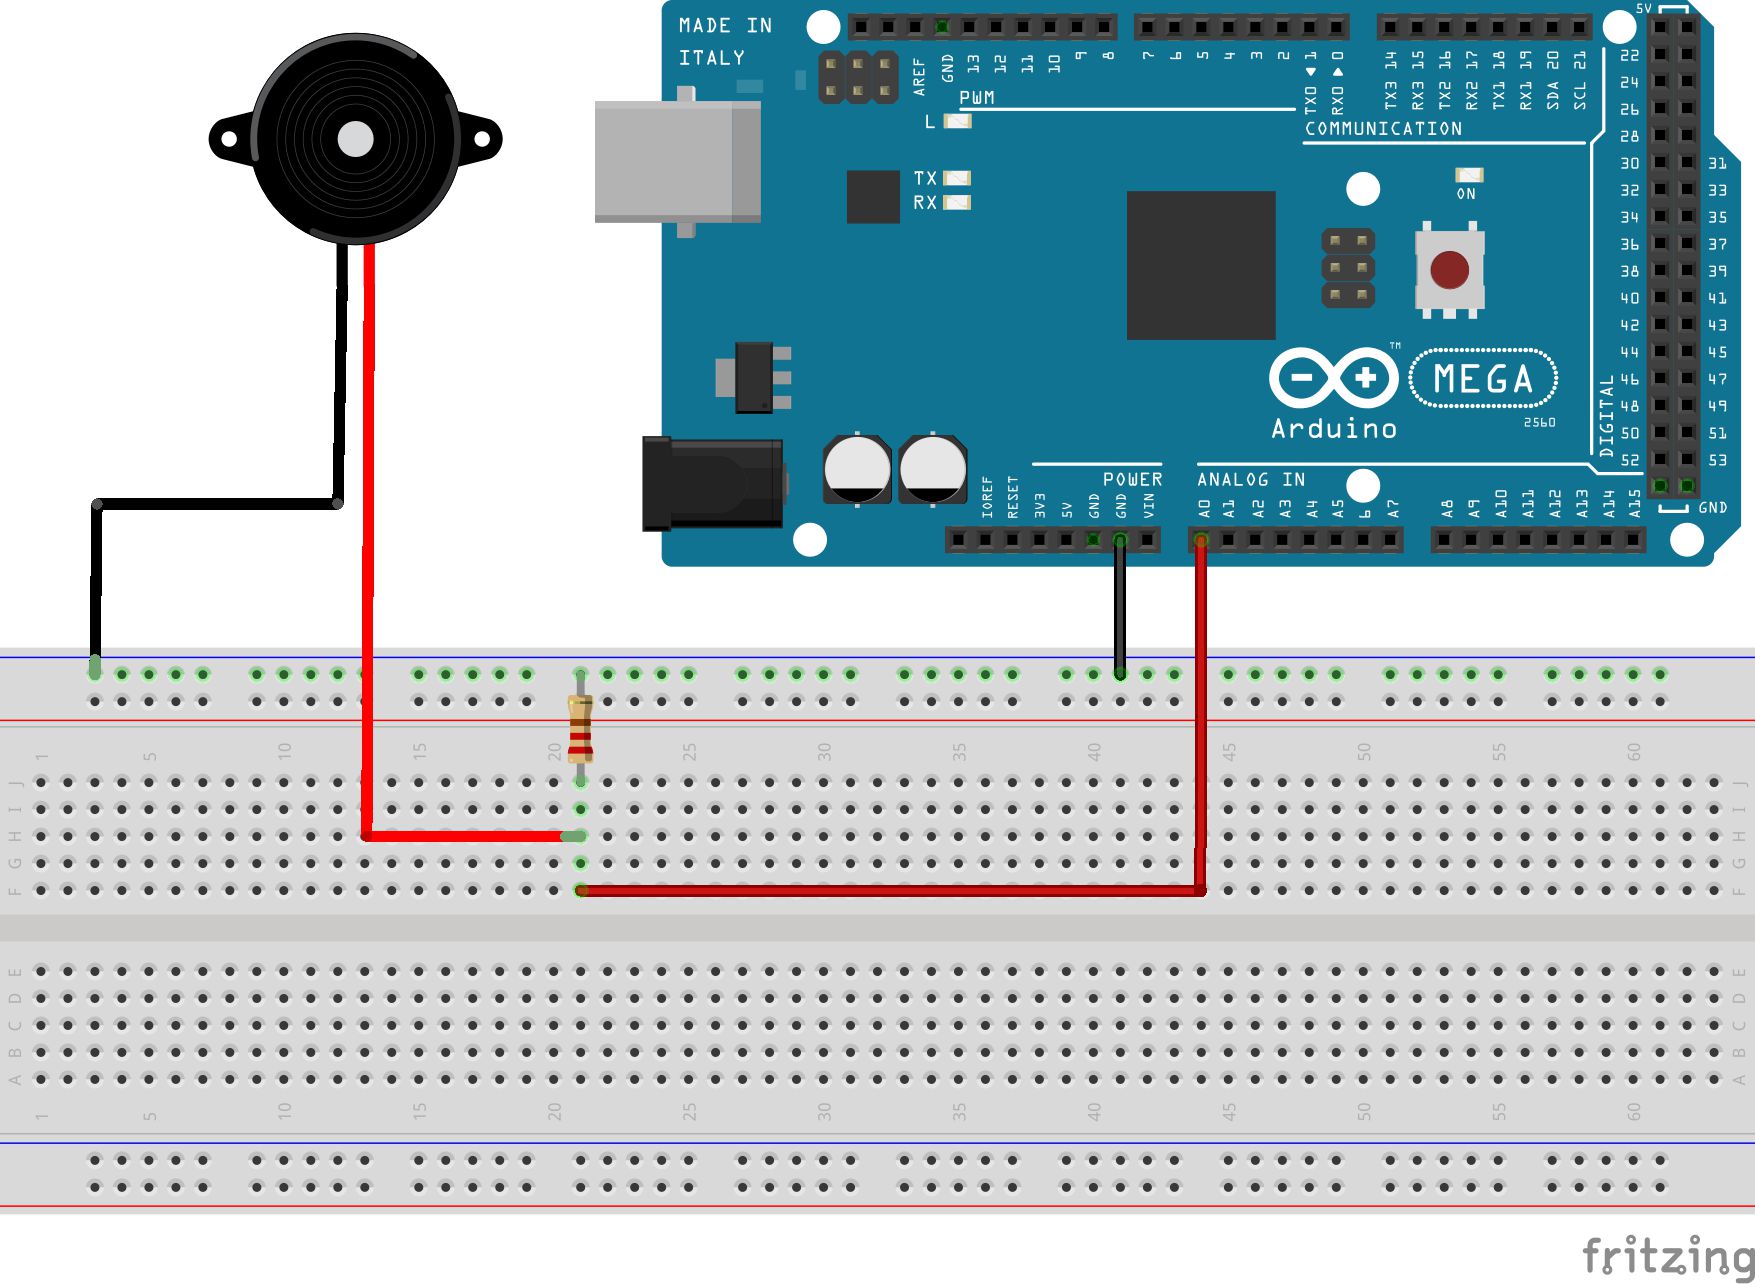
如何将单个的压电传感器连接到一个Arduino板
如显示在前面的图中,对每个压电/关键,需要连接到接地母线片之一从压电黑(地)线,而红色(信号)线需要连接到终端的一个条。然后需要从端子条的接地条连接的电阻器(在任何方向);电线从端子排,以对Arduino的模拟输入引脚之一,而另一根电线从地下带材的接地引脚之一。然后,您需要重复这个电路的每个压电,每次使用不同的终端条和Arduino的模拟输入引脚,其表现如下图。
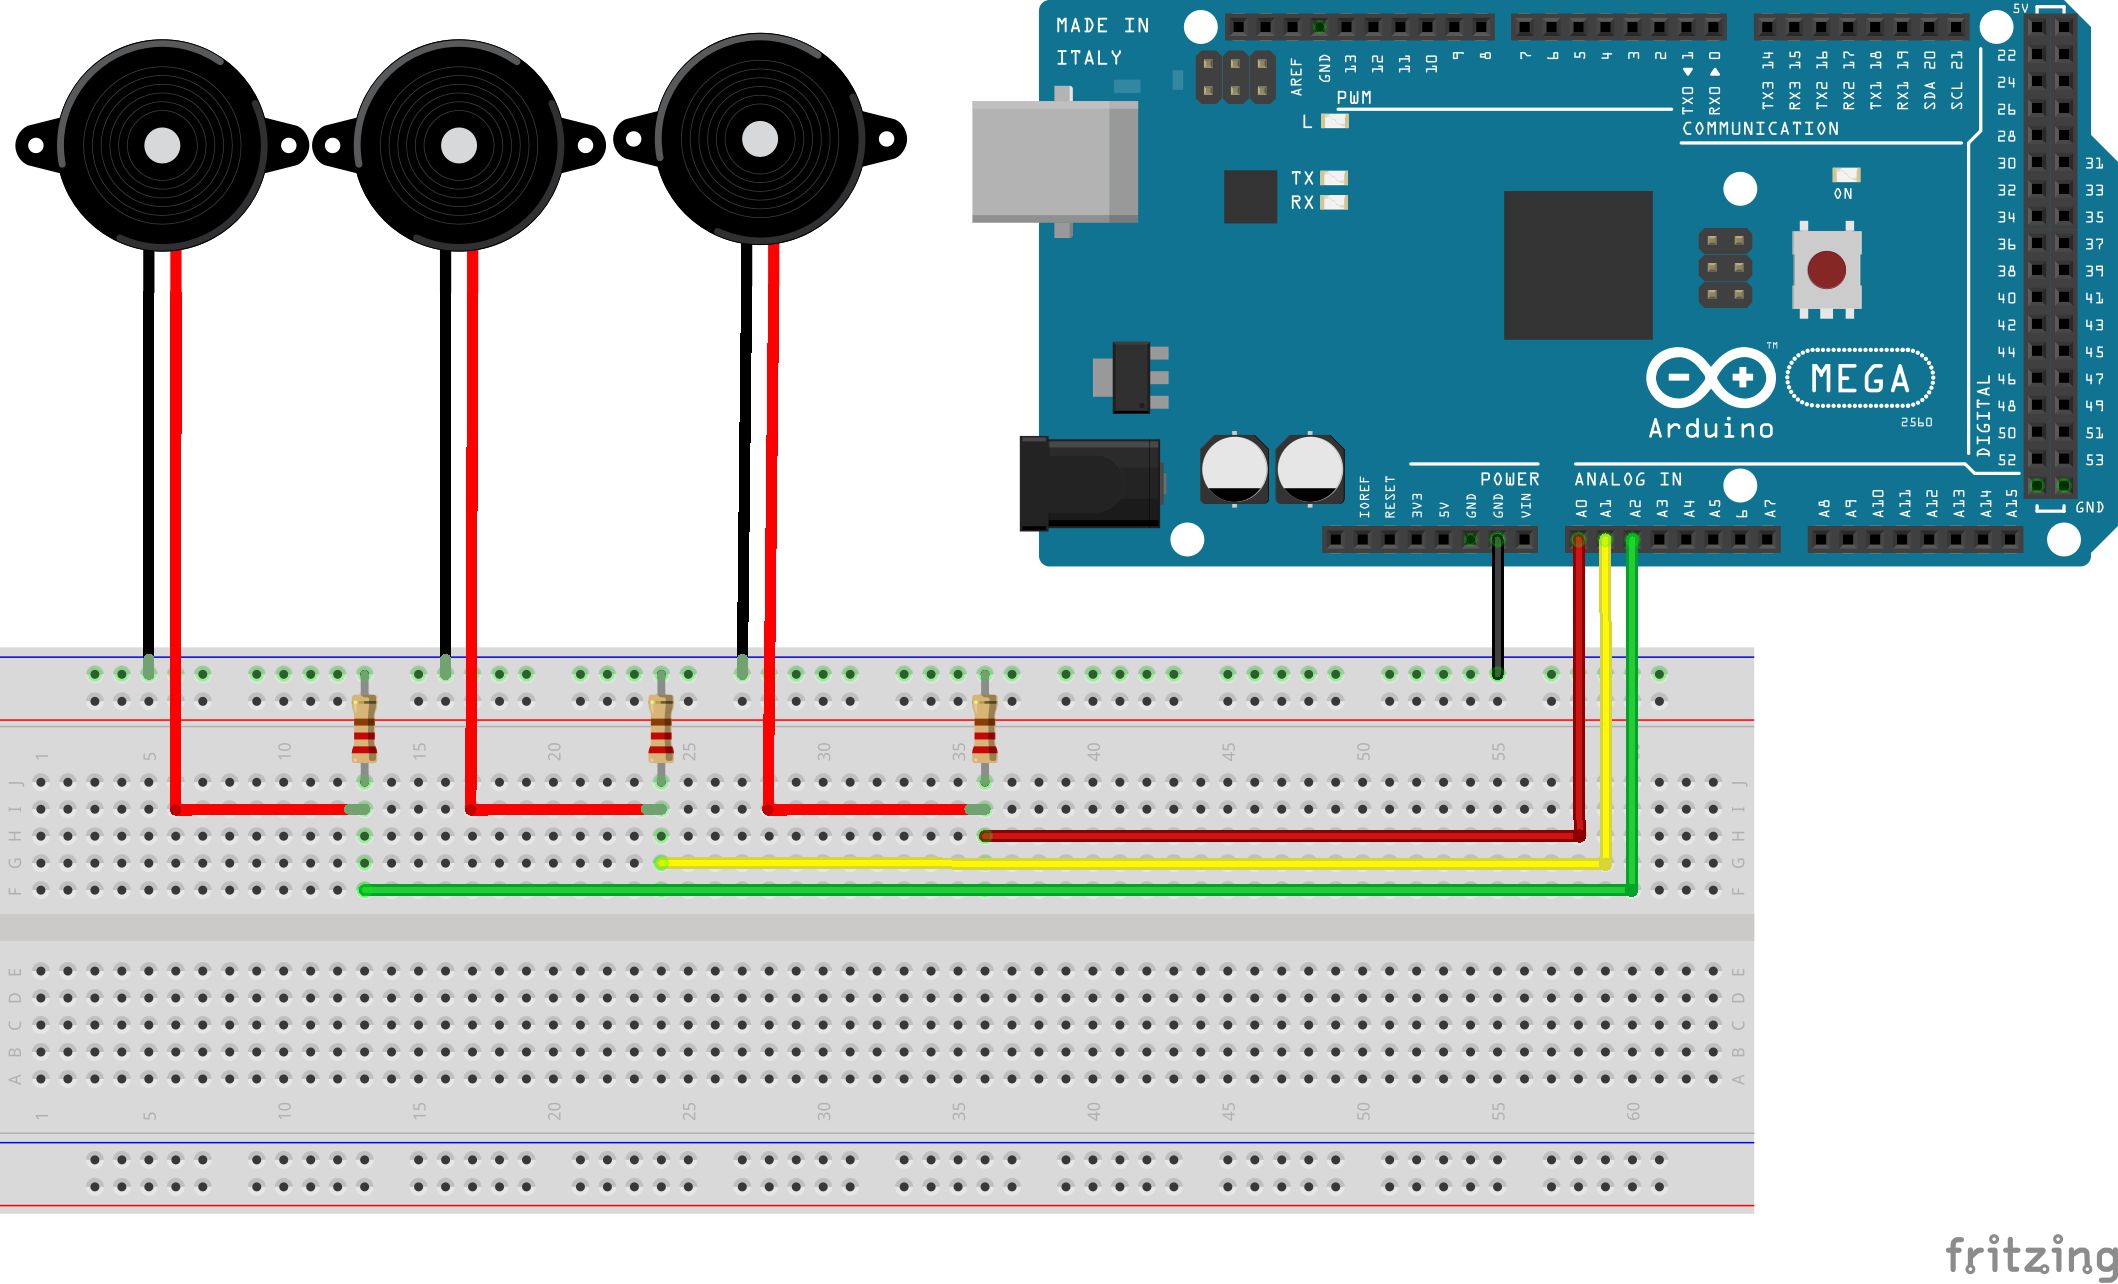
如何将多个压电传感器连接到一个Arduino板
我建议使用不同颜色的电线每个模拟输入连接,这使得它更容易看到什么
最佳
Step 4—Edit and Upload the Code
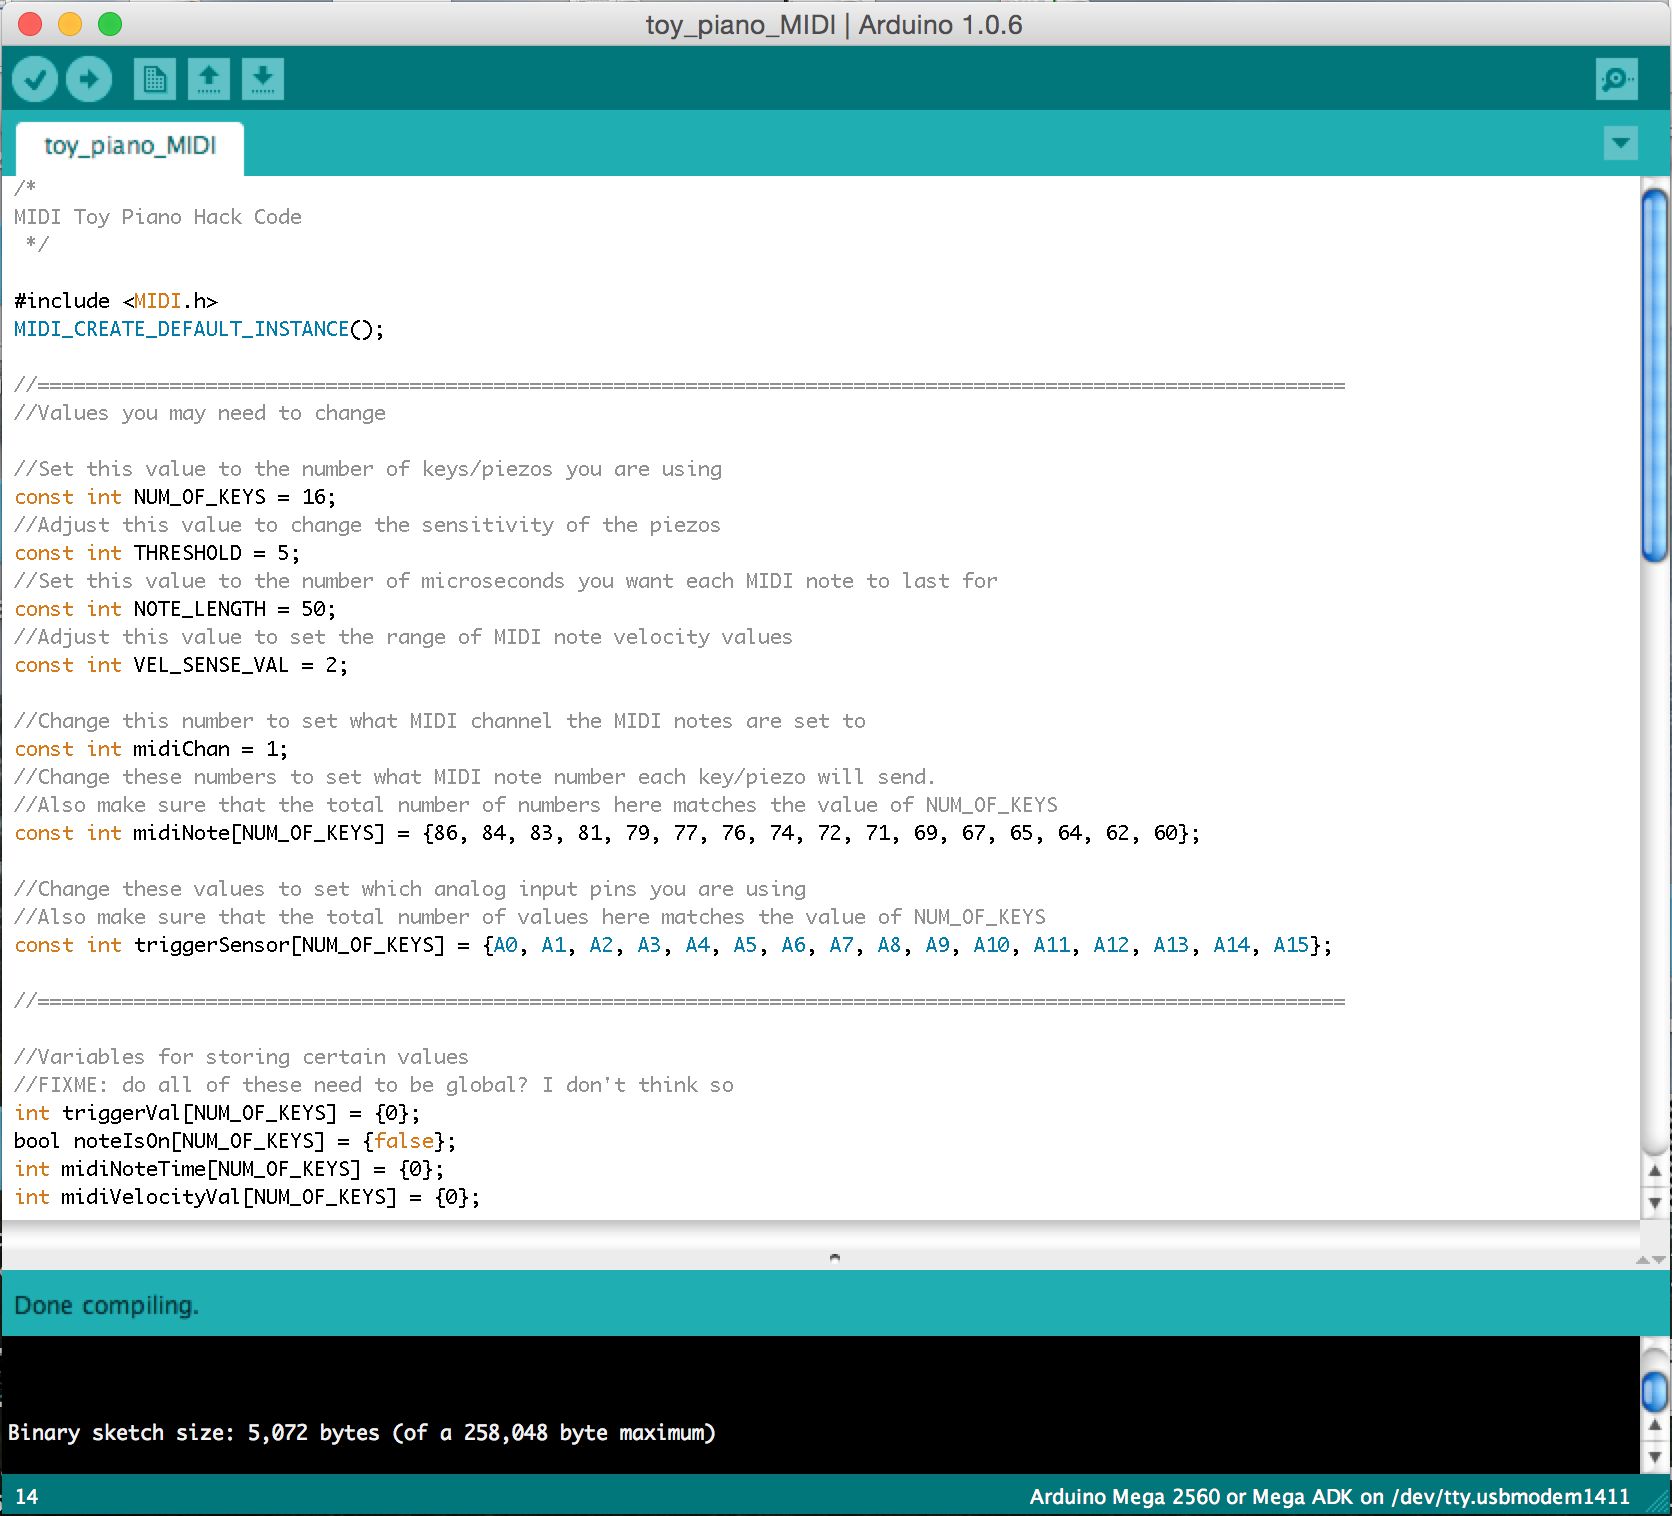
经过硬件和电子设备是否齐全,然后需要一些软件上传到Arduino板,将转由压电体读数为MIDI音符。一旦你已经下载并安装这两个软件的Arduino和Arduino的MIDI库,打开Arduino的应用程序和下面的代码复制到Arduino的文本编辑器:
/*
MIDI Toy Piano Hack Code
*/

#include
MIDI_CREATE_DEFAULT_INSTANCE();

//========================================================================================
//Values you may need to change

//Set this value to the number of keys/piezos you are using
const int NUM_OF_KEYS = 16;
//Adjust this value to change the sensitivity of the piezos
const int THRESHOLD = 5;
//Set this value to the number of microseconds you want each MIDI note to last for
const int NOTE_LENGTH = 50;
//Adjust this value to set the range of MIDI note velocity values
const int VEL_SENSE_VAL = 2;

//Change this number to set what MIDI channel the MIDI notes are set to
const int midiChan = 1;
//Change these numbers to set what MIDI note number each key/piezo will send.
//Also make sure that the total number of numbers here matches the value of NUM_OF_KEYS
const int midiNote[NUM_OF_KEYS] = {86, 84, 83, 81, 79, 77, 76, 74, 72, 71, 69, 67, 65, 64, 62, 60};

//Change these values to set which analog input pins you are using
//Also make sure that the total number of values here matches the value of NUM_OF_KEYS
const int triggerSensor[NUM_OF_KEYS] = {A0, A1, A2, A3, A4, A5, A6, A7, A8, A9, A10, A11, A12, A13, A14, A15};

//=======================================================================================

//Variables for storing certain values
int triggerVal[NUM_OF_KEYS] = {0};
bool noteIsOn[NUM_OF_KEYS] = {false};
int midiNoteTime[NUM_OF_KEYS] = {0};
int midiVelocityVal[NUM_OF_KEYS] = {0};

void setup()
{
    MIDI.begin(MIDI_CHANNEL_OMNI);
}

void loop()
{
    //repeat the below code for each anaolog input/piezo sensor
    for (int count; count < NUM_OF_KEYS; count++)
    {
        //read the piezo value
        triggerVal[count] = analogRead(triggerSensor[count]);

        //if the value is over the threshold and there isn't currently a note on for this piezo
        if (triggerVal[count] > THRESHOLD && noteIsOn[count] == false)
        {
            //get a velocity value based on the value
            midiVelocityVal[count] = triggerVal[count] * (127.0/1023.0);

            //increase sensitivity
            midiVelocityVal[count] *= VEL_SENSE_VAL;

            //make sure we don't go out of range
            if (midiVelocityVal[count] > 127)
            midiVelocityVal[count] = 127;

            //send a MIDI note-on message
            MIDI.sendNoteOn (midiNote[count], midiVelocityVal[count], midiChan);

            //flag that the note is on
            noteIsOn[count] = true;

            //start a timer for the note to be on for
            midiNoteTime[count] = NOTE_LENGTH;
        }

        //if the note is currently on
        if (noteIsOn[count] == true)
        {
            //reduce the time value by 1
            midiNoteTime[count]--;

            //if time value equals 0
            if (midiNoteTime[count] == 0)
            {
                //turn off the note
                MIDI.sendNoteOff (midiNote[count], 0, midiChan);
                noteIsOn[count] = false;
            }

        }

    }

    //pause the loop
    delay(1);
}
教您如何使用Arduino的软件,以及如何代码有点超出了本文的范围,所以我
- NUM_OF_KEYS
- 门槛
- NOTE_LENGTH
- VEL_SENSE_VAL
- midiChan
- midiNote
- triggerSensor
Arduino的软件
一旦你
- 去
- 通过USB将Arduino板连接至您的计算机。
- 去
- 去
- 去
请注意
Step 5—Connect the Software
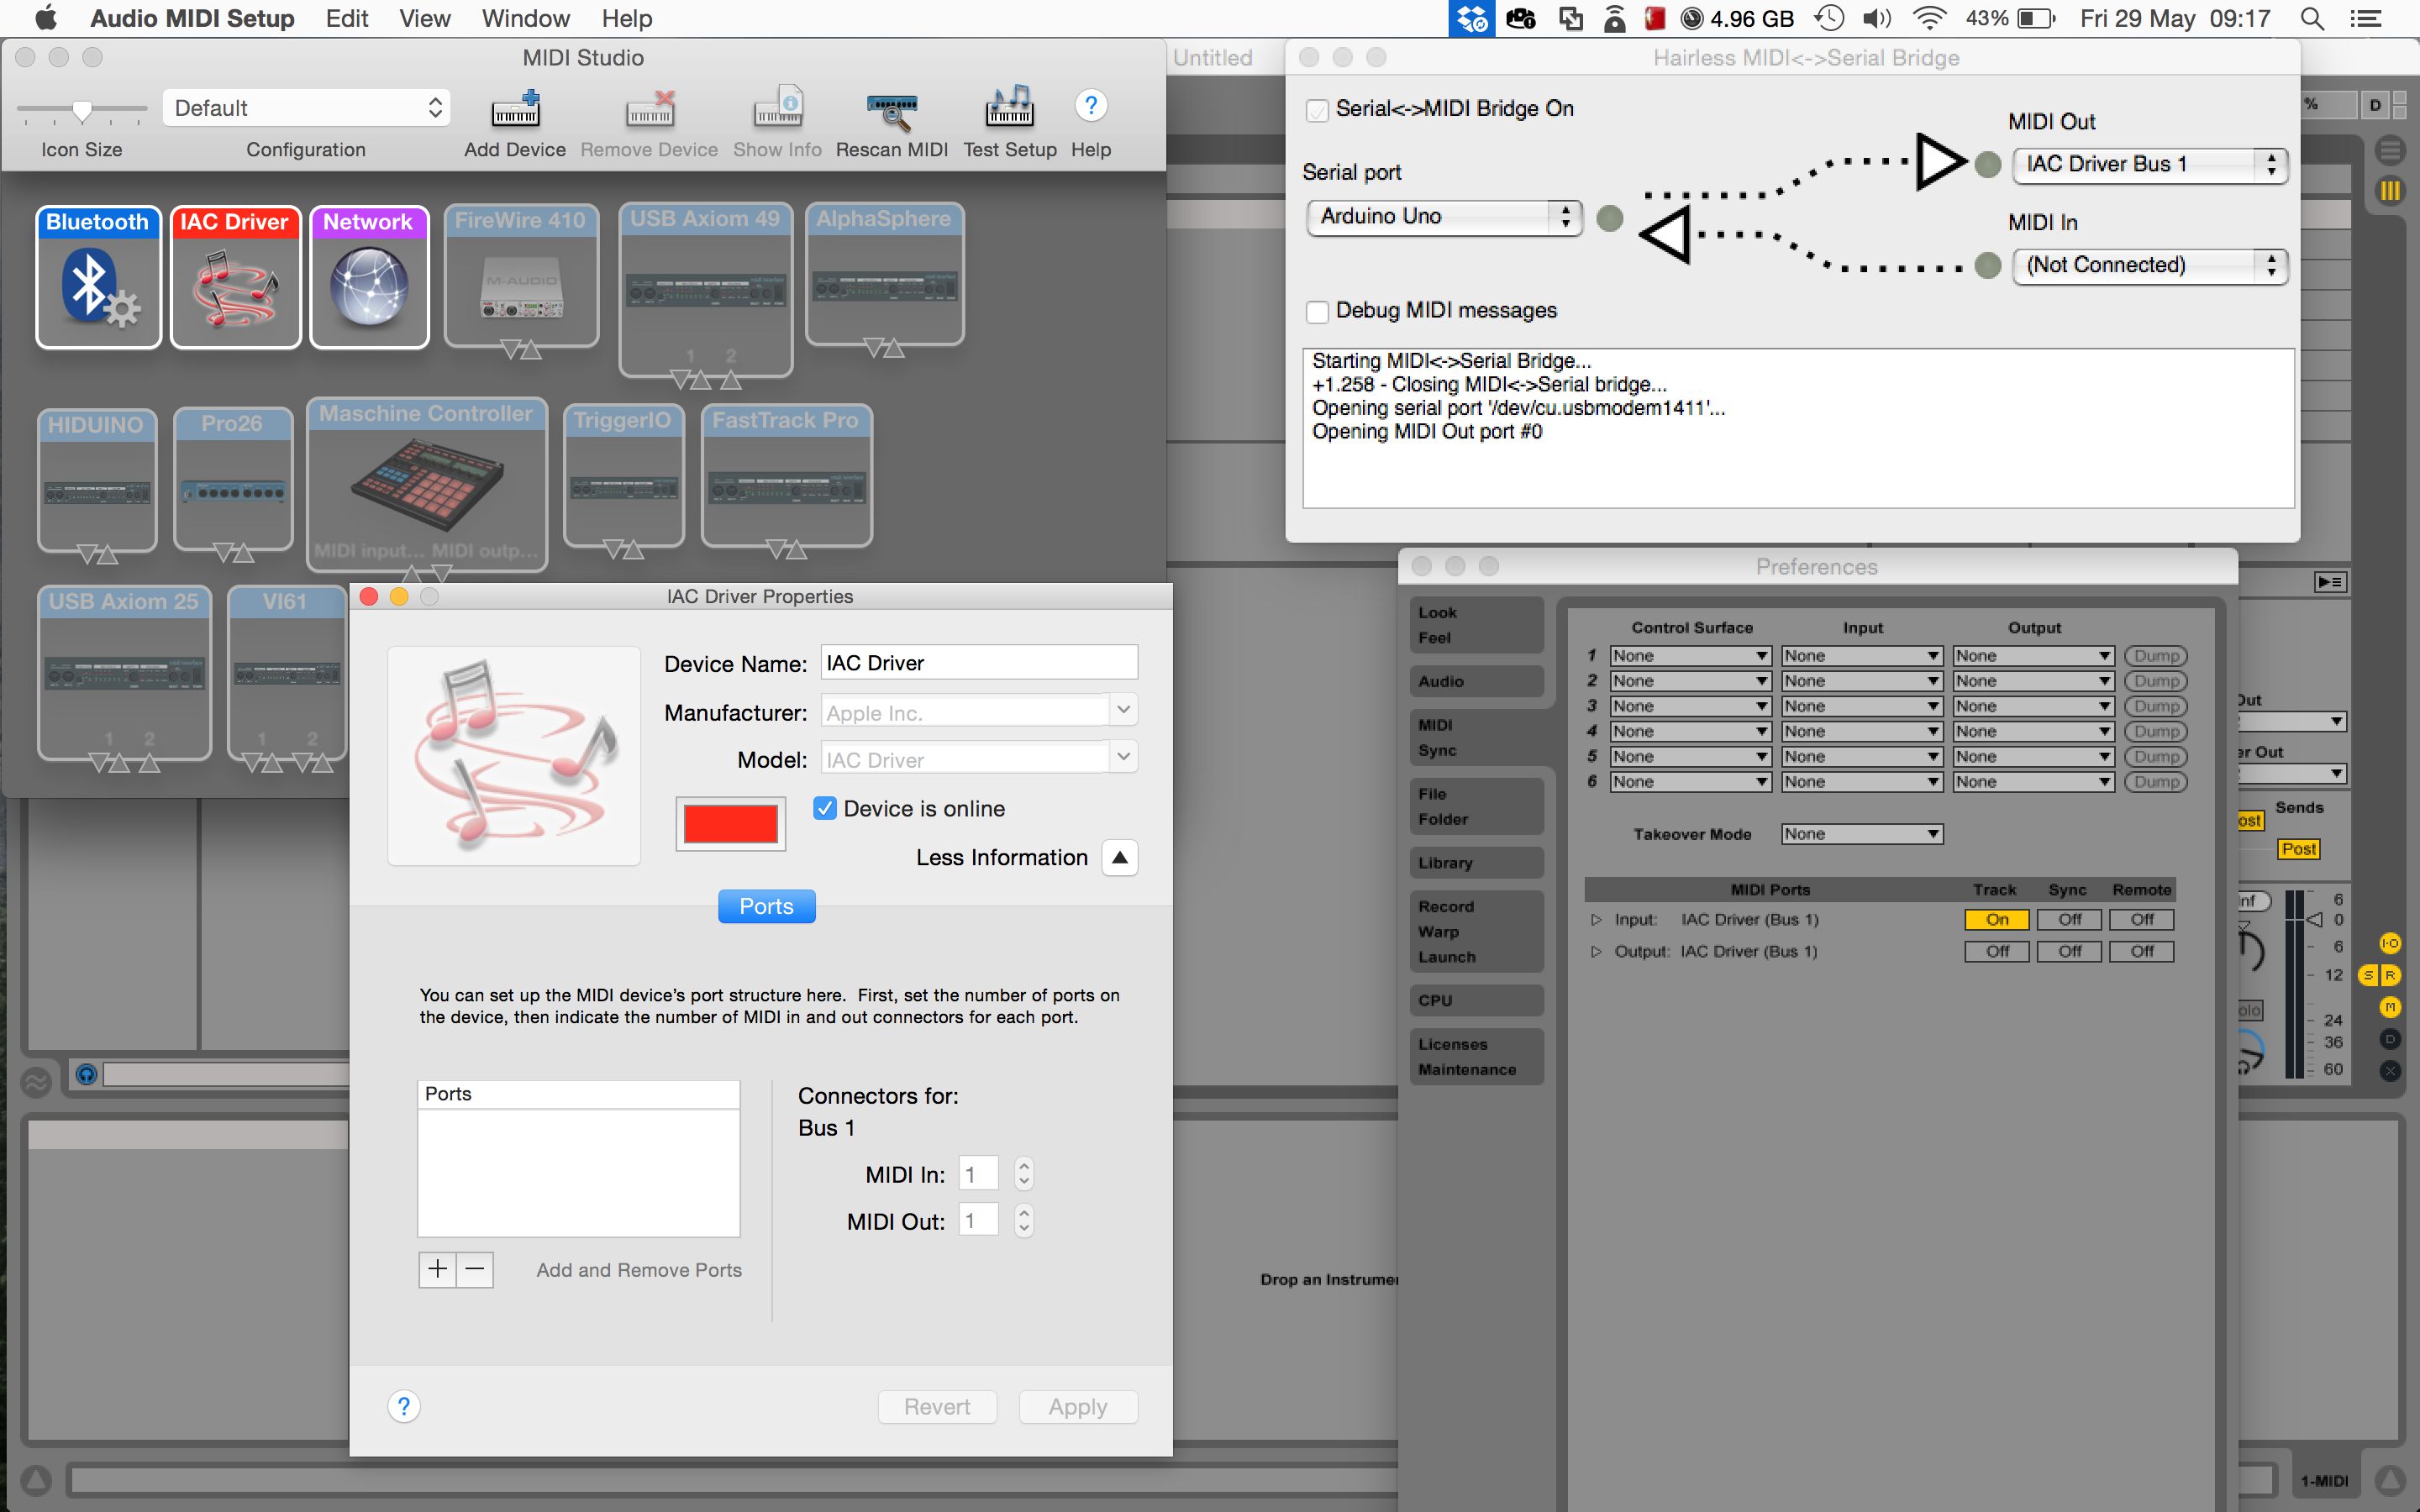
左:在OS X右上角虚拟MIDI端口设置:配置无毛MIDI到串行桥。右下:连接到的Ableton Live中的虚拟MIDI端口。
最后,你需要启动和计算机上连接所有必需的软件:
设置虚拟MIDI端口:
如果你是在Windows上:
- 打开loopMIDI
- 点击
- 离开应用程序运行
如果你是在OS X:
- 启动
- 去
- 双击
- 确保
- 关闭应用程序
连接无毛MIDI转串口桥到Arduino和虚拟MIDI端口:
- 启动无毛
- 在左手侧设置
- 在右侧设置
- 确保
- 离开应用程序运行
DAW / MIDI乐器软件,连接你的虚拟端口:
- 启动您的DAW或MIDI乐器
- 在这种情形下
请注意 -如果你的Arduino是黑客攻击与HIDUINO,步骤1和2唐
一旦这个已经完成,你现在应该能够从您的MIDI乐器与玩具钢琴音符触发。
看在行动声学玩具钢琴的MIDI控制器的一个简短的视频演示:
Conclusion
以便
另外,如果你是在参加接下来的MIDI哈克事件有趣,留意上MIDI哈克网站进行公告。还有一对夫妇正在世界各地每年举办一次类似的音乐高科技这种形式的比赛,如音乐和Hackday技术的音乐巨星,以及各种一次性和局部的事件。

Discussion
You could connect a different type of sensor or electronic source and get results without changing the code, however it will only create a note based on the first reading it gets over the threshold (due to the logic implemented for turning piezo inputs into MIDI notes). Using just electrical current to trigger a reading would be very similar to using a simple push button (where pressing the button completes the circuit and creates a reading), so I'd recommend looking at Arduino button tutorials for that.
It sounds like your piezo sensors are not properly connected to the Arduino. Check that they are connected to the correct pins. You may also need to correct the value of NUM_OF_KEYS in the code if you are using less than 16 sensors/keys. You may also need to up the value of THRESHOLD in the code if your piezos are particularly sensitive.
thanks for answering me so fast , I'll check that the wires are connected correctly, I have another doubt about the code it in the end you said : "repeat the below code for each anaolog input/piezo sensor", and I 'm trying to do with a arduino uno with only 3 pins I changed all that you said , but the end I do not know where to get the code to be copied to each piezo I have and also do not know where it ends.
look I change this:
NUM_OF_KEYS = 3;
midiNote[NUM_OF_KEYS] = {86, 84, 83}
triggerSensor[NUM_OF_KEYS] = {A0, A1, A2}
IN THIS PART I WILL NEED TO PUT SOME NUMBER? -> (int count; count < NUM_OF_KEYS; count++)
Im sorry for all this question but im very lost with this and thank you so much for your help and sorry for my english.
Im from Brasil.
NUM_OF_KEYS, midiNote, and triggerSensor are the only values you need to change, which you have correctly done. The "repeat the below code for each anaolog input/piezo sensor" comment is actually a description of what the below 'for' loop does, rather than being an instruction. You shouldn't have to change any code in that section for it to work.
Thank you so much, this time again made ​​the piezos cables and worked, thanks for your help I buy one arduino mega
and when it comes I gonna do with the 16 piezos.
please let me ask you one more question?! can I put on this project potentiometers or one pitch bend?
Glad you got it working.
If you want to attach something like a potentiometer you'll need to change the code for reading from that particular analogue input. However the code needed here is a lot simpler - see https://www.arduino.cc/en/Tutorial/AnalogReadSerial to lean how to do this.
_____
#include
____
He's answering me this
#include
^
exit status 1
#include expects "FILENAME" or
Do you have an idea?
Thanks,
Florent
Thanks for the kind words and for spotting this mistake.
The code above has now been updated to the correct version.
Thanks,
Liam.
Project = allow young people to explore (play) the out-of-reach pipe organ from a wireless-midi capable keyboard.
So far... I have an arduino, a wireless midi transmitter/receiver (Medeli WIMIDI - tested and quite surprised by performance), a breadboard (cables, female midi socket etc).
I want to connect the wireless midi transmitter to the out socket of the remote keyboard and the wireless midi receiver to the arduino (I need to solder connect to arduino via breadboard). With the arduino midi library I presume I will then be able to receive the incoming midi signal ? This is where it becomes tricky for me to ascertain next steps!... I then want to translate the midi in to individual note signals (much like what you have done in this article). Is this possible?
If this is doable, my last sticking point is how to get the individual note signals 'transferred' to the organ console. I have seen an article where someone attaches a solenoid for each note to a wooden board and then rests the board over the top of the organ keyboard. However, the organ we are planning to work on already has access to the rear of the keyboard and each note has a visible switch (2 cables to each note) on a low voltage (12v) system. Is it possible to intercept each of these switches with the arduino outputs for each note? My apologies if this is a stupid question!?
This is an awesome tutorial. It'll help me a lot with what I want to do cause the setting is similar but usage is completely different.
I wonder if the amount of the contact mics can be different? Is there any maximum we can connect?
Also, is it possible to use condenser mics instead of piezos, possibly with a little trick?? Otherwise do you have any suggestions of how I can do it?
Thanks a lot!
The number of piezo sensors you can connect depends on the number of analog inputs that your microcontroller has e.g. on an Arduino Mega you have 16 analog inputs. However it is possible to expand this number using multiplexer components - see https://playground.arduino.cc/Learning/4051. There are also Arduino IO expander shields that can do this for you.
Regarding using consider mics instead, the extra complexity depends on whether you are just trying to detect a sound level, or trying to capture actual sound data. For just detecting sound levels see http://www.learningaboutelectronics.com/Articles/Arduino-microphone-circuit.php as an example, however recording actual audio is more complex (e.g. see http://www.instructables.com/id/Arduino-Audio-Input/).
Thanks a lot for your answer.
I have an Ard.Mega and I indeed only need to use them to retrieve vibration data - not sound.
Do you think I can use your setup the same, but differ the code to make it receive only vibration level - say from 0 to 100? In that case, would you mind sharing how the code shall be?
Many thanks.
I had a question. You used 18 piezo. But the Arduino mega allows only 16 input. What ambi missing?
""""const int THRESHOLD = {5,6,8,4,2,5,7,8,5,6};""""
What is the highest treshold value ?
Can you please tell me how i can separately change treshold, and limit the maximum & minumum velocity of each individual piezo?
If possible, write me another command line where i can adust the time amount for the gap between two stroke to avoid double triggering problem.
Thank you.
The highest value a piezo sensor can send using an Arduino is 1023, so threshold values could be anything up to this.
If you just want to 'clip' limit the velocity value, you could change the values on lines 'if (midiVelocityVal[count] > 127) midiVelocityVal[count] = 127;' to set a lower max value, and you could do the same kind of thing for the minimum limit e.g. 'if (midiVelocityVal[count] < 10) midiVelocityVal[count] = 10;'.
To limit how often a stoke can happen you could use the Arduino Millis Library (https://www.arduino.cc/en/Reference/Millis) to store a time for every stoke and then only process a new stroke if it's time is greater than the last time by a certain amount.
I saw padcycles in some sketch. I think it's about avoiding double triggering. I am not sure though. I tried Google. Didn't get enough learning about that term.
I have been playing my DIY arduino midi drum for a year.
your code works flawlessly. Recently i have decided to use a foot switch instead of using 2 separate pads for closed & open hat.
I use Arduino meda...Can you please guide me how the momentary switch should be wired to my arduino ?
And what modification i have to make into my current code for activating the switch functionality ?
My current Code is given below...
/*
Midi drum ..with 10 piezo.. no pedal(2 separate pad with 2 separate piezo for closed hat and open hat), Kick,snare, open hat, closed hat, tom1, tom2, tom3, crash1, crash2, ride
*/
#include
MIDI_CREATE_DEFAULT_INSTANCE();
//========================================================================================
//Set this value to the number of keys/piezos you are using
const int NUM_OF_KEYS = 10;
//Adjust this value to change the sensitivity of the piezos
const int THRESHOLD = 10;
//Set this value to the number of microseconds you want each MIDI note to last for
const int NOTE_LENGTH = 50;
//Adjust this value to set the range of MIDI note velocity values
const int VEL_SENSE_VAL = 10;
//Change this number to set what MIDI channel the MIDI notes are set to
const int midiChan = 1;
//Change these numbers to set what MIDI note number each key/piezo will send.
//Also make sure that the total number of numbers here matches the value of NUM_OF_KEYS
const int midiNote[NUM_OF_KEYS] = {36, 38, 60, 61, 49, 52, 48, 47, 43, 84};
//Change these values to set which analog input pins you are using
//Also make sure that the total number of values here matches the value of NUM_OF_KEYS
const int triggerSensor[NUM_OF_KEYS] = {A0, A1, A2, A3, A4, A5, A6, A7, A8, A9,};
//=======================================================================================
//Variables for storing certain values
int triggerVal[NUM_OF_KEYS] = {0};
bool noteIsOn[NUM_OF_KEYS] = {false};
int midiNoteTime[NUM_OF_KEYS] = {0};
int midiVelocityVal[NUM_OF_KEYS] = {0};
void setup()
{
MIDI.begin(MIDI_CHANNEL_OMNI);
Serial.begin(115200); //REMOVE THIS LINE IF USING HIDUINO INSTEAD OF HAIRLESS
}
void loop()
{
//repeat the below code for each anaolog input/piezo sensor
for (int count; count < NUM_OF_KEYS; count++)
{
//read the piezo value
triggerVal[count] = analogRead(triggerSensor[count]);
//if the value is over the threshold and there isn't currently a note on for this piezo
if (triggerVal[count] > THRESHOLD && noteIsOn[count] == false)
{
//get a velocity value based on the value
midiVelocityVal[count] = triggerVal[count] * (127.0 / 1523.0);
//increase sensitivity
midiVelocityVal[count] *= VEL_SENSE_VAL;
//make sure we don't go out of range
if (midiVelocityVal[count] > 127)
midiVelocityVal[count] = 80;
//send a MIDI note-on message
MIDI.sendNoteOn (midiNote[count], midiVelocityVal[count], midiChan);
//flag that the note is on
noteIsOn[count] = true;
//start a timer for the note to be on for
midiNoteTime[count] = NOTE_LENGTH;
}
//if the note is currently on
if (noteIsOn[count] == true)
{
//reduce the time value by 1
midiNoteTime[count]--;
//if time value equals 0
if (midiNoteTime[count] == 0)
{
//turn off the note
MIDI.sendNoteOff (midiNote[count], 0, midiChan);
noteIsOn[count] = false;
}
}
}
//pause the loop
delay(1);
}
I want to add a momentary switch as a foot pedal which will triggers note between 61 & 60 ( Closed & open HiHat). Thank You
Want to join the discussion?
Create an account or login to get started!