
A NonLinear Educating Company
تحول بيانو لعبة خمر في طريق اردوينو MIDI المراقب المالي
Liam Lacey on Jul 31, 2015 in DIY & Hacking | 25 comments
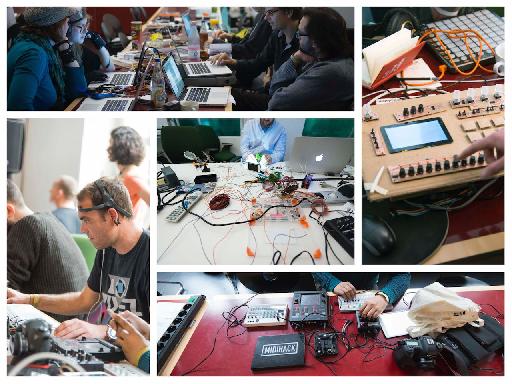
في مايو 2015 حضرت MIDI هاك
إذا كنت تقرأ المادة السابقة من الألغام ، وكنت أعرف أنني أوصي منصة اردوينو لصنع وحدات تحكم MIDI DIY. اخترت اردوينو لهذا المشروع على منابر اقترح الأخرى، حيث أنه يوفر لك الكثير من السيطرة على ما تفعله مع بيانات الإدخال / الإخراج، ومع ذلك فإنه لا يزال مبتدئا للغاية ودية مع الكثير من الدعم الرسمي وأدلة. ويهدف هذا الدليل إلى الأفراد الذين هم مبتدئين في الإلكترونيات، وتطوير البرمجيات، واردوينو.
وهنا لائحة من الأشياء التي سوف تحتاج لهذا المشروع. جميع المكونات الإلكترونية المذكورة هنا يمكن شراؤها من أي جيدة DIY / الهاوي متجر للالكترونيات، مثل SparkFun.
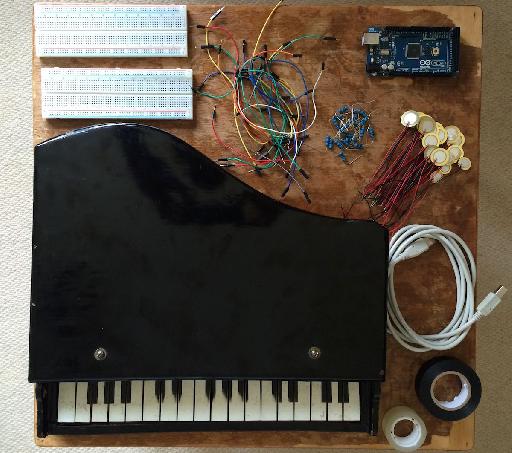
What You Will Need for this Project
- والصوتية لعبة خشبية البيانو. أنا اشتريت لعبة العزف على البيانو الخروج من موقع ئي باي لحوالي 15 دولارا، حيث عادة ما تكون هناك عدد قليل متوفرة، ولكن يمكنك أيضا العثور عليها في بعض الأحيان في محلات الخيرية وأسواق السلع المستعملة. ويستند هذا المشروع حول البيانو مع آلية يمكن من خلالها تسبب مفاتيح مطرقة لضرب نوعا من كائن صدى. وذلك باستخدام لوحة المفاتيح الإلكترونية لعبة لا تعمل هنا.
- اردوينو متنها. هذا هو متحكم التي ستكون
- بيزو عناصر. وتستخدم أجهزة الاستشعار عنصر بيزو للكشف عن الاهتزاز ويقرع، وهما عنصران شعبية للاستخدام بشكل خاص في منتجات طبل الزناد DIY والتجارية. وسوف تستخدم هذه للكشف عن المطابع من المفاتيح، وسوف تحتاج إلى واحد من هذه لكل مفتاح. سوف تحتاج إلى النظر في حجم piezos التي تحتاجها على أساس حجم رؤوس مطرقة داخل البيانو
- المقاومات 1M أوم. المقاومات هي العنصر الأساسي والمشترك في الدوائر الكهربائية، وتستخدم لمقاومة تدفق الكهرباء. سوف تحتاج إلى واحدة من هذه لكل مفتاح / بيزو.
- الأسلاك. سوف اردوينو وأسلاك سهلة اللوح، المعروف أيضا باسم أسلاك الطائر من الذكور إلى الذكور، تكون أسهل للاستخدام، وسوف نستخدم هذه لربط جميع المكونات إلى اردوينو. سوف تحتاج 2 لكل مفتاح / بيزو، وكذلك حفنة من إضافات.
- الألواح-لحام أقل. الألواح-لحام أقل تسمح لك بإنشاء الدوائر الإلكترونية دون الحاجة لحام كل شيء معا. قد تحتاج اثنين من هذه اعتمادا على عدد المفاتيح الخاصة بك لعبة العزف على البيانو لديه.
- كابل USB
- شريط لاصق على الوجهين
- برنامج اردوينو. يستخدم البرنامج اردوينو لبرمجة مجلس اردوينو لنفعل ما نريد أن تفعله. هذا هو متاحة بحرية على الصفحة اردوينو البرمجيات ويمكن تشغيلها على OS X و Windows و Linux. سوف تحتاج أيضا إلى تحميل مكتبة MIDI اردوينو.
- المسلسل إلى MIDI والظاهري البرامج ميناء ميدي. سوف تحتاج بعض البرامج التسلسلي ل-MIDI لتحويل الرسائل الواردة من اردوينو إلى رسائل MIDI. أوصي مجانا بلا شعر MIDI إلى تطبيق جسر المسلسل، ولكن هناك عدد من الآخر متاح. سوف تحتاج أيضا إلى استخدام منفذ MIDI الظاهري لربط مخرجات بلا شعر لمدخلات شعبة النهوض بالمرأة أو MIDI الصك. لهذا فإنني أوصي loopMIDI على ويندوز، أو على OS X يمكنك استخدام المدمج في سائق IAC. بدلا من ذلك، فمن الممكن ل
- MIDI برنامج. أنت
Step 1—Prepare your Piano
قبل أن تتمكن من البدء في إدخال الالكترونيات إلى البيانو الخاص بك، فإنك تحتاج إلى إزالة قضبان الصوت، أو تعديلها بحيث يمكنك تحميل piezos لهم. وقد فسدت مجموعة من القضبان في بلدي البيانو على الجانب السفلي من أعلى، ولذا فإنني ببساطة مفكوك لهم لإزالتها، ثم مشدود في كتلة من الخشب أن أتمكن من ربط أجهزة الاستشعار بيزو ل. ومن شأن خيار بديل يتمثل في إصلاح قطعة رقيقة مسطحة من مادة (على سبيل المثال، من الورق المقوى والخشب) على الجانب السفلي من قضبان أن piezos يمكن أن تكون ثابتة ل، ولكن قد تجد أنه من الصعب أن نعلق شيئا لقضبان، بالإضافة إلى أنك قد تجد أيضا فإن قضبان تحصل في الطريق عند محاولة إدراج الالكترونيات.
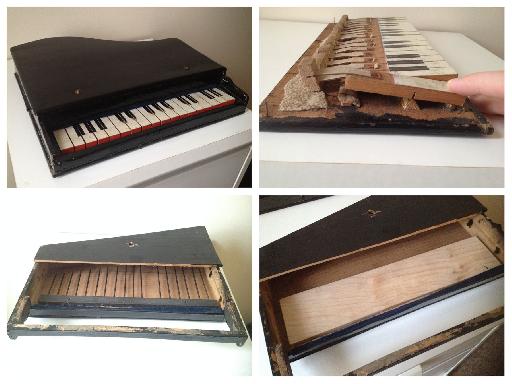
من عقارب الساعة أعلى اليسار
تعديل آخر قد تحتاج إلى القيام به لالبيانو الخاص بك هو إضافة لارتفاع / نقطة على سطح المطرقة التي تضرب piezos. إذا كان رؤساء المطرقة هي أوسع من الدائرة الداخلية للpiezos أنها قد لا تؤدي أجهزة الاستشعار بشكل صحيح، لذلك للتغلب على هذه المشكلة مع بلدي البيانو I مسجلة كرات صغيرة من القصدير على المطارق لإنشاء نقطة أثارها.
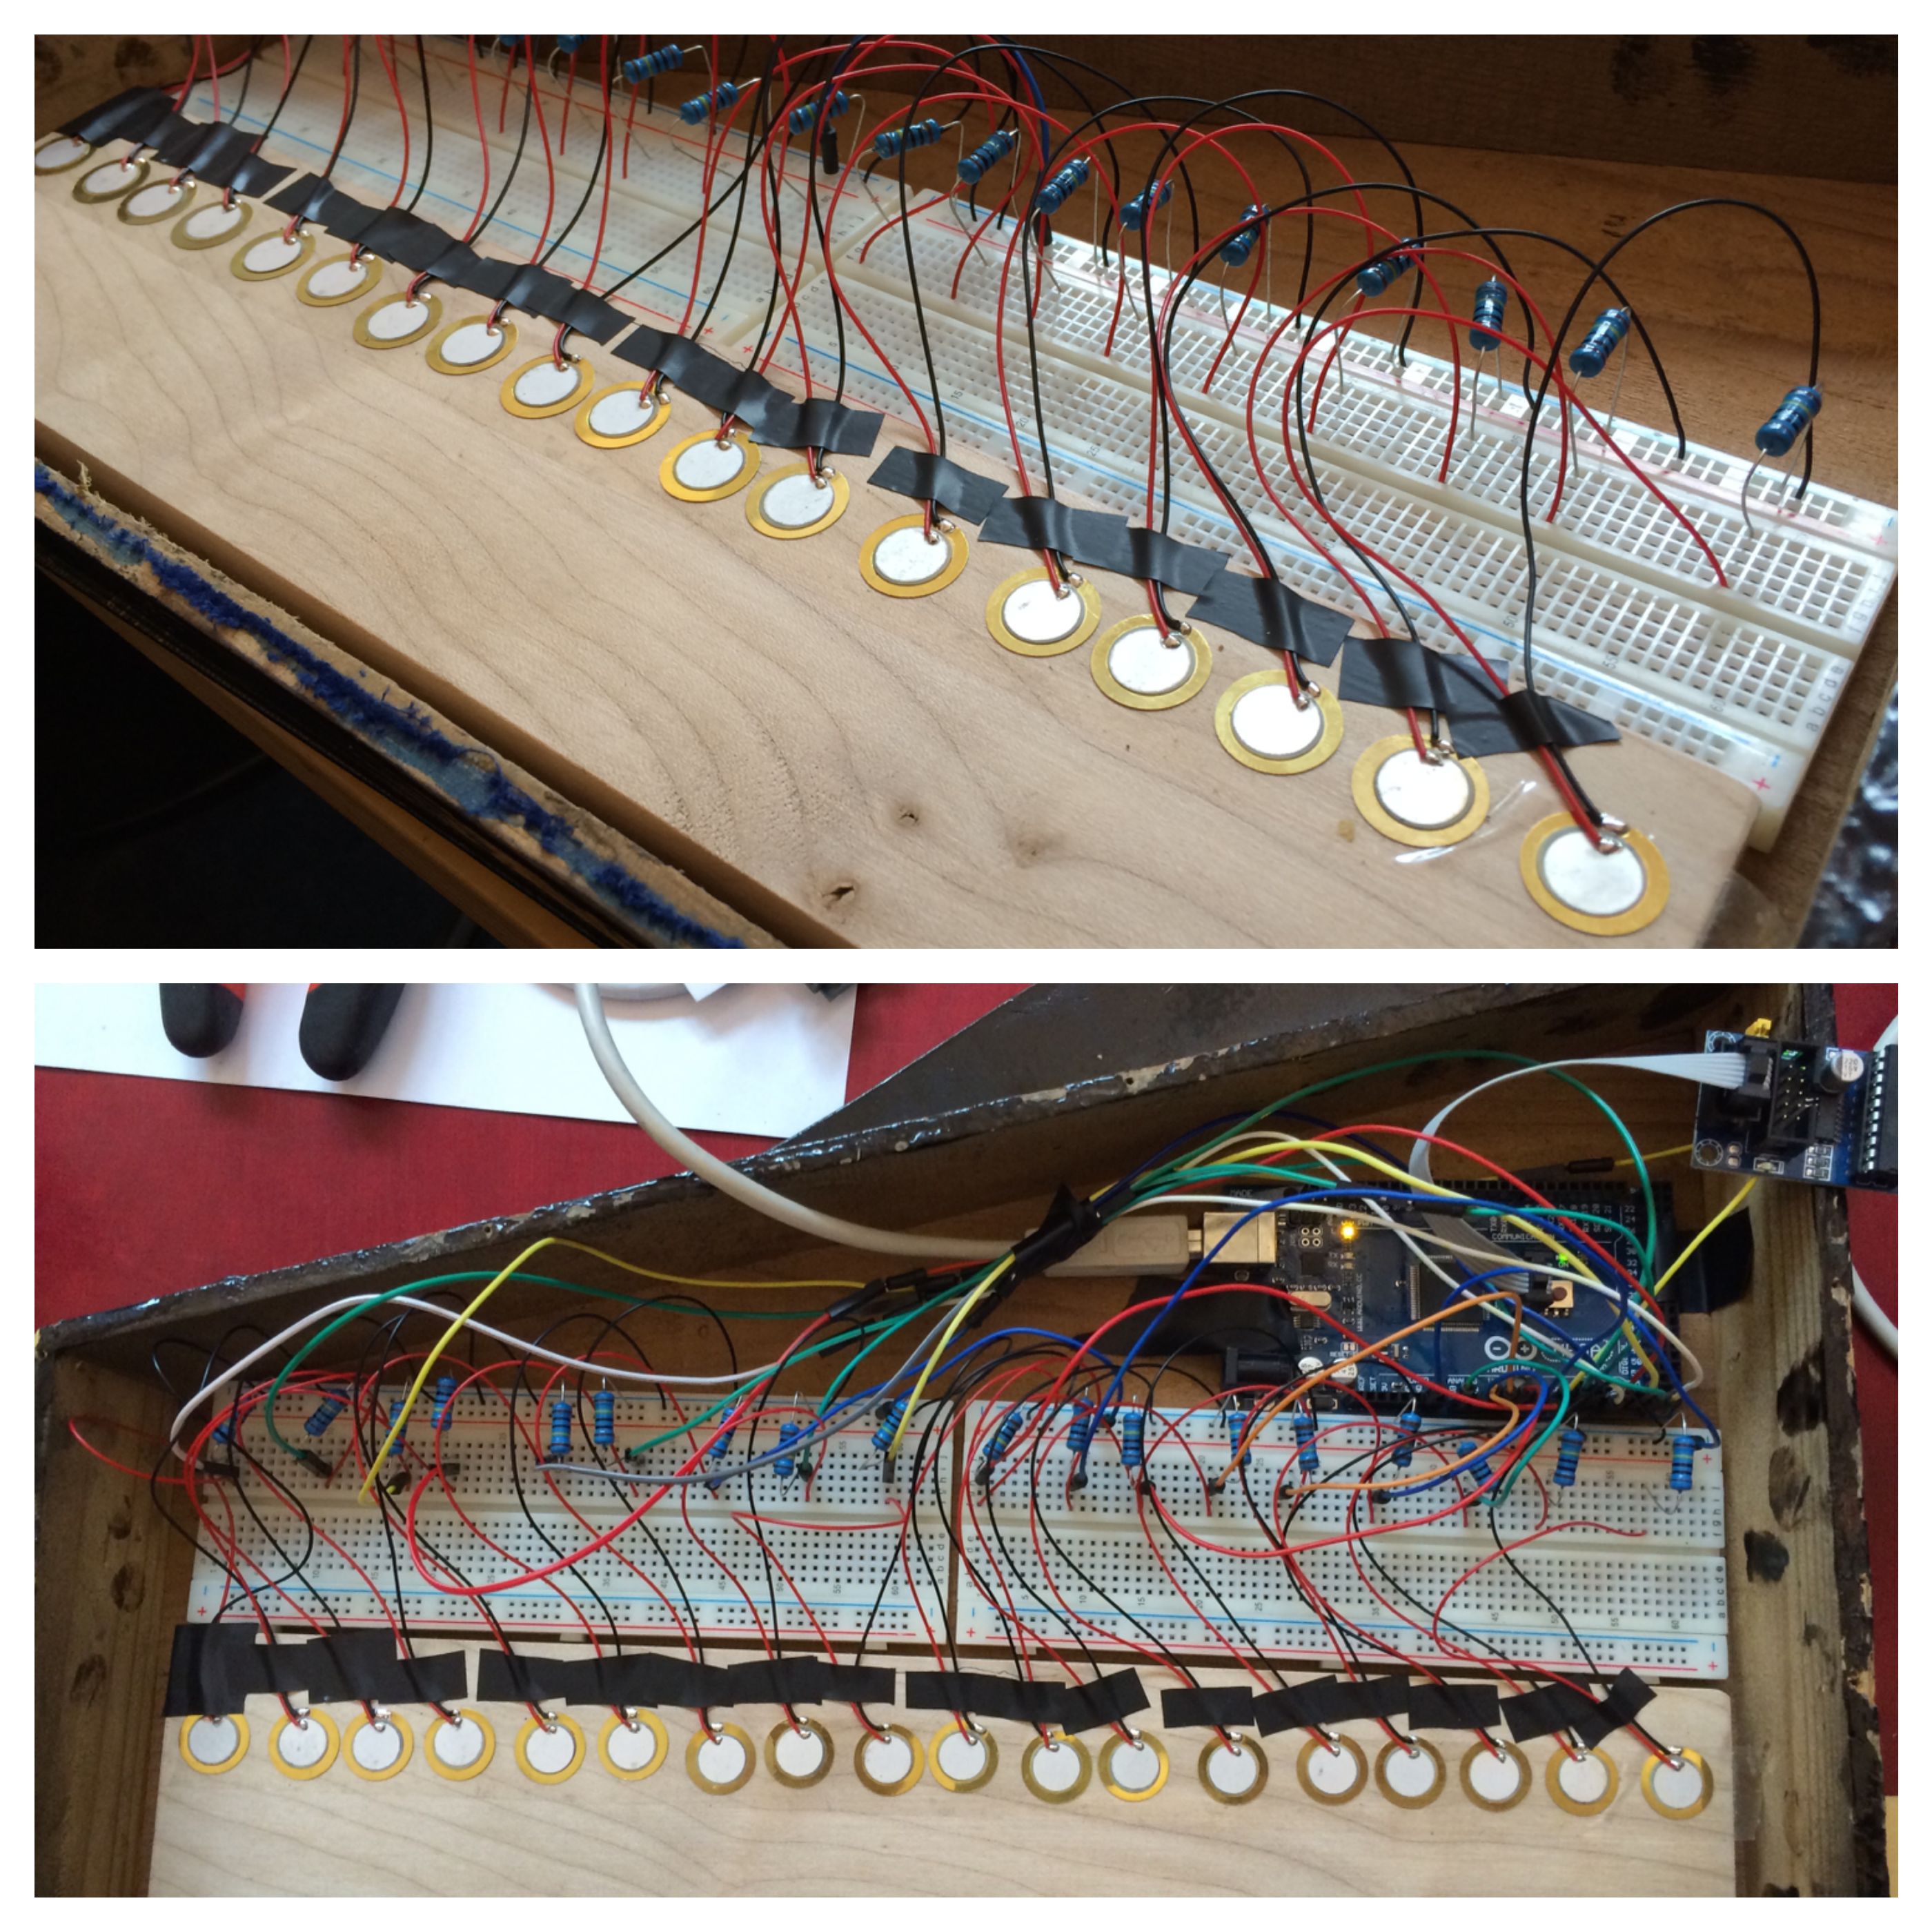
Step 2—Attach the Piezos
ونحن الآن في وضع أجهزة الاستشعار بيزو على الجانب السفلي من أعلى البيانو حيث أن آليات مطرقة عادة ضرب قضبان الصوت عند الضغط على المفاتيح. إذا البيانو الخاص بك هو المصنوعة يدويا مثل الألغام، وسوف تجد على الأرجح أن المطارق ارين
بمجرد
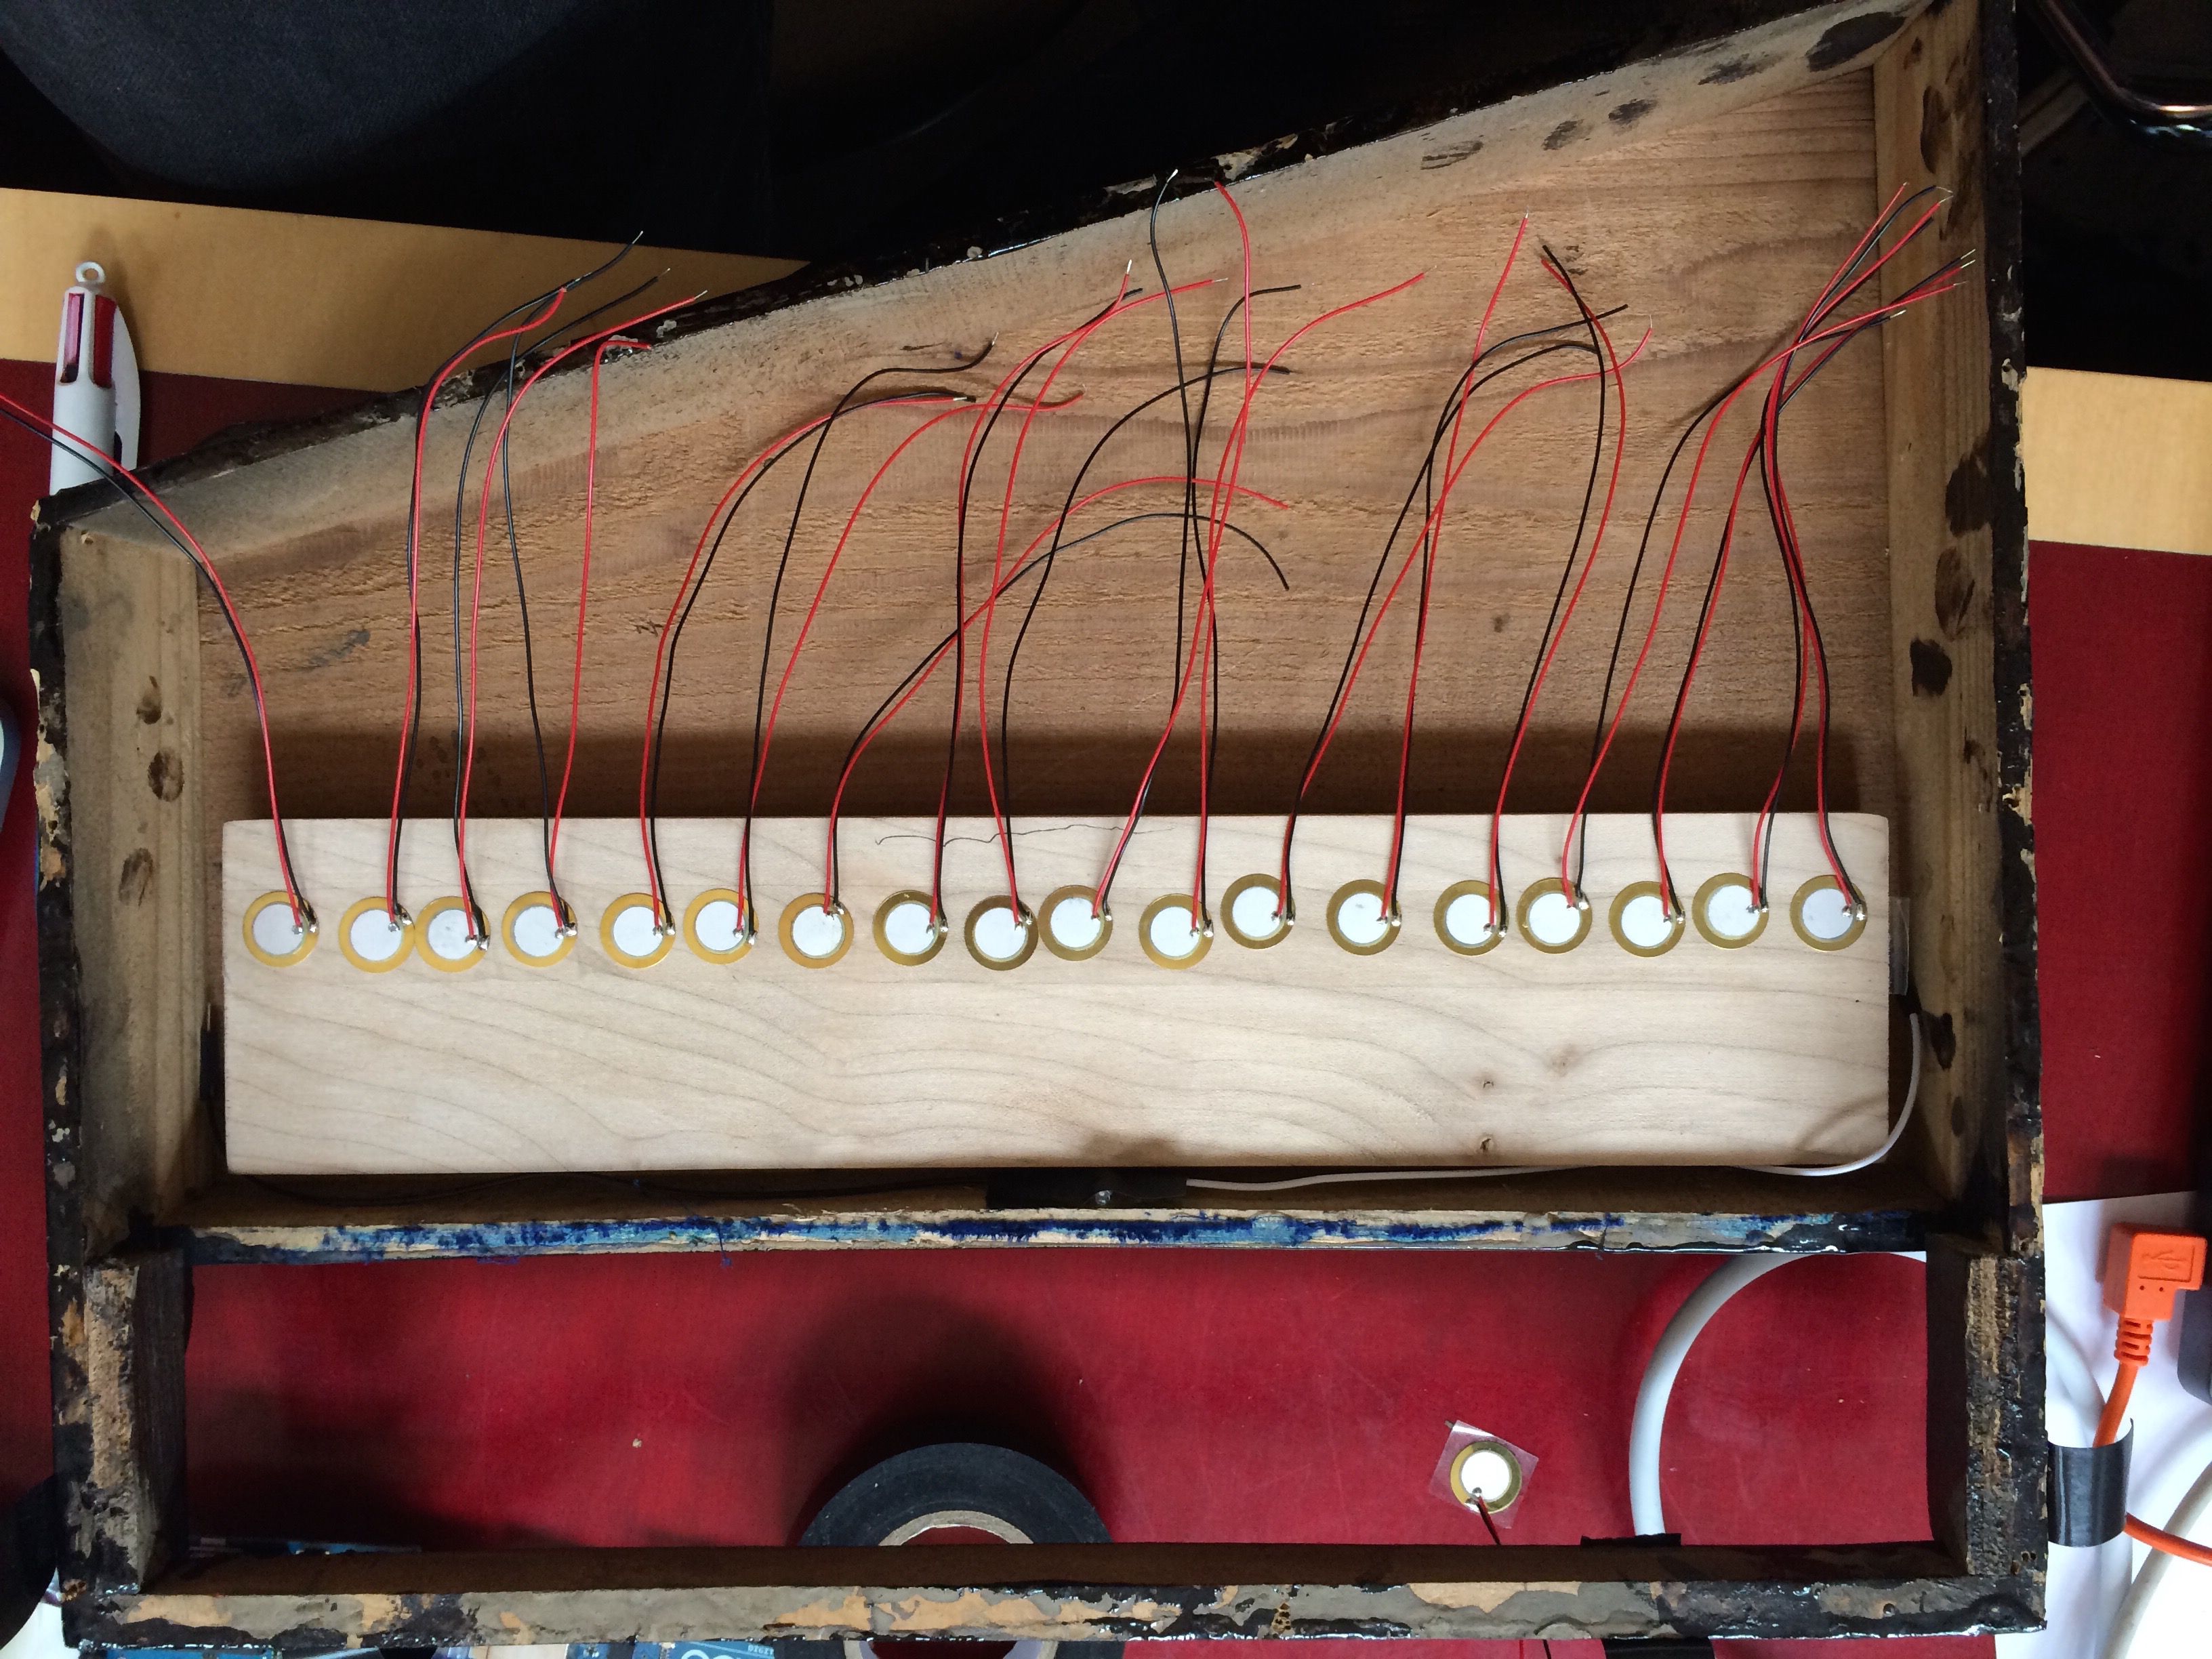
أجهزة الاستشعار بيزو المرفقة
Step 3—Complete the Circuitry
من أجل استكمال الدوائر تحتاج أولا إلى إرفاق اللوح / ثانية واردوينو متنها إلى داخل البيانو. إذا فتح البيانو الخاص بك من الأسفل كما فعل الألغام وربما كنت بحاجة إلى عصا لوحات على الجانب السفلي من أعلى، ولكن إذا كان يفتح على البيانو من أعلى يمكن ربما كنت إكمال المشروع مجرد وضع لوحات في أسفل دون الحاجة إلى عصا عليهم. وضع اللوح / ث الأقرب إلى piezos، مع اردوينو على الجانب الآخر.
القادمة التي تحتاج إلى إرفاق المكونات إلى اللوح / ثانية. هناك قسمين رئيسيين لمعظم الألواح (كما هو موضح في الرسم البياني التالي)
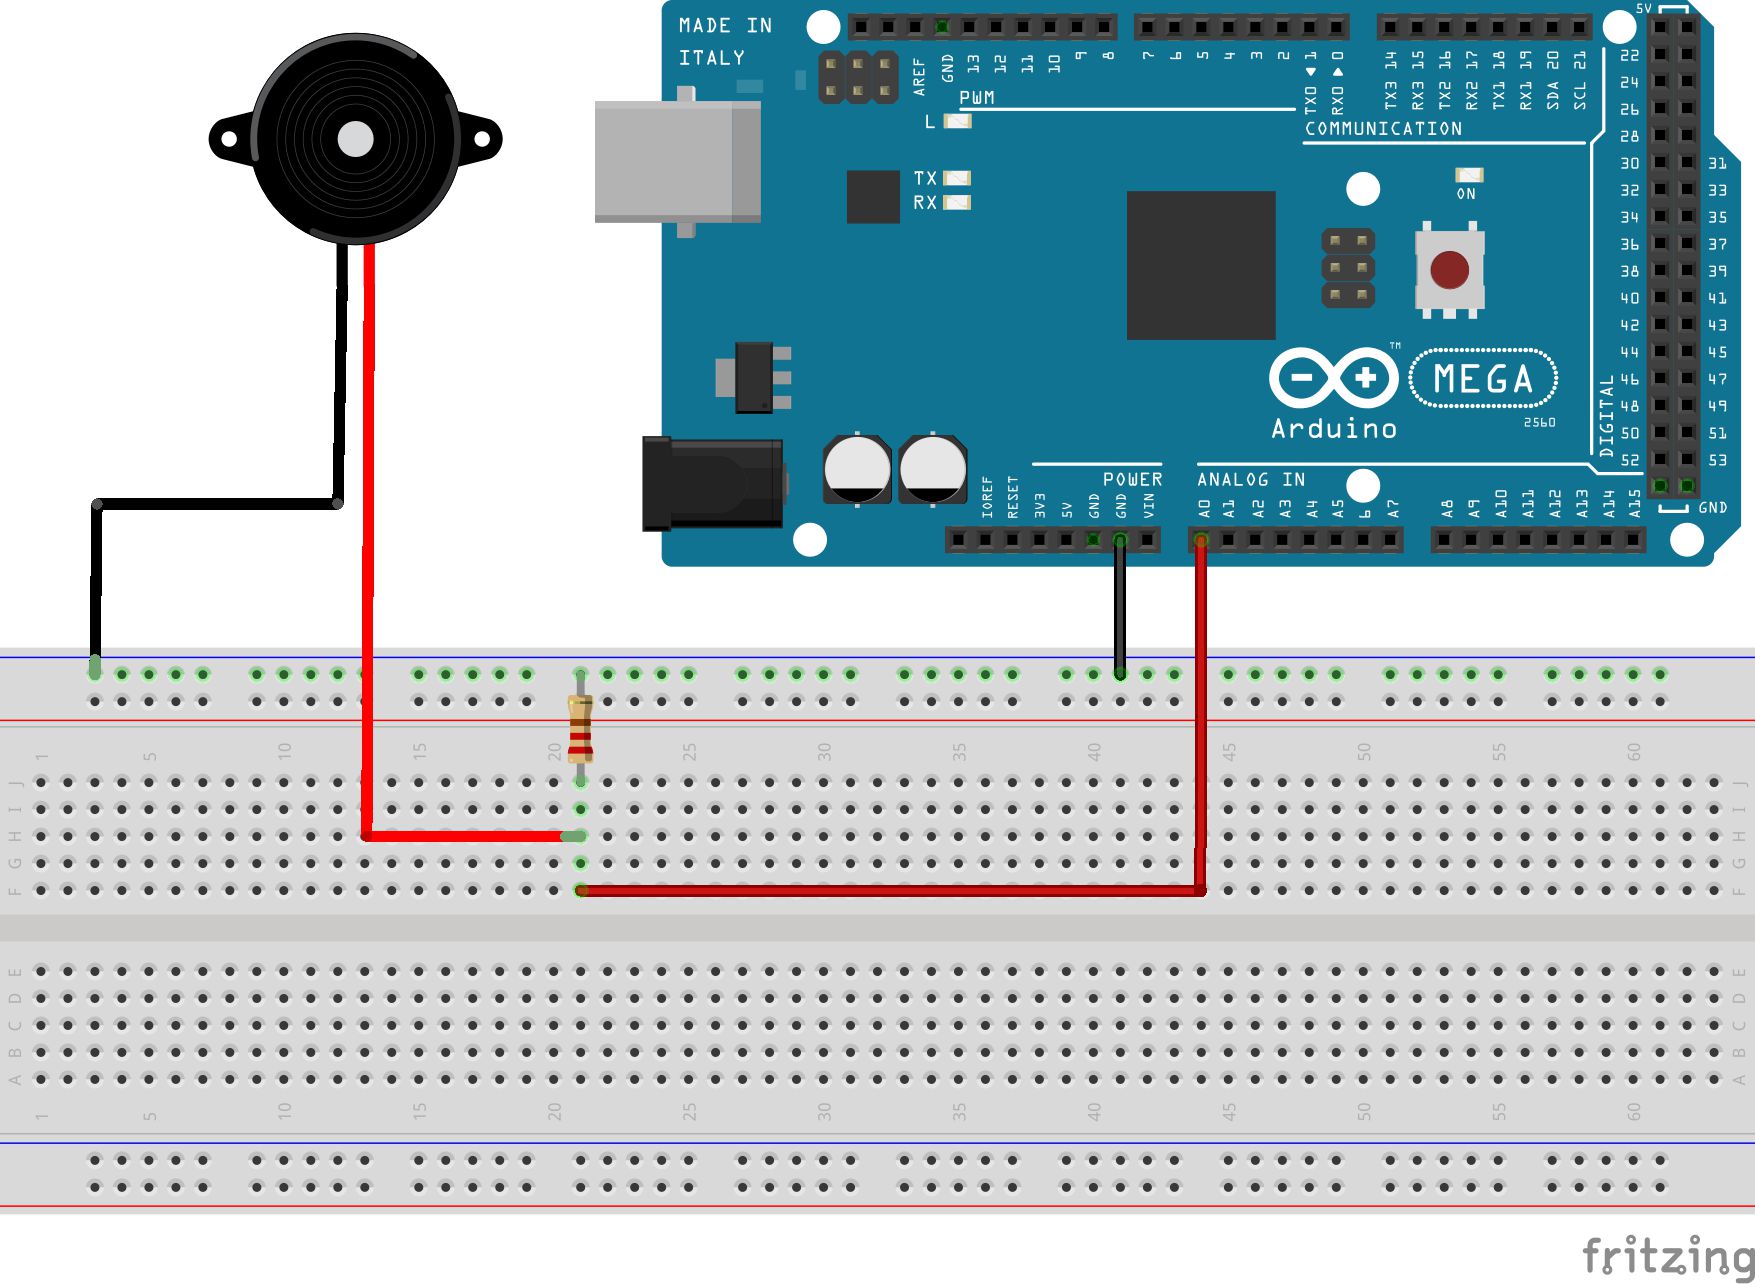
كيفية توصيل جهاز استشعار بيزو واحد إلى لوحة اردوينو
كما هو معروض في الرسم البياني السابق، لكل بيزو / مفتاح، والأسود (الأرض) سلك من بيزو يجب أن تكون متصلا إلى واحدة من شرائح حافلة الأرض، في حين أن اللون الأحمر (إشارة) سلك يجب أن تكون متصلا إلى واحد من محطة شرائط. ثم تحتاج إلى توصيل المقاوم (في أي اتجاه) من قطاع محطة لقطاع أرض الواقع؛ سلك من قطاع المحطة إلى واحدة من دبابيس مدخلات تناظرية على اردوينو، وسلك آخر من قطاع الأرض إلى واحد من المسامير الأرض. ثم تحتاج إلى تكرار هذه الدائرة لكل بيزو، وذلك باستخدام شريط محطة مختلفة واردوينو المدخلات التناظرية دبوس في كل مرة، كما هو موضح في الرسم البياني التالي.
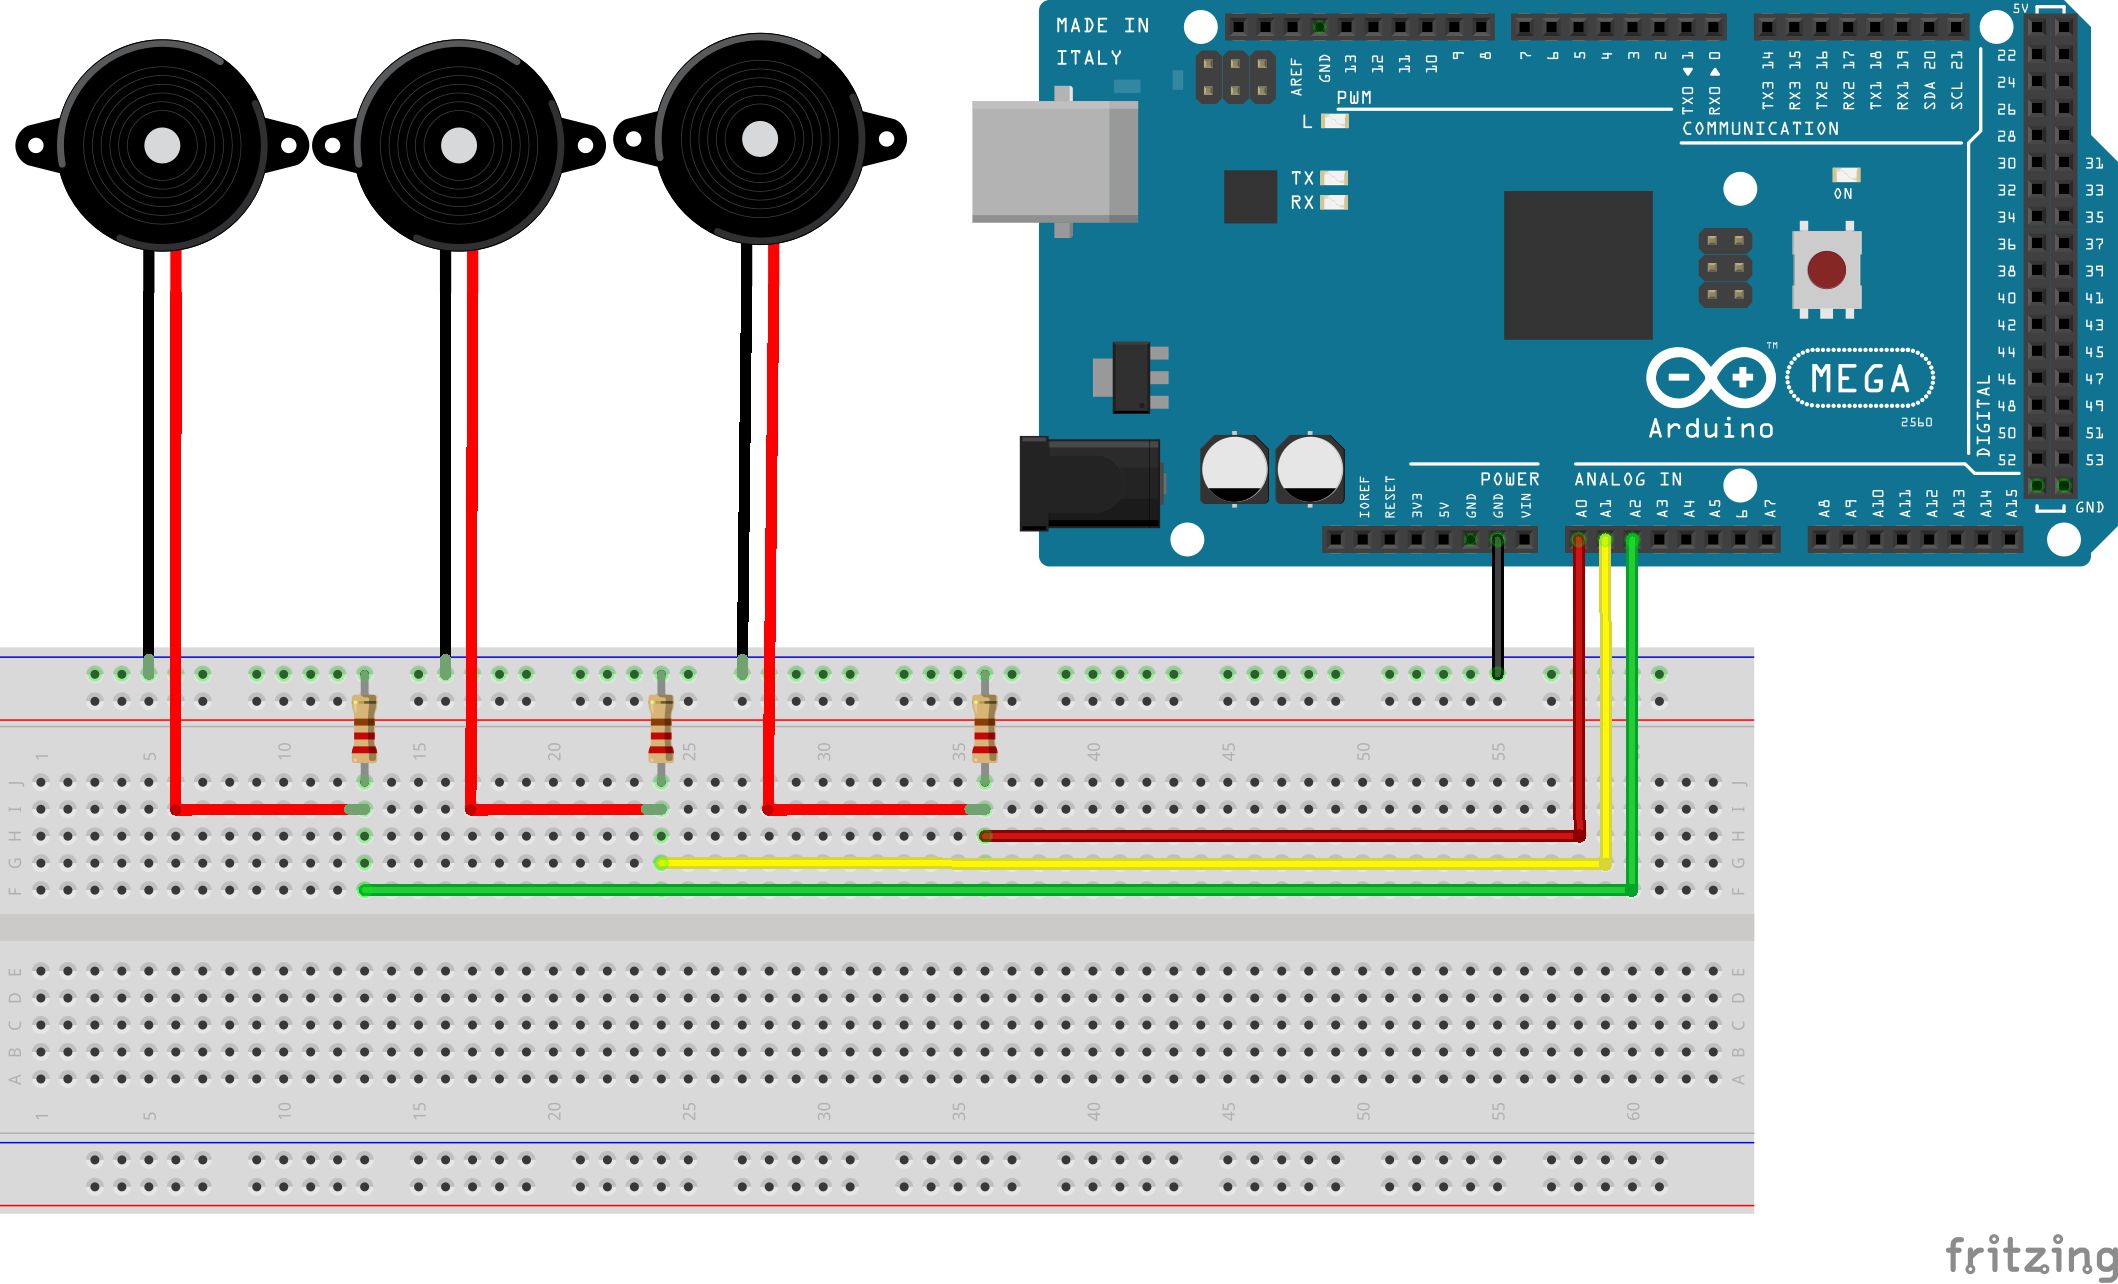
كيفية ربط أجهزة الاستشعار بيزو متعددة للوحة اردوينو
أوصي باستخدام الأسلاك لون مختلف لكل اتصال مدخلات تناظرية، وهذا يجعل من السهل أن نرى ما
أعلى
Step 4—Edit and Upload the Code
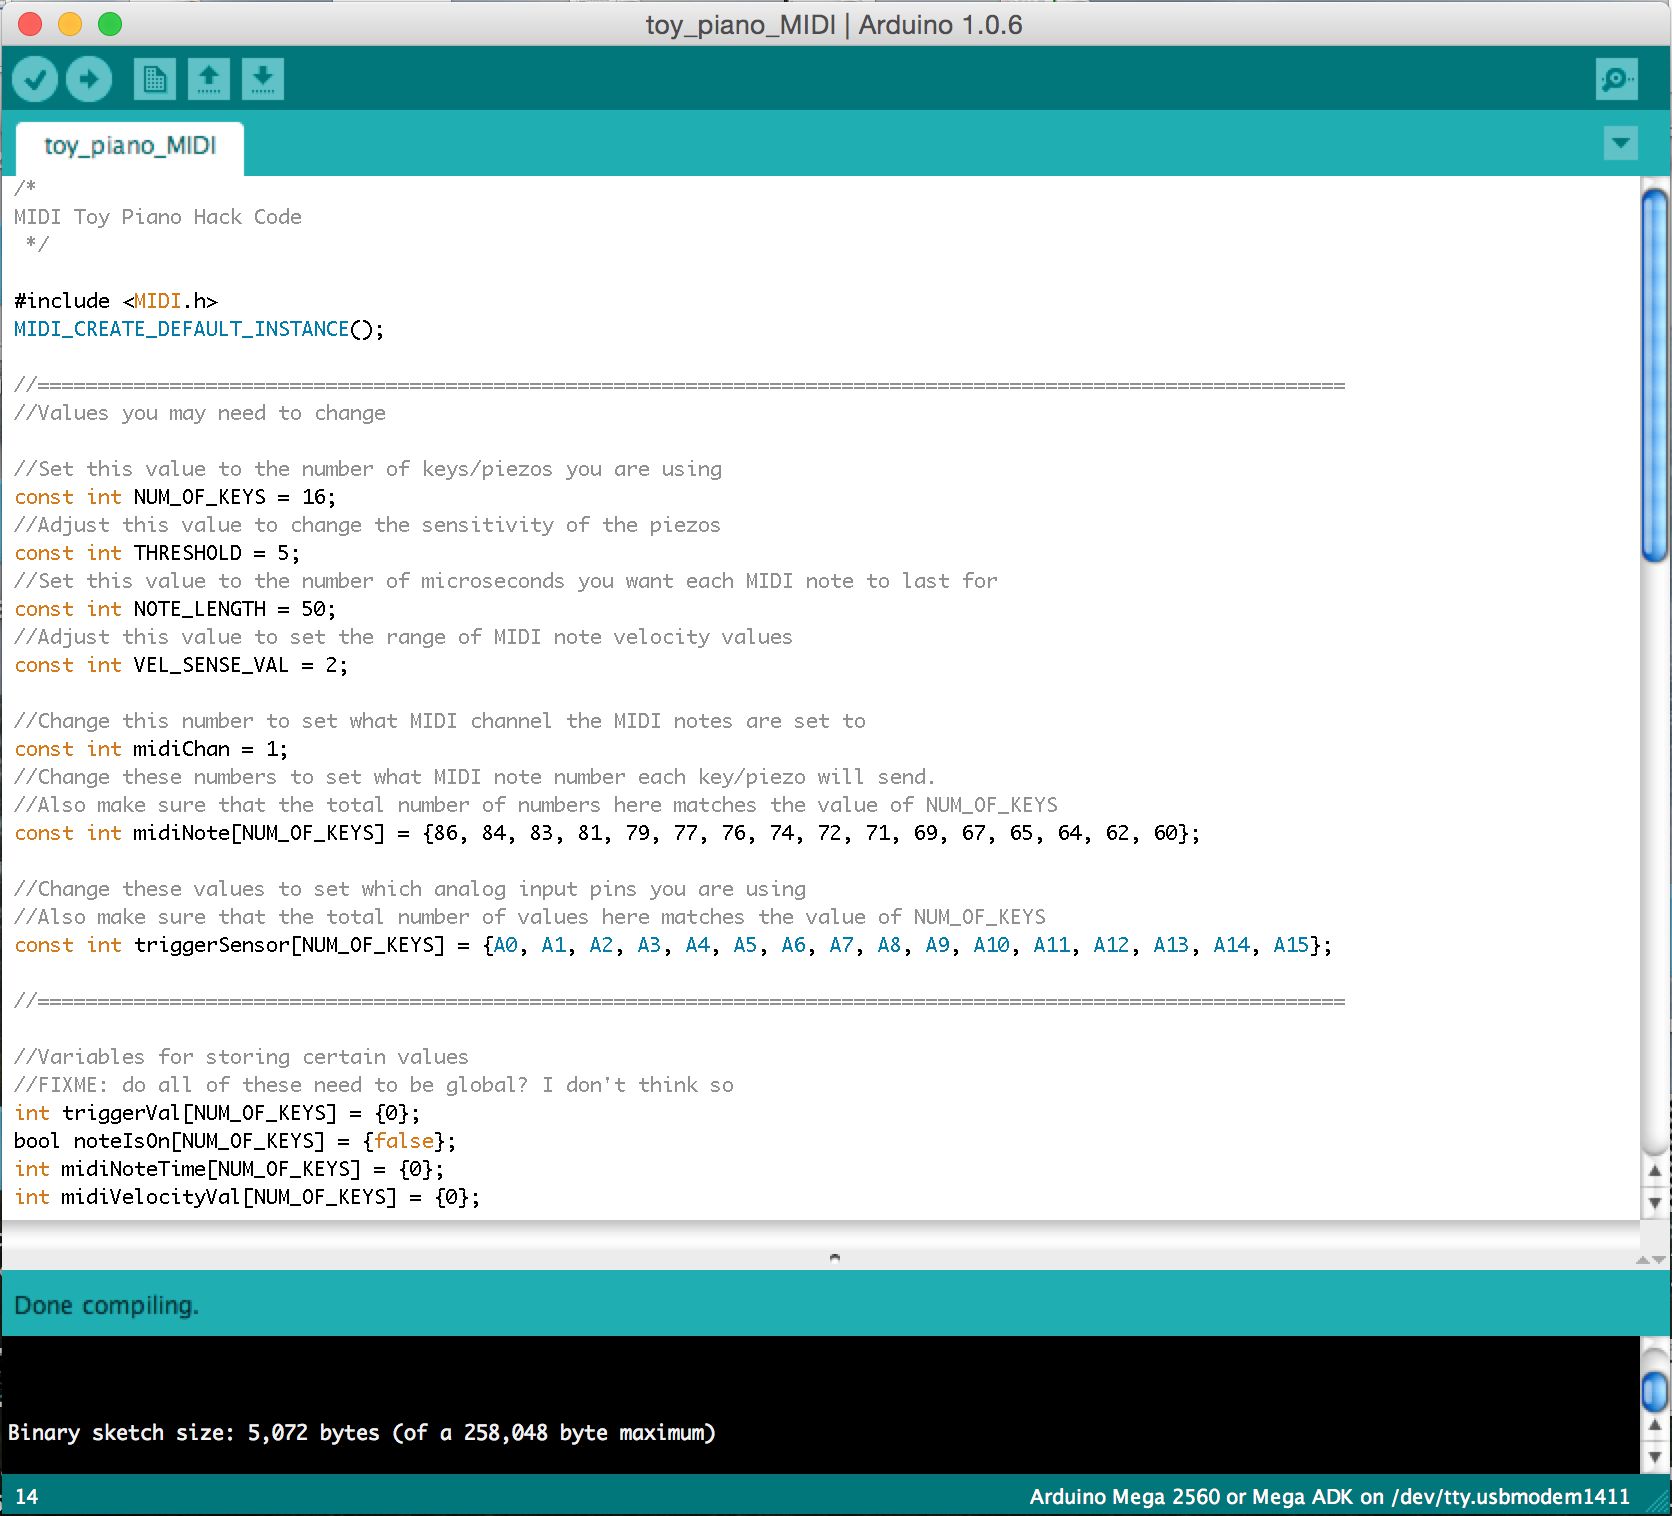
بعد الأجهزة والإلكترونيات كاملة، ثم تحتاج إلى تحميل بعض البرامج لمجلس اردوينو من شأنها أن تحول قراءات من piezos في الملاحظات MIDI. وبمجرد الانتهاء من تحميل وتثبيت كل من برنامج اردوينو ومكتبة MIDI اردوينو، افتح تطبيق اردوينو ونسخ الشفرة ادناه الى محرر النصوص اردوينو:
/*
MIDI Toy Piano Hack Code
*/

#include
MIDI_CREATE_DEFAULT_INSTANCE();

//========================================================================================
//Values you may need to change

//Set this value to the number of keys/piezos you are using
const int NUM_OF_KEYS = 16;
//Adjust this value to change the sensitivity of the piezos
const int THRESHOLD = 5;
//Set this value to the number of microseconds you want each MIDI note to last for
const int NOTE_LENGTH = 50;
//Adjust this value to set the range of MIDI note velocity values
const int VEL_SENSE_VAL = 2;

//Change this number to set what MIDI channel the MIDI notes are set to
const int midiChan = 1;
//Change these numbers to set what MIDI note number each key/piezo will send.
//Also make sure that the total number of numbers here matches the value of NUM_OF_KEYS
const int midiNote[NUM_OF_KEYS] = {86, 84, 83, 81, 79, 77, 76, 74, 72, 71, 69, 67, 65, 64, 62, 60};

//Change these values to set which analog input pins you are using
//Also make sure that the total number of values here matches the value of NUM_OF_KEYS
const int triggerSensor[NUM_OF_KEYS] = {A0, A1, A2, A3, A4, A5, A6, A7, A8, A9, A10, A11, A12, A13, A14, A15};

//=======================================================================================

//Variables for storing certain values
int triggerVal[NUM_OF_KEYS] = {0};
bool noteIsOn[NUM_OF_KEYS] = {false};
int midiNoteTime[NUM_OF_KEYS] = {0};
int midiVelocityVal[NUM_OF_KEYS] = {0};

void setup()
{
    MIDI.begin(MIDI_CHANNEL_OMNI);
}

void loop()
{
    //repeat the below code for each anaolog input/piezo sensor
    for (int count; count < NUM_OF_KEYS; count++)
    {
        //read the piezo value
        triggerVal[count] = analogRead(triggerSensor[count]);

        //if the value is over the threshold and there isn't currently a note on for this piezo
        if (triggerVal[count] > THRESHOLD && noteIsOn[count] == false)
        {
            //get a velocity value based on the value
            midiVelocityVal[count] = triggerVal[count] * (127.0/1023.0);

            //increase sensitivity
            midiVelocityVal[count] *= VEL_SENSE_VAL;

            //make sure we don't go out of range
            if (midiVelocityVal[count] > 127)
            midiVelocityVal[count] = 127;

            //send a MIDI note-on message
            MIDI.sendNoteOn (midiNote[count], midiVelocityVal[count], midiChan);

            //flag that the note is on
            noteIsOn[count] = true;

            //start a timer for the note to be on for
            midiNoteTime[count] = NOTE_LENGTH;
        }

        //if the note is currently on
        if (noteIsOn[count] == true)
        {
            //reduce the time value by 1
            midiNoteTime[count]--;

            //if time value equals 0
            if (midiNoteTime[count] == 0)
            {
                //turn off the note
                MIDI.sendNoteOff (midiNote[count], 0, midiChan);
                noteIsOn[count] = false;
            }

        }

    }

    //pause the loop
    delay(1);
}
تعليمك كيفية استخدام البرنامج اردوينو وكيفية رمز قليلا خارج نطاق هذا المقال، لذلك أنا
- NUM_OF_KEYS
- العتبة
- NOTE_LENGTH
- VEL_SENSE_VAL
- midiChan
- midiNote
- triggerSensor
برنامج اردوينو
بمجرد
- توجه إلى
- ربط مجلس اردوينو إلى جهاز الكمبيوتر الخاص بك عن طريق USB.
- توجه إلى
- توجه إلى
- توجه إلى
يرجى ملاحظة
Step 5—Connect the Software
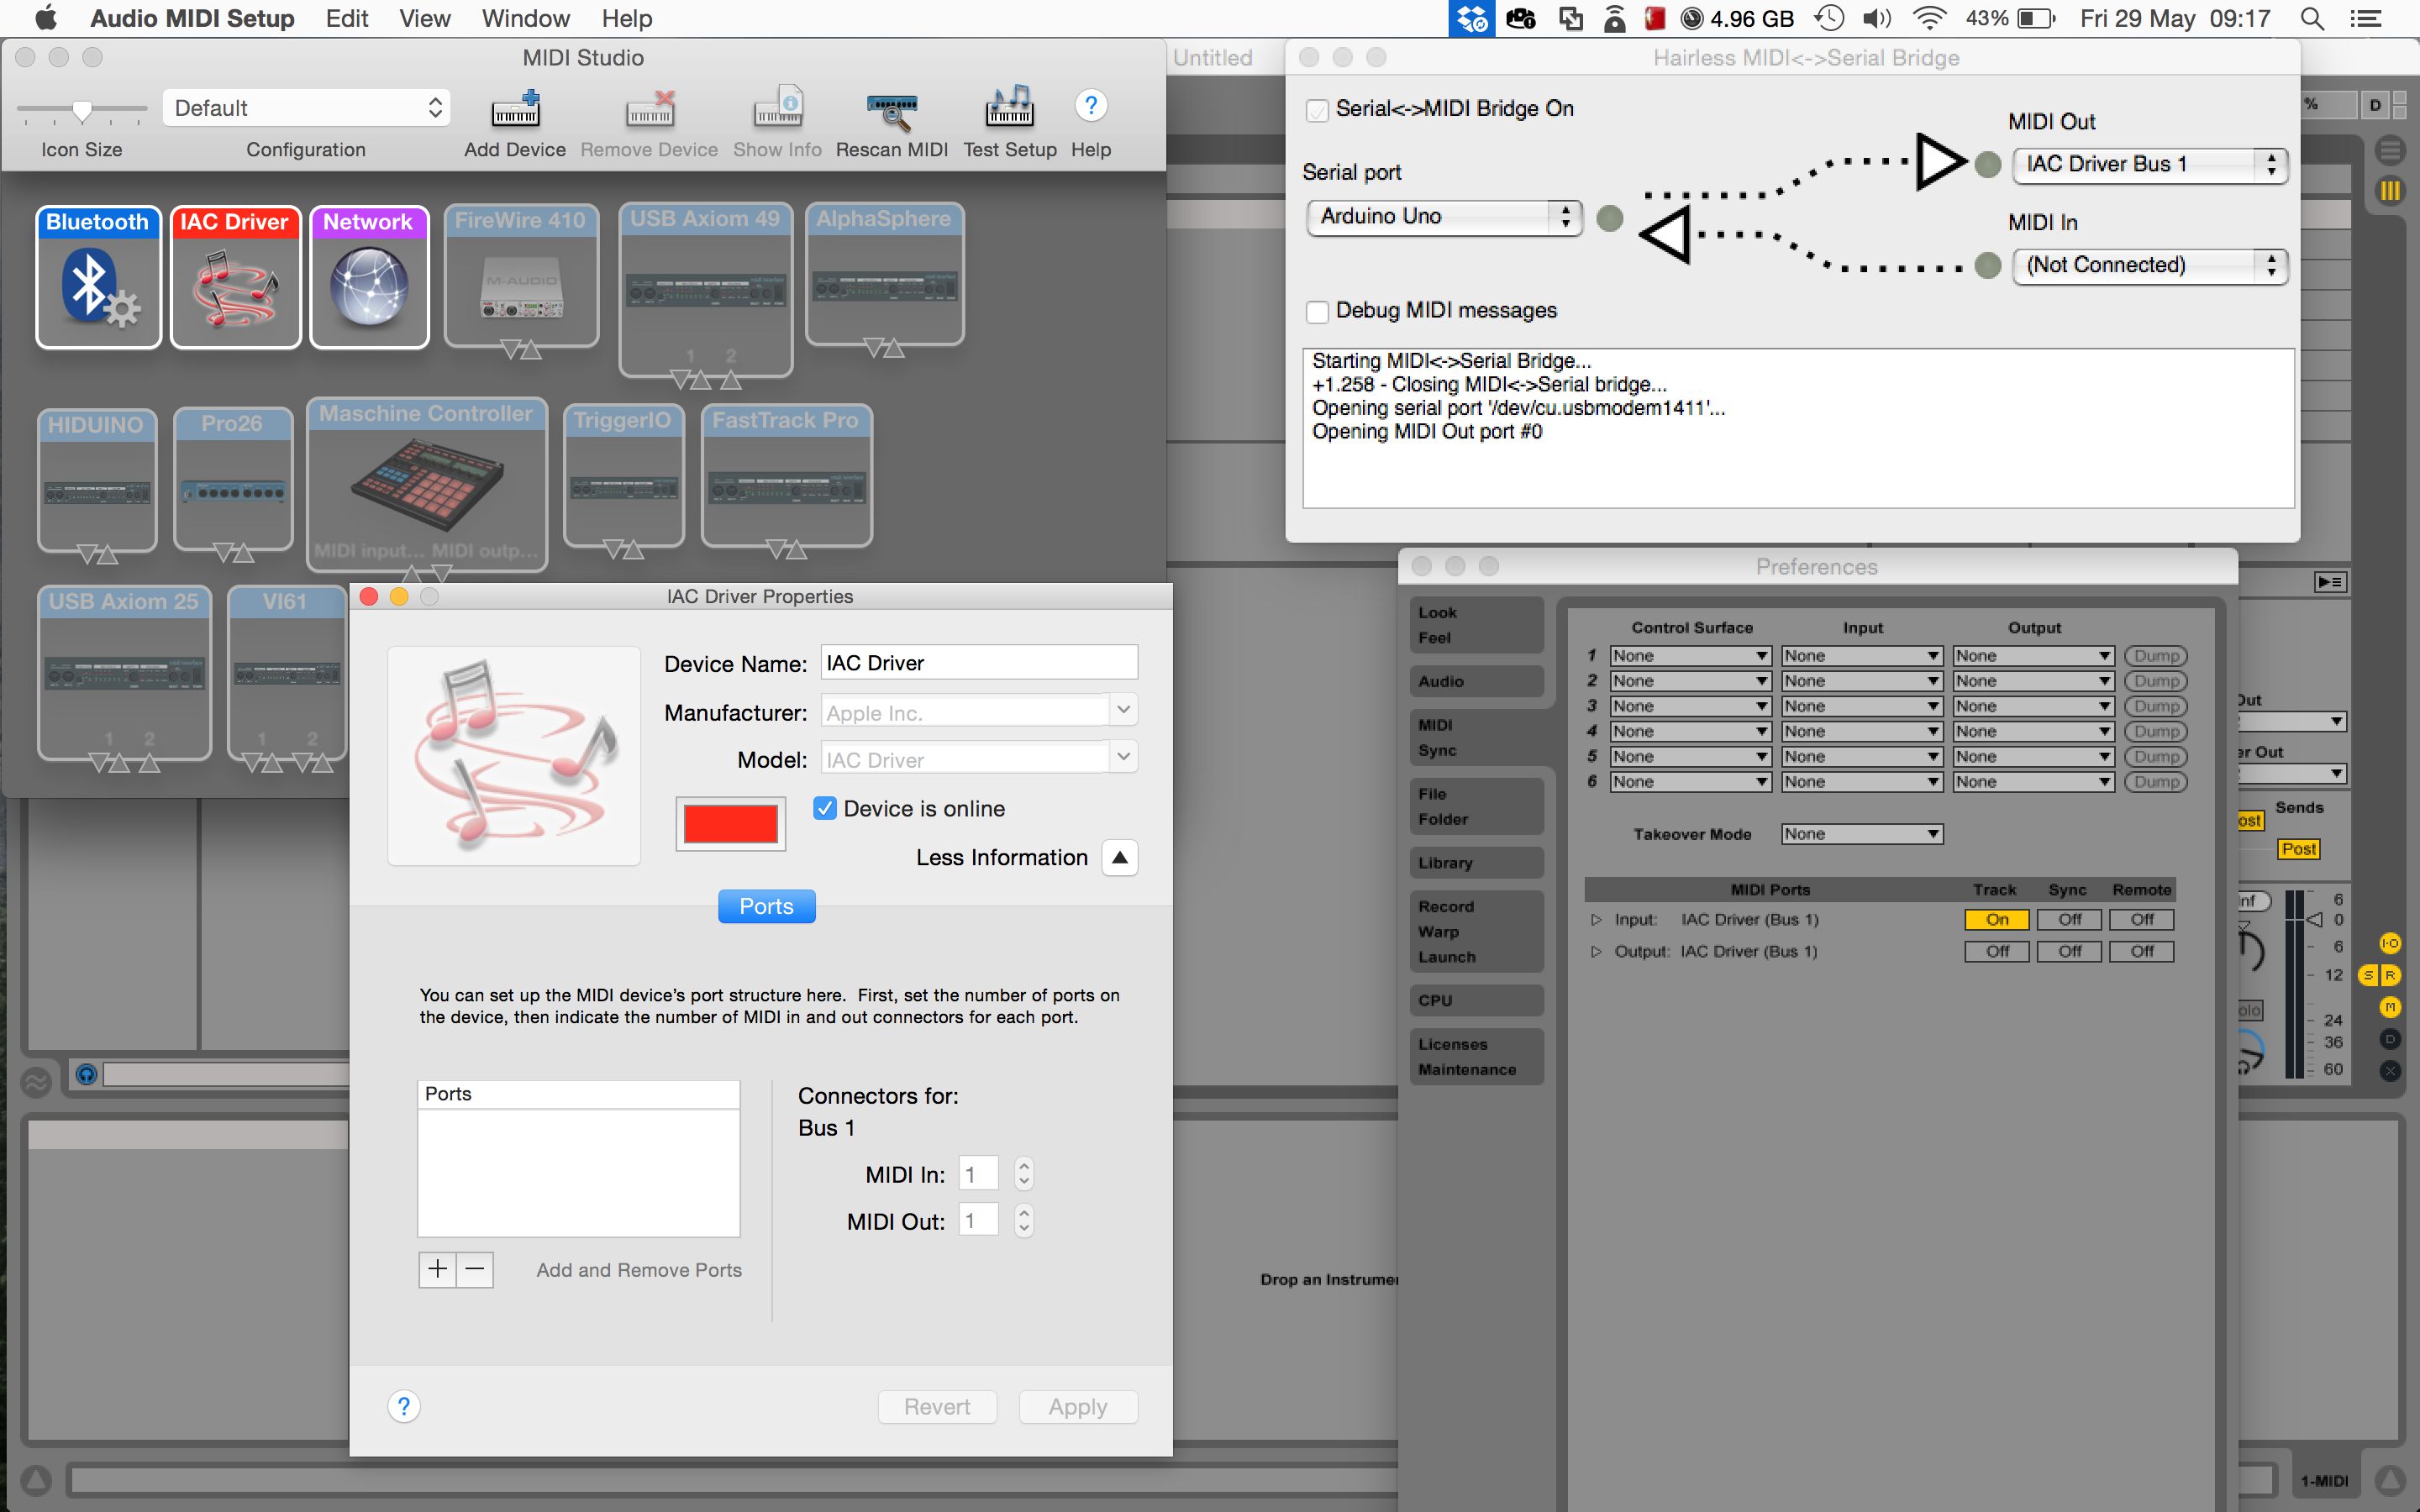
اليسار: إنشاء ميناء ميدي ظاهري على OS X. أعلى اليمين: تكوين بلا شعر MIDI إلى جسر المسلسل. أسفل اليمين: توصيل إلى ميناء ميدي الظاهري في ابلتون الحياة.
أخيرا تحتاج إلى إطلاق وربط جميع البرامج المطلوبة على جهاز الكمبيوتر الخاص بك:
إعداد منفذ MIDI الظاهري:
إذا كنت على ويندوز:
- فتح loopMIDI
- اضغط على
- ترك تطبيق قيد التشغيل
إذا كنت على OS X:
- إطلاق
- توجه إلى
- انقر مرتين على
- تأكد من أن
- إغلاق التطبيق
اتصال بلا شعر MIDI-إلى-المسلسل جسر لاردوينو وميناء ميدي الظاهري:
- إطلاق الصلعاء
- من ناحية اليسار ضبط الجانب ل
- على اليد اليمنى ضبط الجانب ل
- تأكد من أن
- ترك تطبيق قيد التشغيل
يوصلك البرنامج أداة شعبة النهوض بالمرأة / MIDI إلى ميناء الظاهري:
- إطلاق شعبة النهوض بالمرأة أو MIDI الصك
- تحتها
يرجى ملاحظة - إذا تم اختراق اردوينو مع HIDUINO، الخطوات 1 و 2 دون
مرة واحدة وقد تم الانتهاء من هذا يجب أن تكون الآن قادرة على تحريك الملاحظات من أدوات MIDI الخاص بك مع لعبة العزف على البيانو.
مشاهدة عرض فيديو قصير من لعبة العزف على البيانو تحكم MIDI الصوتية في العمل:
Conclusion
لهذا السبب
أيضا، إذا كنت مثيرة للاهتمام في المشاركة في هذا الحدث MIDI هاك المقبل، إبقاء العين على موقع MIDI هاك للإعلانات. هناك أيضا بضعة مماثلة hackathons الموسيقى التكنولوجيا التي تقام سنويا في جميع أنحاء العالم، مثل الموسيقى Hackday والموسيقى تك مهرجان، فضلا عن مختلف لمرة واحدة والأحداث المحلية.

Discussion
You could connect a different type of sensor or electronic source and get results without changing the code, however it will only create a note based on the first reading it gets over the threshold (due to the logic implemented for turning piezo inputs into MIDI notes). Using just electrical current to trigger a reading would be very similar to using a simple push button (where pressing the button completes the circuit and creates a reading), so I'd recommend looking at Arduino button tutorials for that.
It sounds like your piezo sensors are not properly connected to the Arduino. Check that they are connected to the correct pins. You may also need to correct the value of NUM_OF_KEYS in the code if you are using less than 16 sensors/keys. You may also need to up the value of THRESHOLD in the code if your piezos are particularly sensitive.
thanks for answering me so fast , I'll check that the wires are connected correctly, I have another doubt about the code it in the end you said : "repeat the below code for each anaolog input/piezo sensor", and I 'm trying to do with a arduino uno with only 3 pins I changed all that you said , but the end I do not know where to get the code to be copied to each piezo I have and also do not know where it ends.
look I change this:
NUM_OF_KEYS = 3;
midiNote[NUM_OF_KEYS] = {86, 84, 83}
triggerSensor[NUM_OF_KEYS] = {A0, A1, A2}
IN THIS PART I WILL NEED TO PUT SOME NUMBER? -> (int count; count < NUM_OF_KEYS; count++)
Im sorry for all this question but im very lost with this and thank you so much for your help and sorry for my english.
Im from Brasil.
NUM_OF_KEYS, midiNote, and triggerSensor are the only values you need to change, which you have correctly done. The "repeat the below code for each anaolog input/piezo sensor" comment is actually a description of what the below 'for' loop does, rather than being an instruction. You shouldn't have to change any code in that section for it to work.
Thank you so much, this time again made ​​the piezos cables and worked, thanks for your help I buy one arduino mega
and when it comes I gonna do with the 16 piezos.
please let me ask you one more question?! can I put on this project potentiometers or one pitch bend?
Glad you got it working.
If you want to attach something like a potentiometer you'll need to change the code for reading from that particular analogue input. However the code needed here is a lot simpler - see https://www.arduino.cc/en/Tutorial/AnalogReadSerial to lean how to do this.
_____
#include
____
He's answering me this
#include
^
exit status 1
#include expects "FILENAME" or
Do you have an idea?
Thanks,
Florent
Thanks for the kind words and for spotting this mistake.
The code above has now been updated to the correct version.
Thanks,
Liam.
Project = allow young people to explore (play) the out-of-reach pipe organ from a wireless-midi capable keyboard.
So far... I have an arduino, a wireless midi transmitter/receiver (Medeli WIMIDI - tested and quite surprised by performance), a breadboard (cables, female midi socket etc).
I want to connect the wireless midi transmitter to the out socket of the remote keyboard and the wireless midi receiver to the arduino (I need to solder connect to arduino via breadboard). With the arduino midi library I presume I will then be able to receive the incoming midi signal ? This is where it becomes tricky for me to ascertain next steps!... I then want to translate the midi in to individual note signals (much like what you have done in this article). Is this possible?
If this is doable, my last sticking point is how to get the individual note signals 'transferred' to the organ console. I have seen an article where someone attaches a solenoid for each note to a wooden board and then rests the board over the top of the organ keyboard. However, the organ we are planning to work on already has access to the rear of the keyboard and each note has a visible switch (2 cables to each note) on a low voltage (12v) system. Is it possible to intercept each of these switches with the arduino outputs for each note? My apologies if this is a stupid question!?
This is an awesome tutorial. It'll help me a lot with what I want to do cause the setting is similar but usage is completely different.
I wonder if the amount of the contact mics can be different? Is there any maximum we can connect?
Also, is it possible to use condenser mics instead of piezos, possibly with a little trick?? Otherwise do you have any suggestions of how I can do it?
Thanks a lot!
The number of piezo sensors you can connect depends on the number of analog inputs that your microcontroller has e.g. on an Arduino Mega you have 16 analog inputs. However it is possible to expand this number using multiplexer components - see https://playground.arduino.cc/Learning/4051. There are also Arduino IO expander shields that can do this for you.
Regarding using consider mics instead, the extra complexity depends on whether you are just trying to detect a sound level, or trying to capture actual sound data. For just detecting sound levels see http://www.learningaboutelectronics.com/Articles/Arduino-microphone-circuit.php as an example, however recording actual audio is more complex (e.g. see http://www.instructables.com/id/Arduino-Audio-Input/).
Thanks a lot for your answer.
I have an Ard.Mega and I indeed only need to use them to retrieve vibration data - not sound.
Do you think I can use your setup the same, but differ the code to make it receive only vibration level - say from 0 to 100? In that case, would you mind sharing how the code shall be?
Many thanks.
I had a question. You used 18 piezo. But the Arduino mega allows only 16 input. What ambi missing?
""""const int THRESHOLD = {5,6,8,4,2,5,7,8,5,6};""""
What is the highest treshold value ?
Can you please tell me how i can separately change treshold, and limit the maximum & minumum velocity of each individual piezo?
If possible, write me another command line where i can adust the time amount for the gap between two stroke to avoid double triggering problem.
Thank you.
The highest value a piezo sensor can send using an Arduino is 1023, so threshold values could be anything up to this.
If you just want to 'clip' limit the velocity value, you could change the values on lines 'if (midiVelocityVal[count] > 127) midiVelocityVal[count] = 127;' to set a lower max value, and you could do the same kind of thing for the minimum limit e.g. 'if (midiVelocityVal[count] < 10) midiVelocityVal[count] = 10;'.
To limit how often a stoke can happen you could use the Arduino Millis Library (https://www.arduino.cc/en/Reference/Millis) to store a time for every stoke and then only process a new stroke if it's time is greater than the last time by a certain amount.
I saw padcycles in some sketch. I think it's about avoiding double triggering. I am not sure though. I tried Google. Didn't get enough learning about that term.
I have been playing my DIY arduino midi drum for a year.
your code works flawlessly. Recently i have decided to use a foot switch instead of using 2 separate pads for closed & open hat.
I use Arduino meda...Can you please guide me how the momentary switch should be wired to my arduino ?
And what modification i have to make into my current code for activating the switch functionality ?
My current Code is given below...
/*
Midi drum ..with 10 piezo.. no pedal(2 separate pad with 2 separate piezo for closed hat and open hat), Kick,snare, open hat, closed hat, tom1, tom2, tom3, crash1, crash2, ride
*/
#include
MIDI_CREATE_DEFAULT_INSTANCE();
//========================================================================================
//Set this value to the number of keys/piezos you are using
const int NUM_OF_KEYS = 10;
//Adjust this value to change the sensitivity of the piezos
const int THRESHOLD = 10;
//Set this value to the number of microseconds you want each MIDI note to last for
const int NOTE_LENGTH = 50;
//Adjust this value to set the range of MIDI note velocity values
const int VEL_SENSE_VAL = 10;
//Change this number to set what MIDI channel the MIDI notes are set to
const int midiChan = 1;
//Change these numbers to set what MIDI note number each key/piezo will send.
//Also make sure that the total number of numbers here matches the value of NUM_OF_KEYS
const int midiNote[NUM_OF_KEYS] = {36, 38, 60, 61, 49, 52, 48, 47, 43, 84};
//Change these values to set which analog input pins you are using
//Also make sure that the total number of values here matches the value of NUM_OF_KEYS
const int triggerSensor[NUM_OF_KEYS] = {A0, A1, A2, A3, A4, A5, A6, A7, A8, A9,};
//=======================================================================================
//Variables for storing certain values
int triggerVal[NUM_OF_KEYS] = {0};
bool noteIsOn[NUM_OF_KEYS] = {false};
int midiNoteTime[NUM_OF_KEYS] = {0};
int midiVelocityVal[NUM_OF_KEYS] = {0};
void setup()
{
MIDI.begin(MIDI_CHANNEL_OMNI);
Serial.begin(115200); //REMOVE THIS LINE IF USING HIDUINO INSTEAD OF HAIRLESS
}
void loop()
{
//repeat the below code for each anaolog input/piezo sensor
for (int count; count < NUM_OF_KEYS; count++)
{
//read the piezo value
triggerVal[count] = analogRead(triggerSensor[count]);
//if the value is over the threshold and there isn't currently a note on for this piezo
if (triggerVal[count] > THRESHOLD && noteIsOn[count] == false)
{
//get a velocity value based on the value
midiVelocityVal[count] = triggerVal[count] * (127.0 / 1523.0);
//increase sensitivity
midiVelocityVal[count] *= VEL_SENSE_VAL;
//make sure we don't go out of range
if (midiVelocityVal[count] > 127)
midiVelocityVal[count] = 80;
//send a MIDI note-on message
MIDI.sendNoteOn (midiNote[count], midiVelocityVal[count], midiChan);
//flag that the note is on
noteIsOn[count] = true;
//start a timer for the note to be on for
midiNoteTime[count] = NOTE_LENGTH;
}
//if the note is currently on
if (noteIsOn[count] == true)
{
//reduce the time value by 1
midiNoteTime[count]--;
//if time value equals 0
if (midiNoteTime[count] == 0)
{
//turn off the note
MIDI.sendNoteOff (midiNote[count], 0, midiChan);
noteIsOn[count] = false;
}
}
}
//pause the loop
delay(1);
}
I want to add a momentary switch as a foot pedal which will triggers note between 61 & 60 ( Closed & open HiHat). Thank You
Want to join the discussion?
Create an account or login to get started!