
A NonLinear Educating Company
Arduinoのを使用してMIDIコントローラにヴィンテージ玩具ピアノを回します
Liam Lacey on Jul 31, 2015 in DIY & Hacking | 25 comments
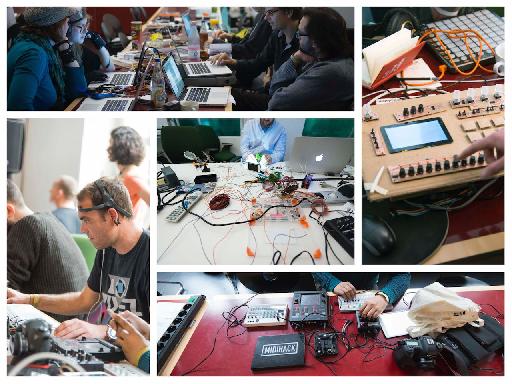
2015年5月に、私は出席したMIDIハック
あなたが読めば私の前回の記事を 、私は非常にDIY MIDIコントローラーを作成するためのArduinoのプラットフォームをお勧めしていることを知っているだろう。私はそれはあなたが入力/出力データで何をするかを制御の多くを提供しますように、しかし、それはまだ非常に初心者に優しい公的支援とガイドの多くのある他の提案したプラットフォーム上で、このプロジェクトのためのArduinoを選択しました。このガイドは、完全な電子機器では、初心者、ソフトウェア開発、およびArduinoのある個人を対象としています。
ここでは、このプロジェクトのために必要とするもののリストです。ここで言及したすべての電子部品は、SparkFunのように、何か良いDIY /趣味の電気店から購入することができます。
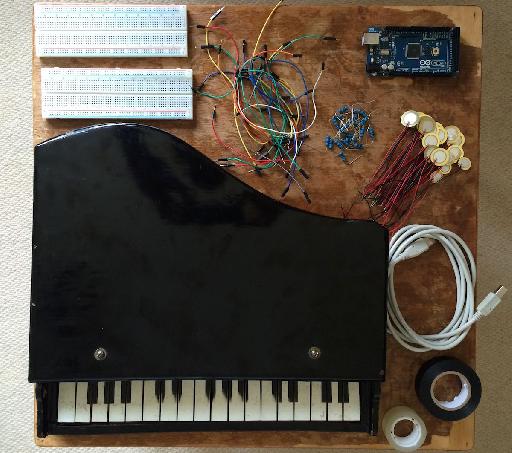
What You Will Need for this Project
- 音響木製のおもちゃのピアノ 。しかし私はあなたにも時折チャリティーショップやフリーマーケットでそれらを見つけることができ、通常は数利用できるがある場合、は約$ 15のためのeBayのオフに私のおもちゃのピアノを購入しました。このプロジェクトは、キーがオブジェクトを共振のいくつかの種類を打つハンマーを引き起こすというメカニズムとピアノの周りに基づいています。おもちゃ電子キーボードを使用すると、ここでは動作しません。
- Arduinoのボード 。これは次のようになりますマイクロコントローラです
- 圧電要素 。ピエゾ素子センサは振動やノックを検出するために使用され、特にDIYおよび商業ドラムトリガー製品に使用するための一般的なコンポーネントされています。我々は、キーからプレスを検出するために、これらを使用して、あなたは、各キーのためにこれらのいずれかが必要になります。あなたはピアノの中ハンマーヘッドの大きさに基づいて、必要なピエゾのサイズを考慮する必要があります
- 1Mオームの抵抗 。抵抗器は、電気回路の中で最も基本的で一般的な構成要素であり、電気の流れに抵抗するために使用されます。あなたは、各キー/ピエゾのためにこれらのいずれかが必要になります。
- ワイヤー 。 Arduinoのも男性間のジャンパ線として知られているブレッドボードにやさしいワイヤは、使用するのが最も簡単になり、私たちはアルドゥイーノにすべてのコンポーネントを接続するために、これらを使用します。あなたは、各キー/ピエゾのほか、エキストラの一握りのための2が必要になります。
- はんだレスブレッドボード 。はんだレスブレッドボードは、あなたが一緒にすべてをはんだ付けする必要なく電子回路を作成することができます。あなたのおもちゃのピアノが持つキーの数に応じて、これらのカップルが必要な場合があります。
- USBケーブル
- 両面粘着テープ
- Arduinoのソフトウェア 。 Arduinoのソフトウェアは、我々はそれが何をやりたいのArduinoボードをプログラムするために使用されます。これは、上で自由に利用可能であるArduinoのソフトウェアページとOS X、Windows、およびLinux上で実行することができます。また、ArduinoのMIDIライブラリをダウンロードする必要があります。
- シリアル- MIDIと仮想MIDIポートソフトウェア 。あなたは、MIDIメッセージへのArduinoから出てきたメッセージを変換するために、いくつかのシリアル - MIDIソフトウェアが必要になります。しかし私は、利用可能な他の人の数があり、シリアルブリッジ·アプリケーションに自由ヘアレスMIDIをお勧めします。また、あなたのDAWやMIDI機器の入力に無毛の出力を接続するために、仮想MIDIポートを使用する必要があります。このために私はあなたがその組み込みのIACドライバを使用することができますWindows上で、またはOS X上でloopMIDIをお勧めします。あるいは、それはすることが可能です
- MIDIソフトウェア 。あなた
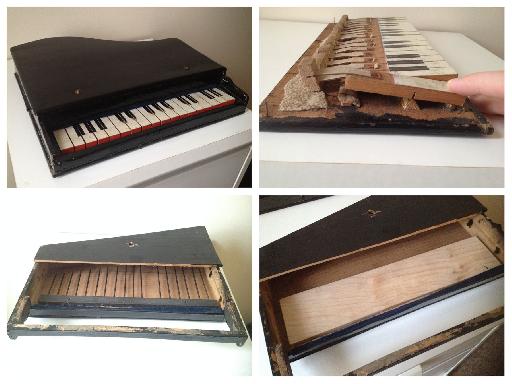
Step 1—Prepare your Piano
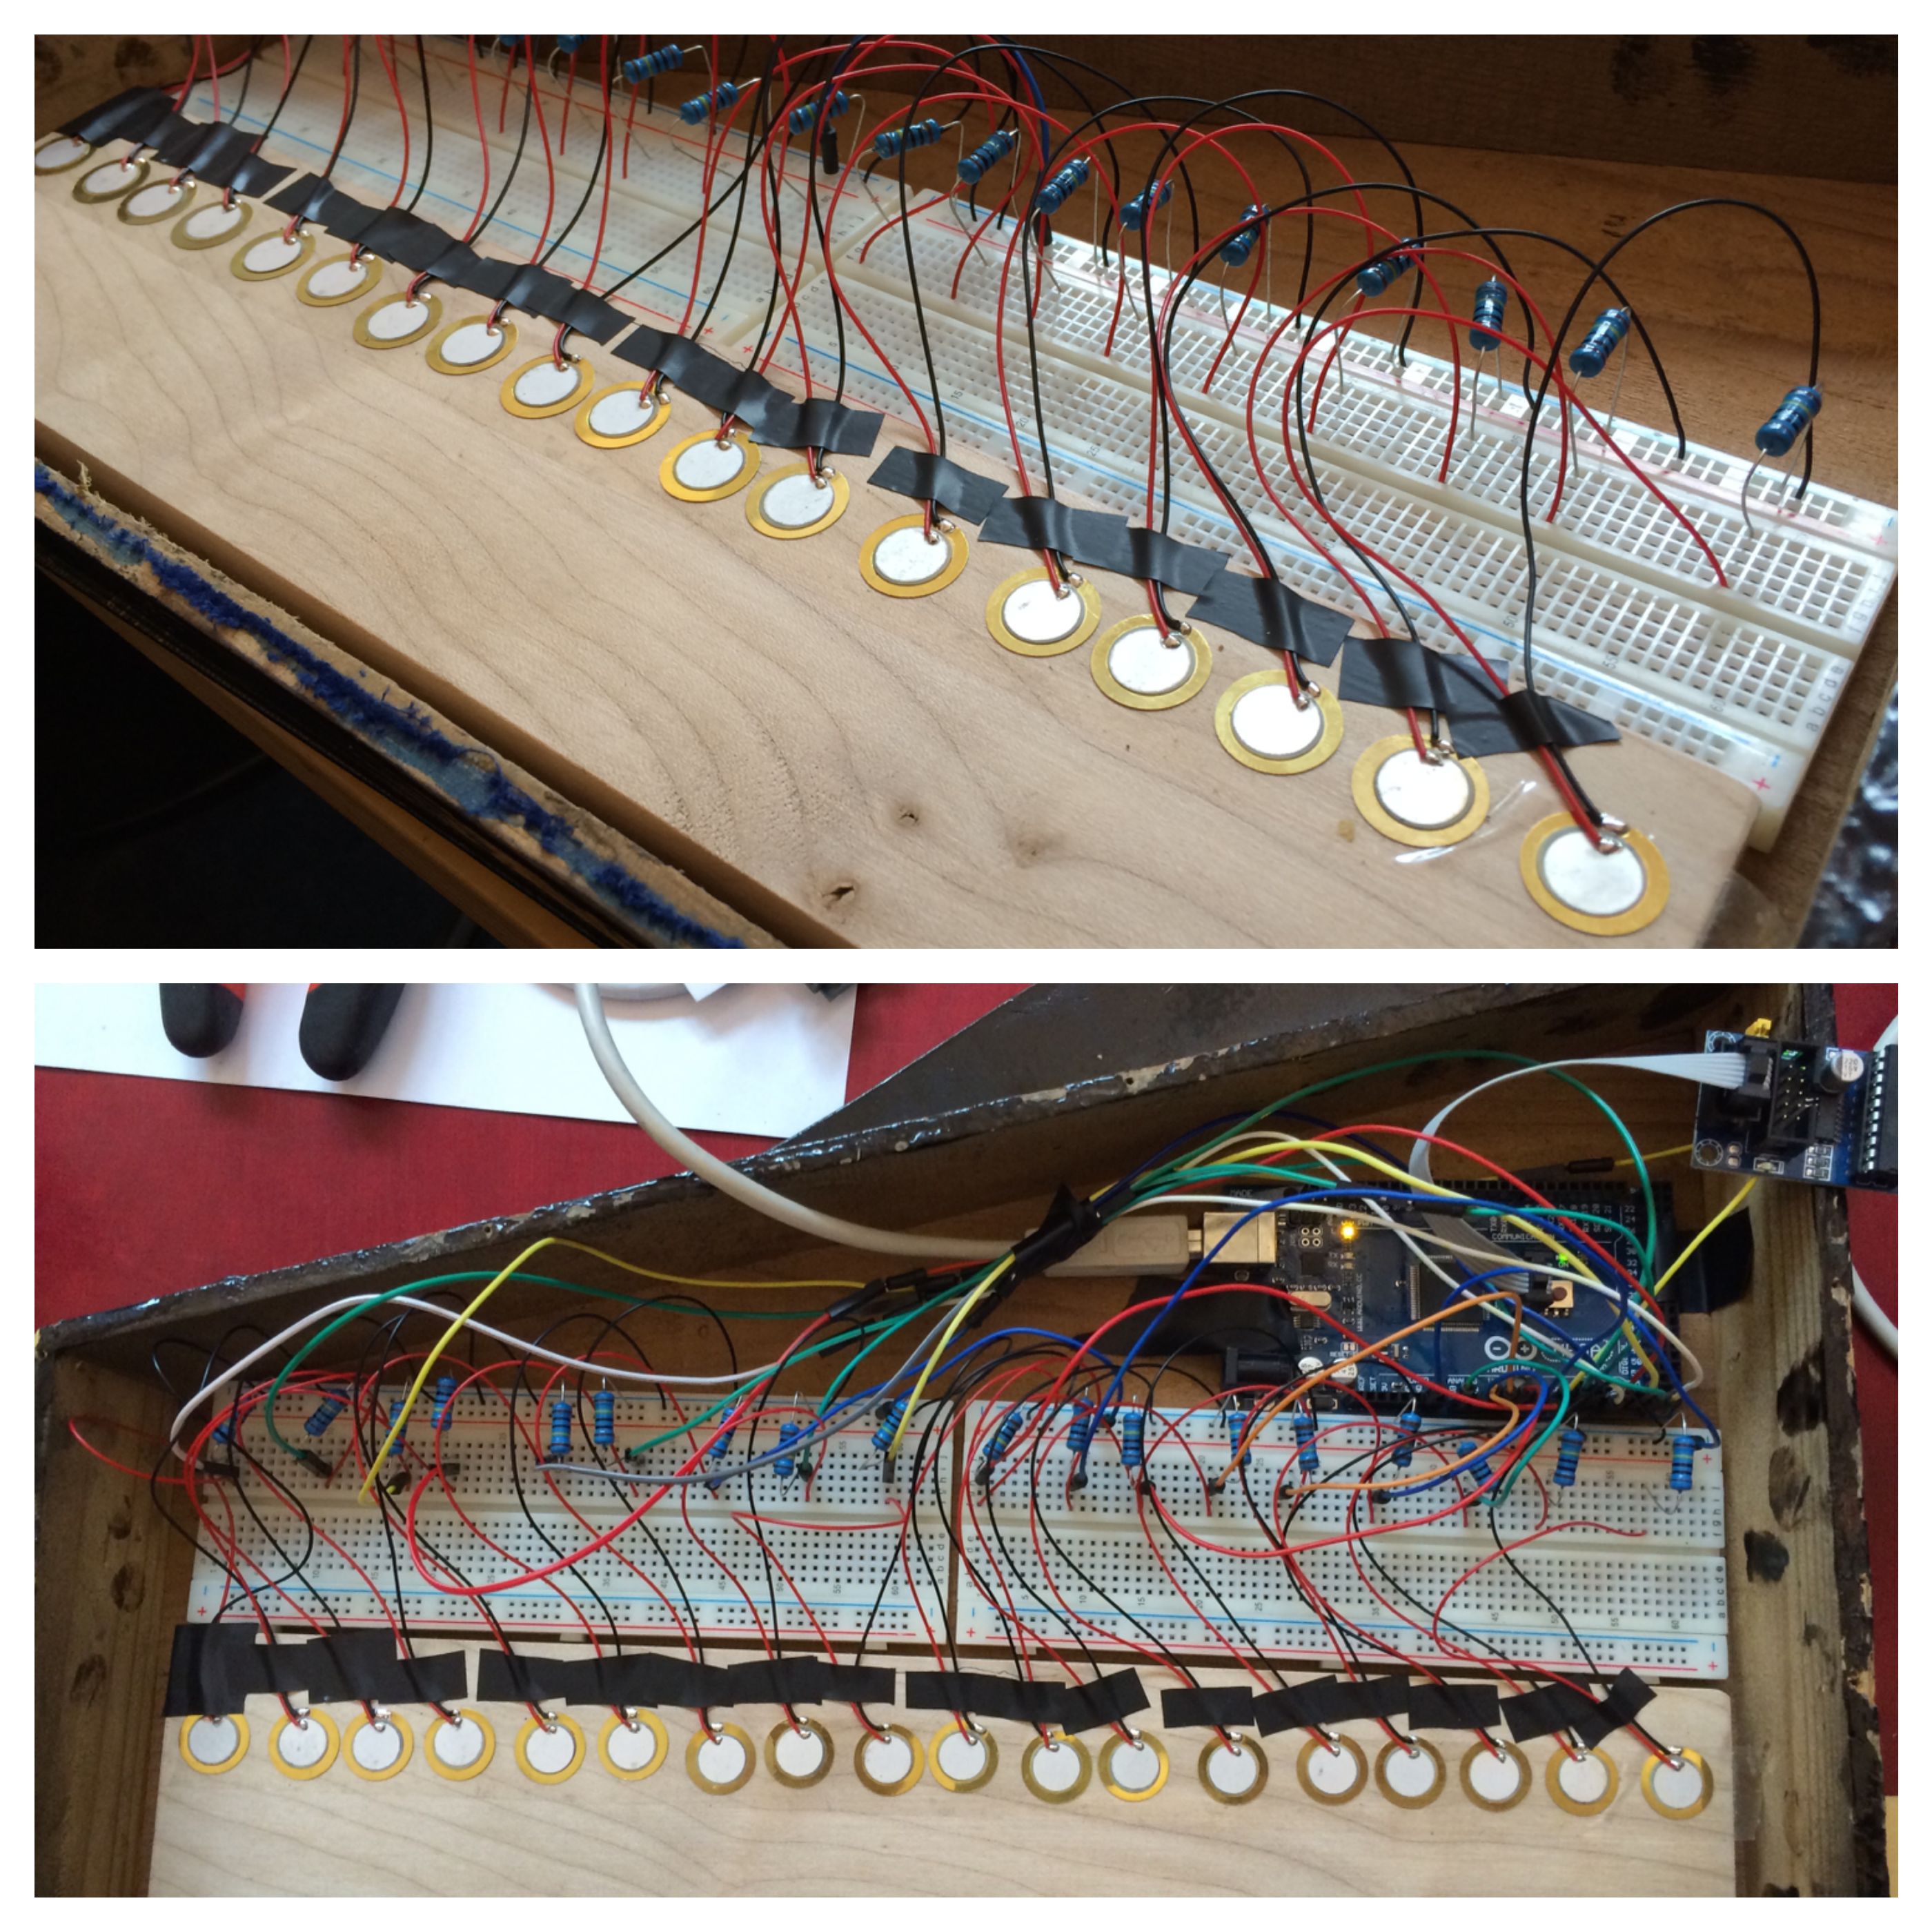
あなたがピアノに電子機器を挿入を開始する前に、あなたが彼らにピエゾをマウントできるように音棒を削除するか、それらを変更する必要があります。私のピアノでのロッドのセットはトップの下にネジ止めするので、私は単純にそれらを削除するには、それらを外し、その後、私は、圧電センサを固定できた木のブロックにねじ込まれました。代替オプションは、しかし、あなたはそれがより困難ロッドに何かを取り付けるために見つけることができ、ピエゾがに固定することができる棒の下側に材料の薄い平らな一片(例えば、段ボール、木材)を固定することで、プラスあなただろうまた、電子機器を挿入しようとしたときにロッドが邪魔になります見つけることができます。
左上から時計回り
あなたがピアノを行う必要があり、他の変更は、ピエゾを打つハンマーの表面にスパイク/ポイントを追加しています。ハンマーヘッドはピエゾの内側の円よりも広い場合、それらは適切にセンサをトリガしない場合がありますので、私のピアノで、この問題を克服するために、私は上げポイントを作成するために、ハンマーの上にはんだの小さなボールをテープで固定。
Step 2—Attach the Piezos
現在、キーが押されたときにハンマー機構は、通常の音棒を打つピアノの上部の下面に圧電センサを配置します。あなたのピアノは私のような手作りのであれば、あなたはおそらくハンマーが上がらないことがわかります
あなたに一度
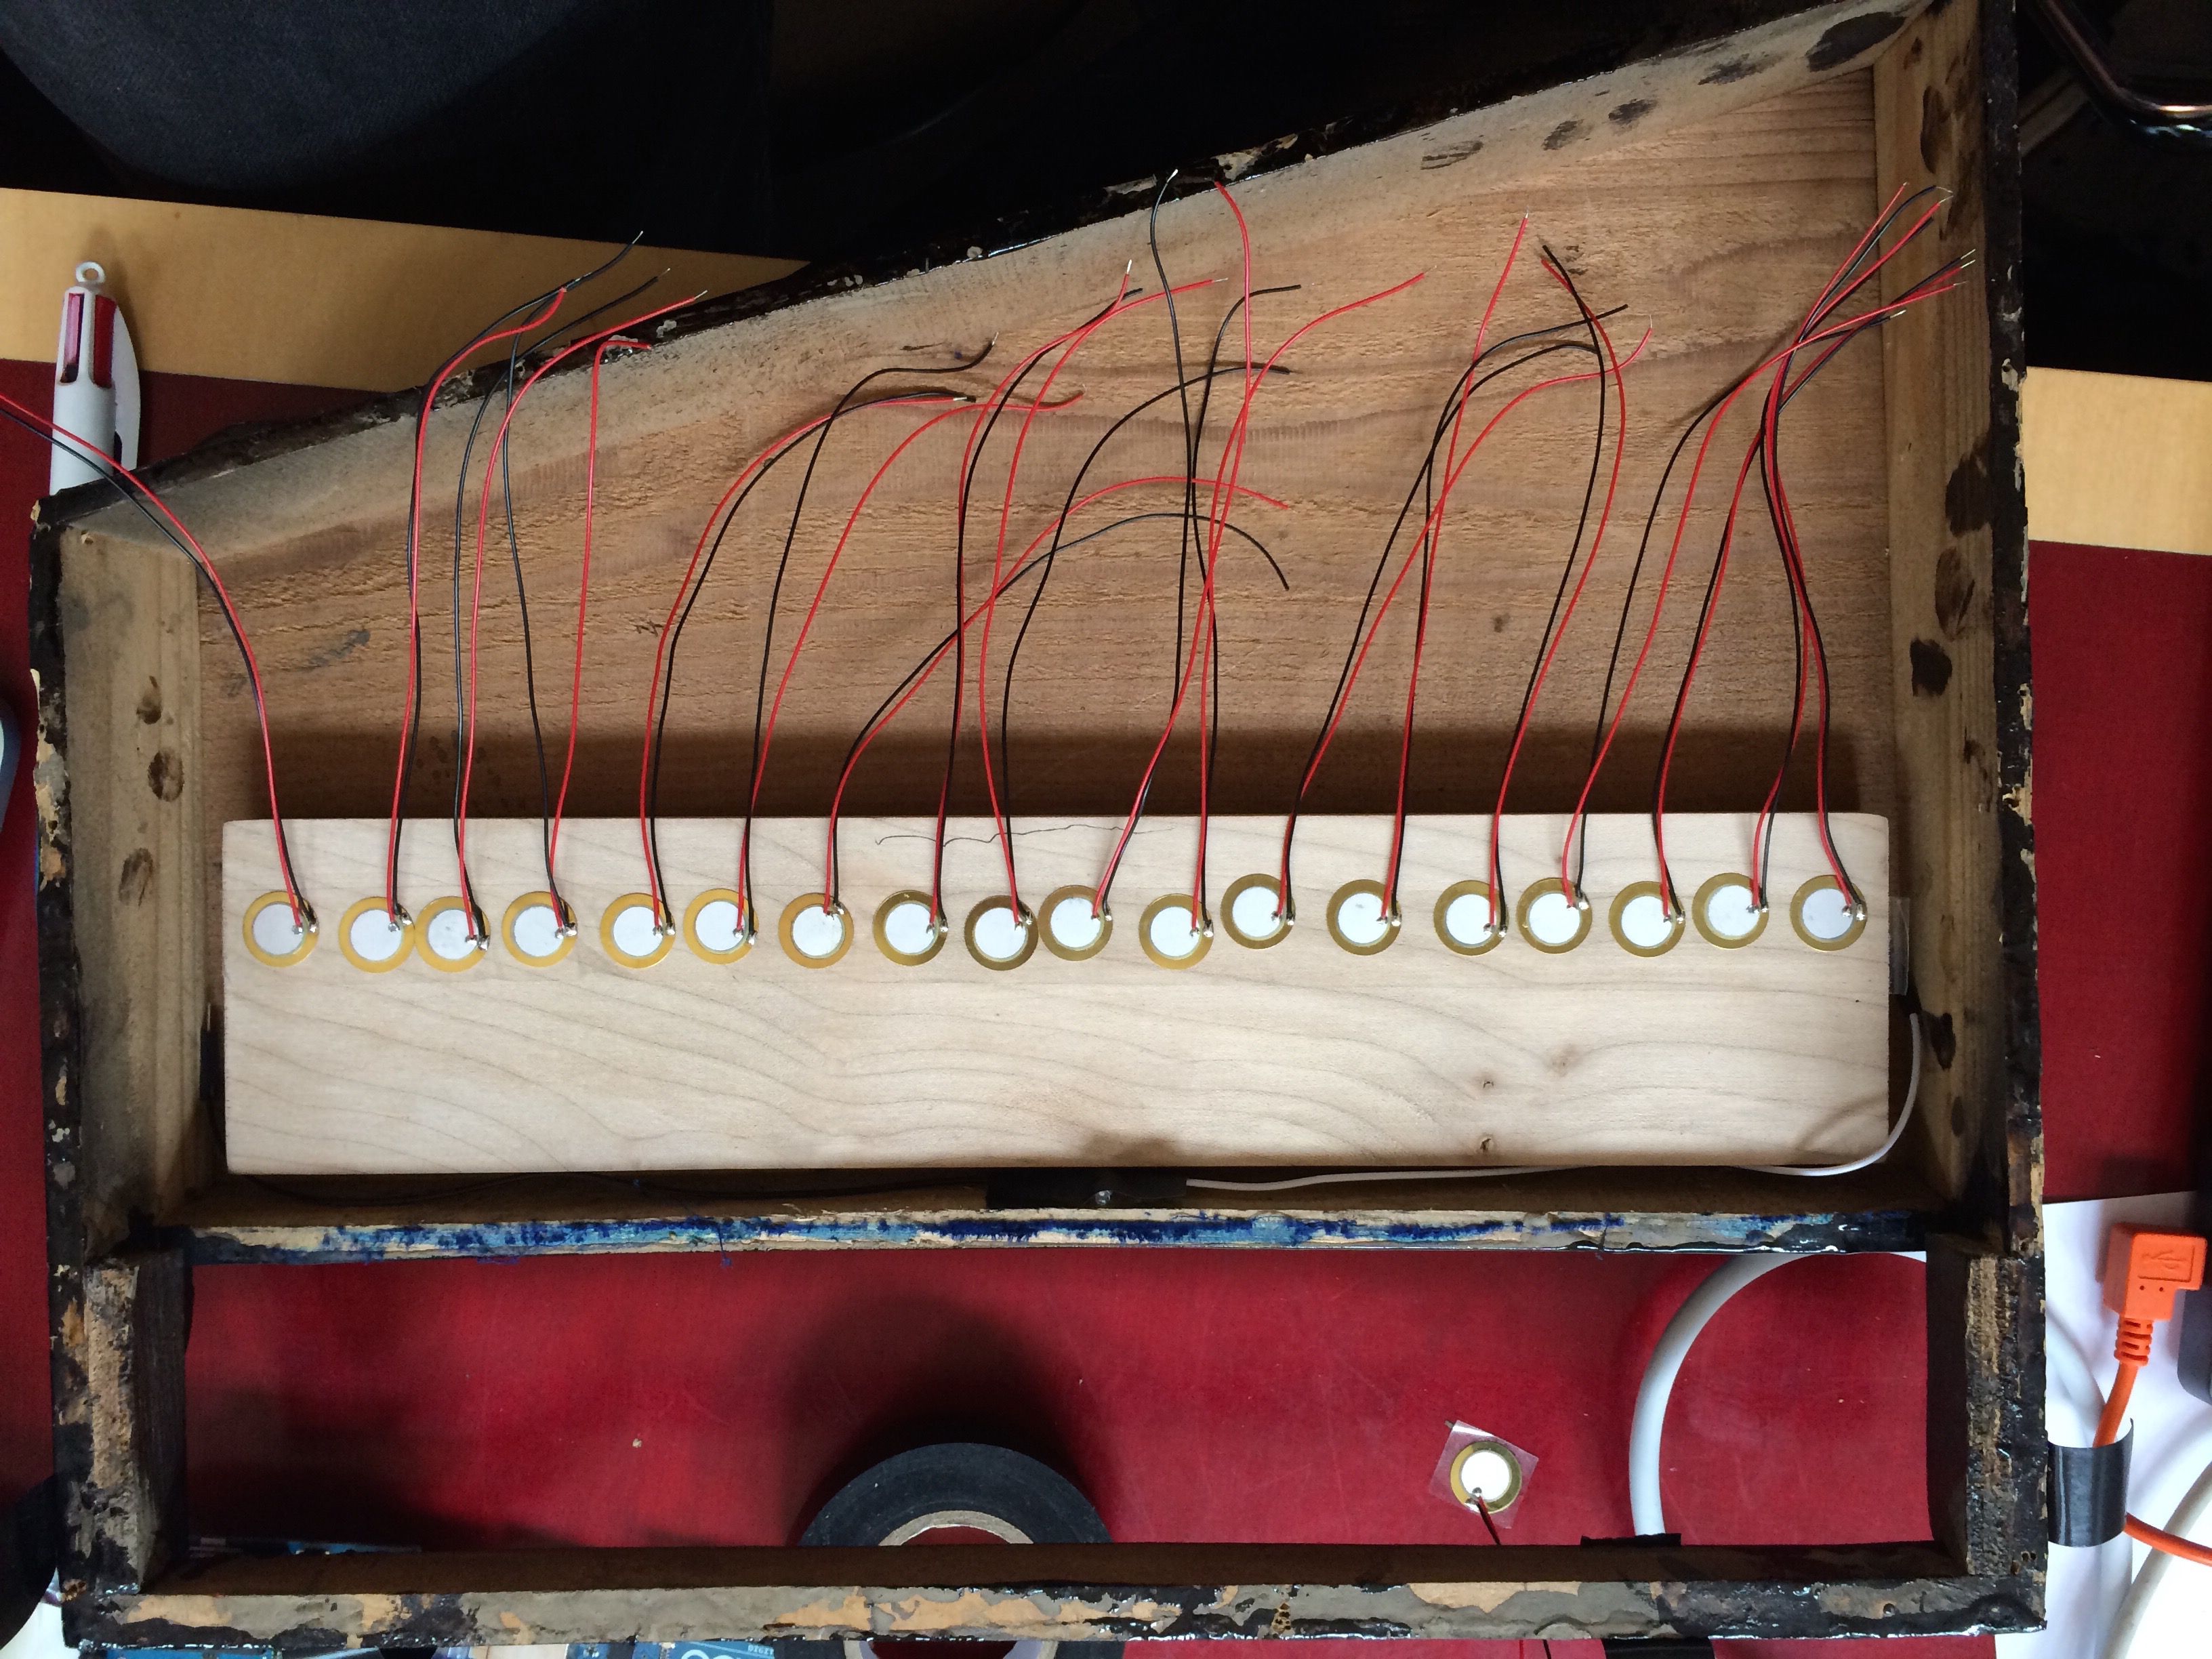
添付の圧電センサ
Step 3—Complete the Circuitry
回路を完成させるためには、まずピアノの内部にブレッドボード/秒とのArduinoボードを接続する必要があります。あなたのピアノが下から開いた場合は鉱山がしたようにあなたは、おそらくピアノは上から開いた場合しかし、あなたはおそらく固執することなく、底に板を配置することによって、プロジェクトを完了することができ、トップの下にボードを固執する必要があります。それらダウン。反対側にはArduinoで、ブレッドボード/ sのピエゾに最も近いを置きます。
次は、ブレッドボード/ sに部品を取り付ける必要があります。 (次の図の中に示されるように)ほとんどのブレッドボードには2つの主要なセクションがあります。
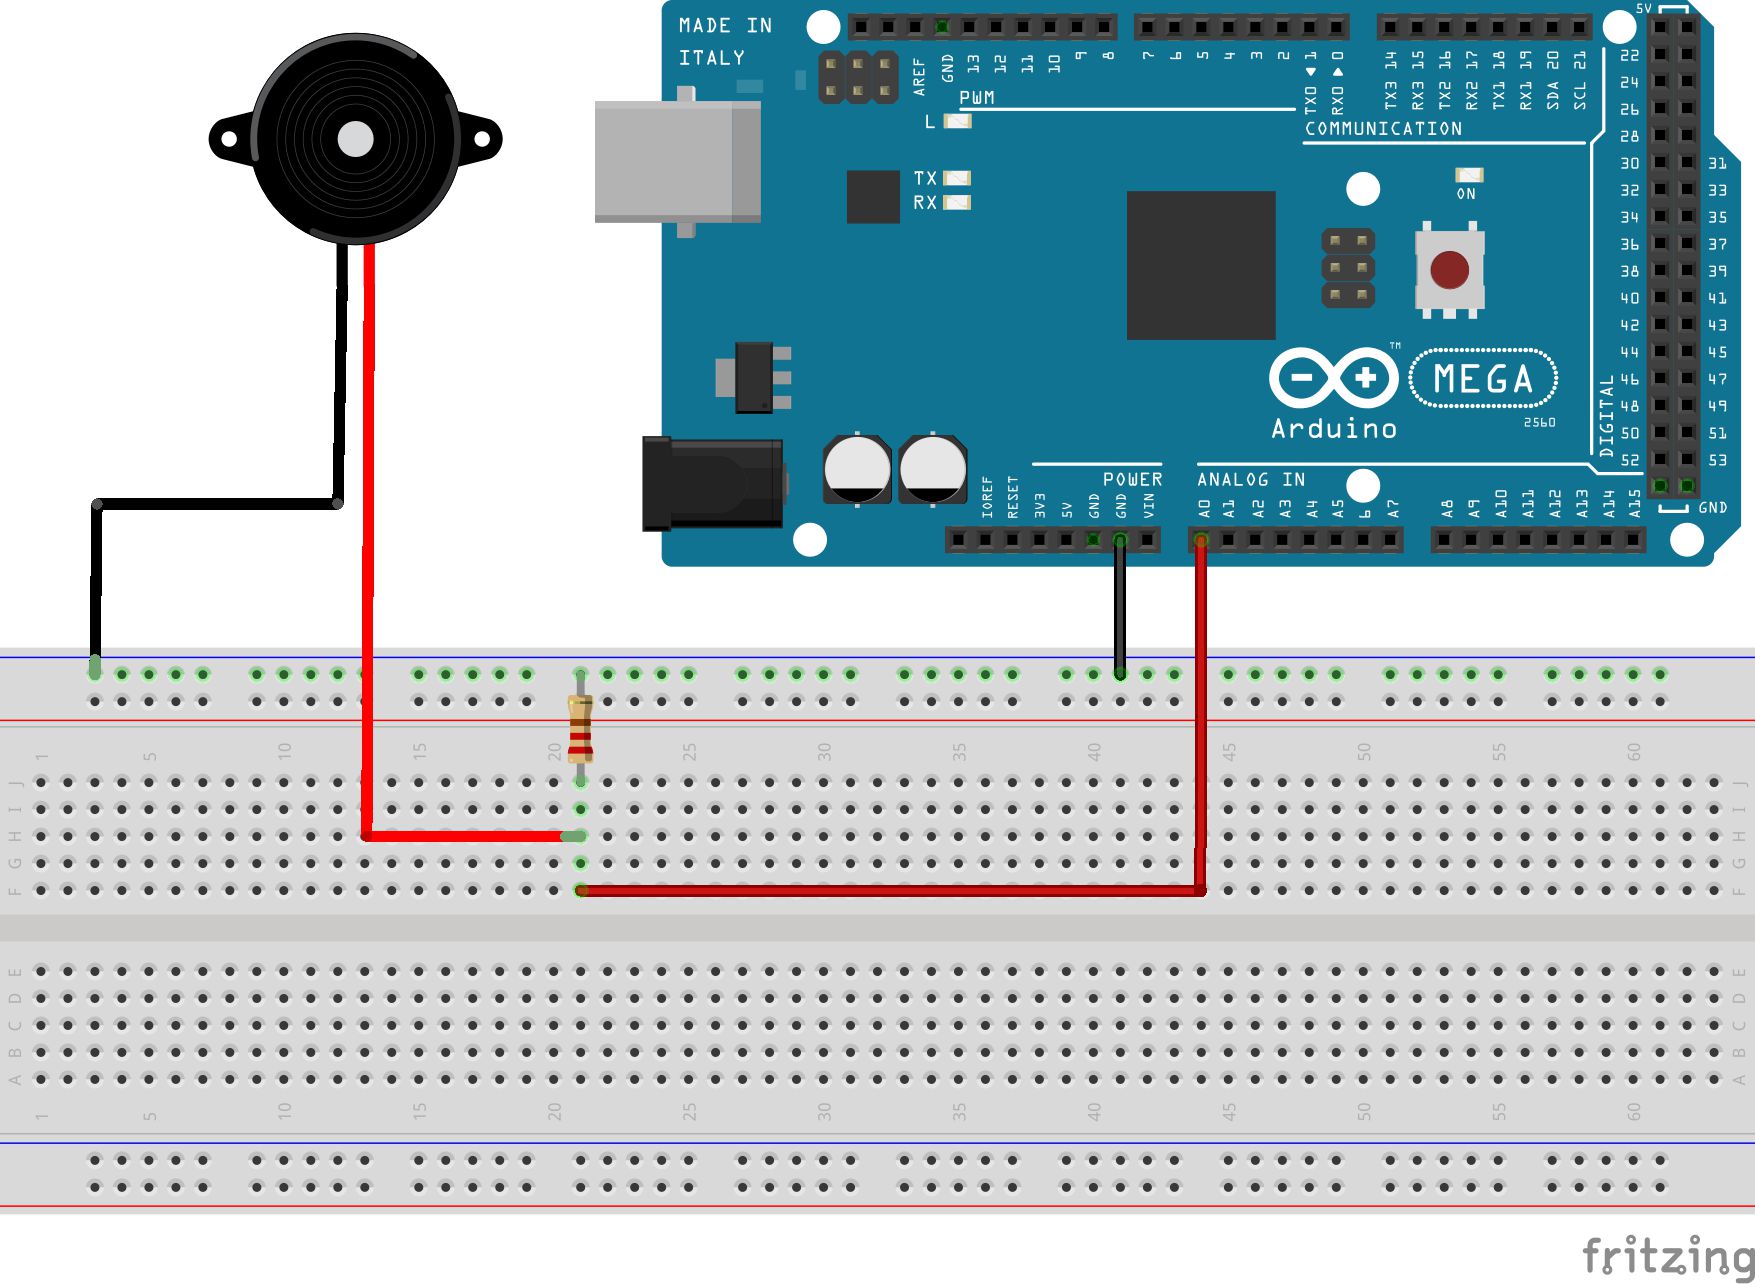
Arduinoのボードに単一の圧電センサを接続する方法
前の図に表示されているように赤色(信号)ワイヤが端子の一方に接続される必要があるのに対し、各圧電/キーに、ピエゾから黒(アース)線は、接地バスストリップの一方に接続される必要がありますストリップ。その後、接地ストリップにターミナルストリップから(任意の方向で)抵抗を接続する必要があります。 Arduinoの上のアナログ入力端子の一方に端子台から電線、およびグランドピンの1つに接地ストリップから別のワイヤ。その後、次の図に示すように、毎回異なるターミナルストリップを使用して、各ピエゾのために、この回路を繰り返す必要があり、Arduinoのアナログ入力端子です。
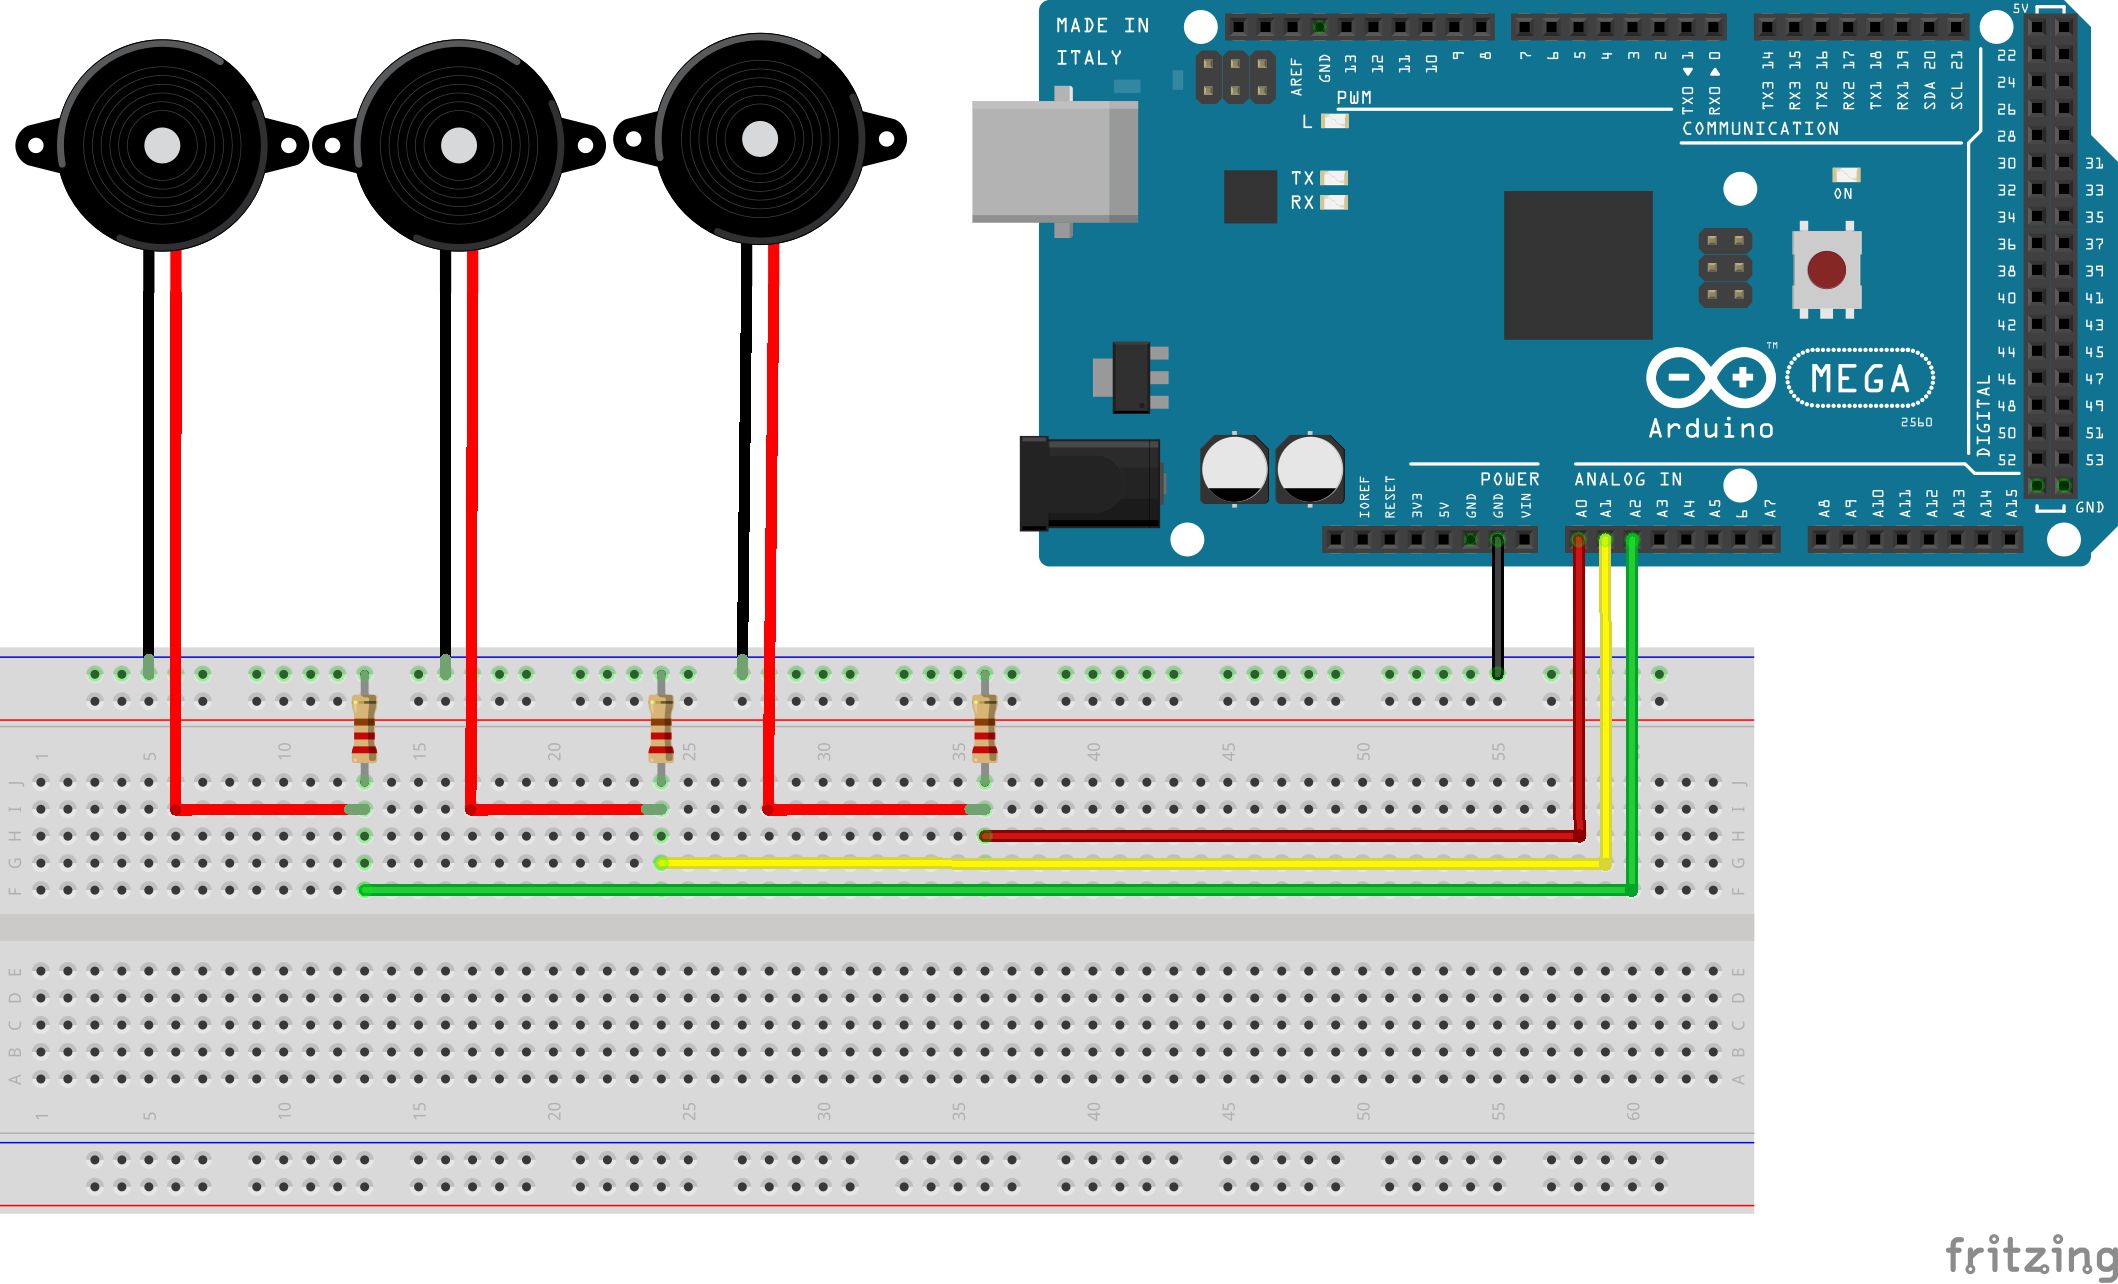
Arduinoのボードに複数の圧電センサを接続する方法
これは何を参照することが容易になるように私は、各アナログ入力接続用の異なる色の線を使用することをお勧めします
上
Step 4—Edit and Upload the Code
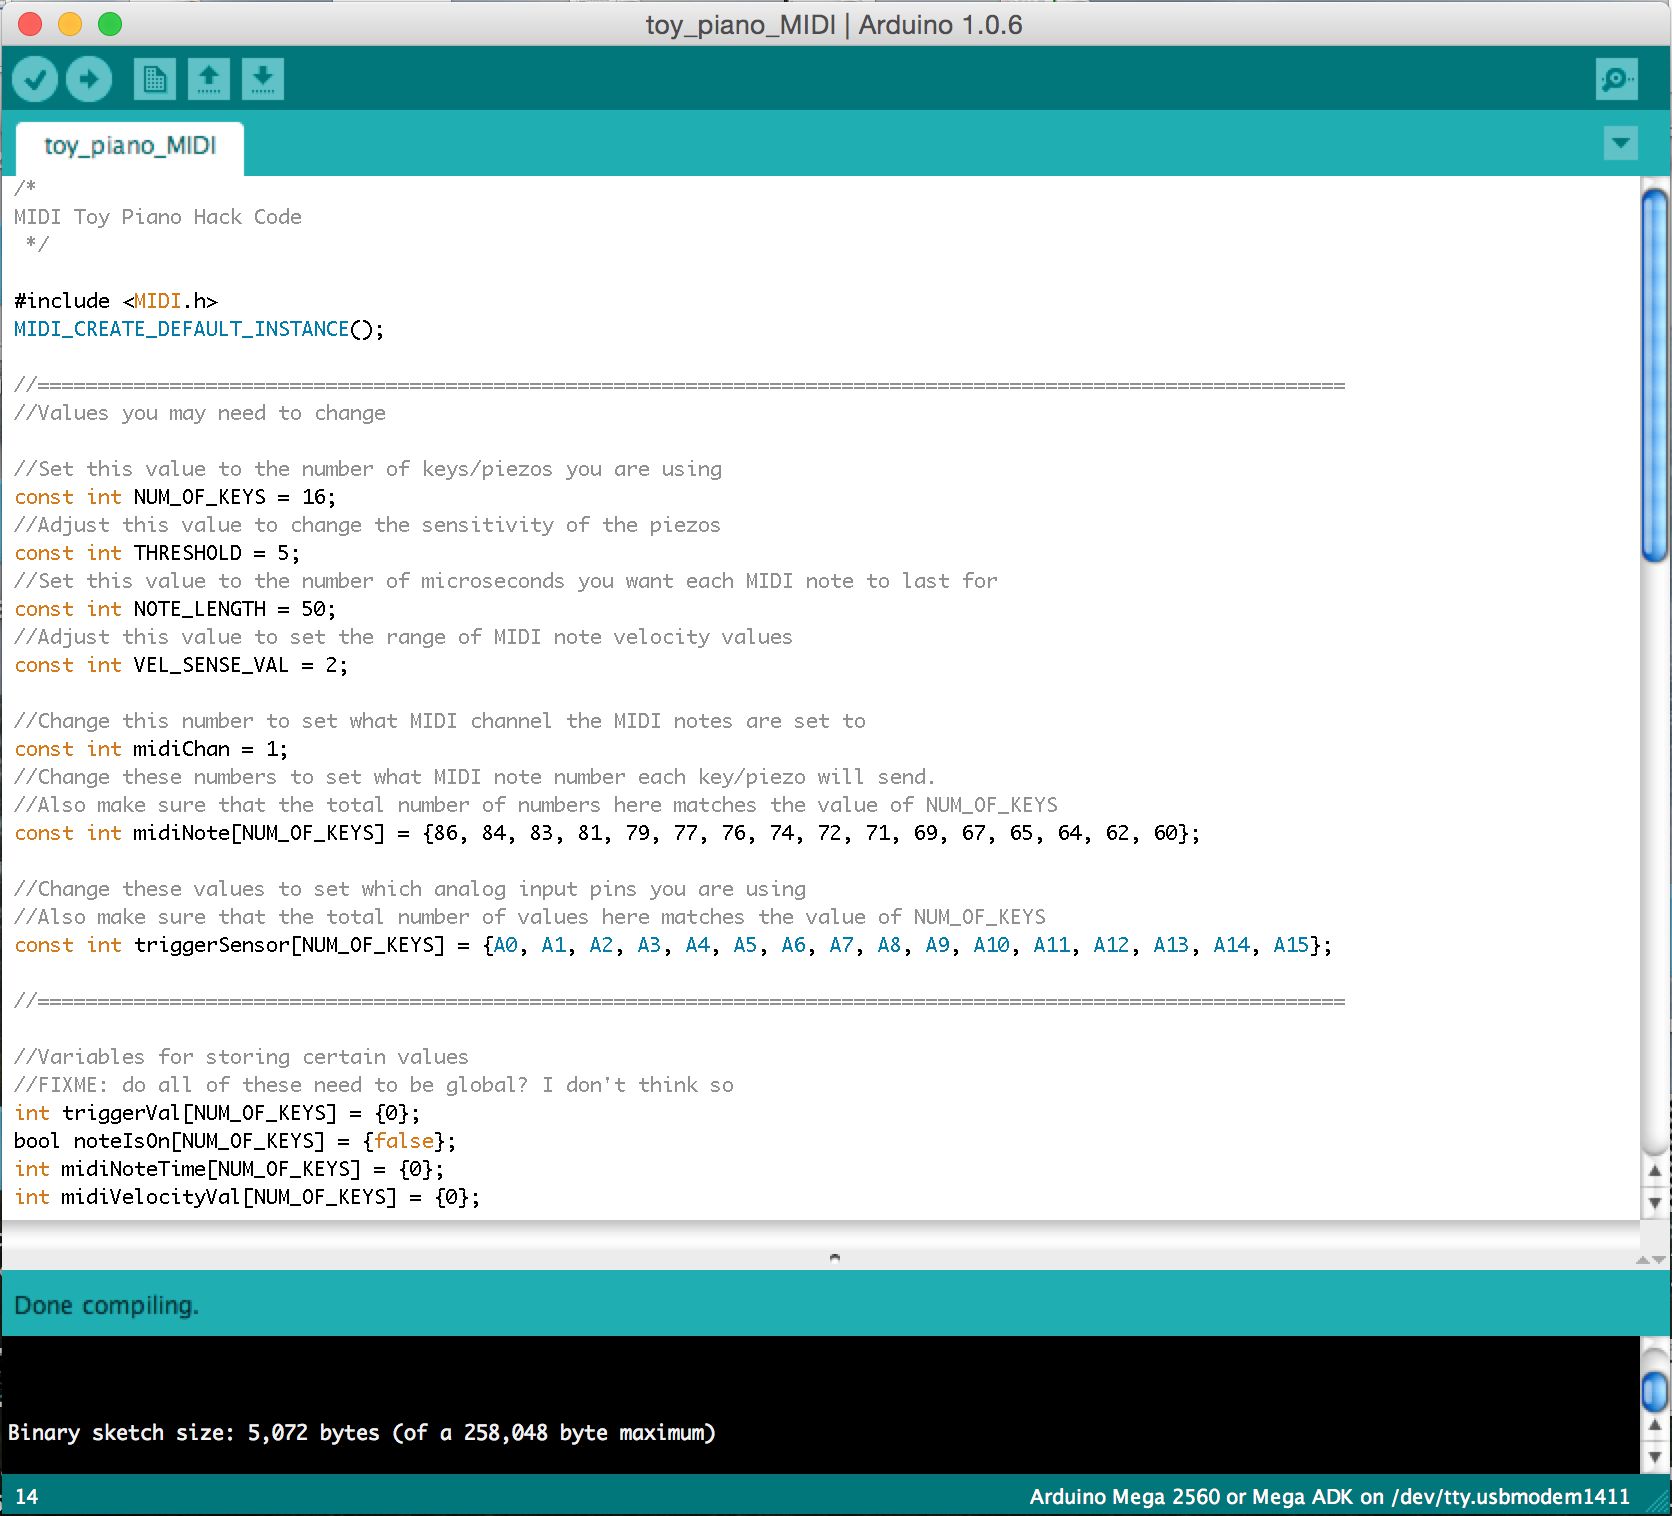
ハードウェアおよびエレクトロニクスが完了したあとは、MIDIノートにピエゾからの読み取り値に変わりますArduinoのボードにいくつかのソフトウェアをアップロードする必要があります。あなたがダウンロードしたとのArduinoのソフトウェアとArduinoのMIDIライブラリの両方をインストールしたら、Arduinoのアプリケーションを開いて、Arduinoのテキストエディタに以下のコードをコピーします。
/*
MIDI Toy Piano Hack Code
*/

#include
MIDI_CREATE_DEFAULT_INSTANCE();

//========================================================================================
//Values you may need to change

//Set this value to the number of keys/piezos you are using
const int NUM_OF_KEYS = 16;
//Adjust this value to change the sensitivity of the piezos
const int THRESHOLD = 5;
//Set this value to the number of microseconds you want each MIDI note to last for
const int NOTE_LENGTH = 50;
//Adjust this value to set the range of MIDI note velocity values
const int VEL_SENSE_VAL = 2;

//Change this number to set what MIDI channel the MIDI notes are set to
const int midiChan = 1;
//Change these numbers to set what MIDI note number each key/piezo will send.
//Also make sure that the total number of numbers here matches the value of NUM_OF_KEYS
const int midiNote[NUM_OF_KEYS] = {86, 84, 83, 81, 79, 77, 76, 74, 72, 71, 69, 67, 65, 64, 62, 60};

//Change these values to set which analog input pins you are using
//Also make sure that the total number of values here matches the value of NUM_OF_KEYS
const int triggerSensor[NUM_OF_KEYS] = {A0, A1, A2, A3, A4, A5, A6, A7, A8, A9, A10, A11, A12, A13, A14, A15};

//=======================================================================================

//Variables for storing certain values
int triggerVal[NUM_OF_KEYS] = {0};
bool noteIsOn[NUM_OF_KEYS] = {false};
int midiNoteTime[NUM_OF_KEYS] = {0};
int midiVelocityVal[NUM_OF_KEYS] = {0};

void setup()
{
    MIDI.begin(MIDI_CHANNEL_OMNI);
}

void loop()
{
    //repeat the below code for each anaolog input/piezo sensor
    for (int count; count < NUM_OF_KEYS; count++)
    {
        //read the piezo value
        triggerVal[count] = analogRead(triggerSensor[count]);

        //if the value is over the threshold and there isn't currently a note on for this piezo
        if (triggerVal[count] > THRESHOLD && noteIsOn[count] == false)
        {
            //get a velocity value based on the value
            midiVelocityVal[count] = triggerVal[count] * (127.0/1023.0);

            //increase sensitivity
            midiVelocityVal[count] *= VEL_SENSE_VAL;

            //make sure we don't go out of range
            if (midiVelocityVal[count] > 127)
            midiVelocityVal[count] = 127;

            //send a MIDI note-on message
            MIDI.sendNoteOn (midiNote[count], midiVelocityVal[count], midiChan);

            //flag that the note is on
            noteIsOn[count] = true;

            //start a timer for the note to be on for
            midiNoteTime[count] = NOTE_LENGTH;
        }

        //if the note is currently on
        if (noteIsOn[count] == true)
        {
            //reduce the time value by 1
            midiNoteTime[count]--;

            //if time value equals 0
            if (midiNoteTime[count] == 0)
            {
                //turn off the note
                MIDI.sendNoteOff (midiNote[count], 0, midiChan);
                noteIsOn[count] = false;
            }

        }

    }

    //pause the loop
    delay(1);
}
どのようにArduinoのソフトウェアを使用する方法を教え、どのようにコードには少しこの記事の範囲を超えているので、私
- NUM_OF_KEYS
- THRESHOLD
- NOTE_LENGTH
- VEL_SENSE_VAL
- midiChan
- midiNote
- triggerSensor
Arduinoのソフトウェア
あなたに一度
- に行きます
- あなたのArduinoボードはUSB経由でコンピュータに接続します。
- に行きます
- に行きます
- に行きます
ご注意ください
Step 5—Connect the Software
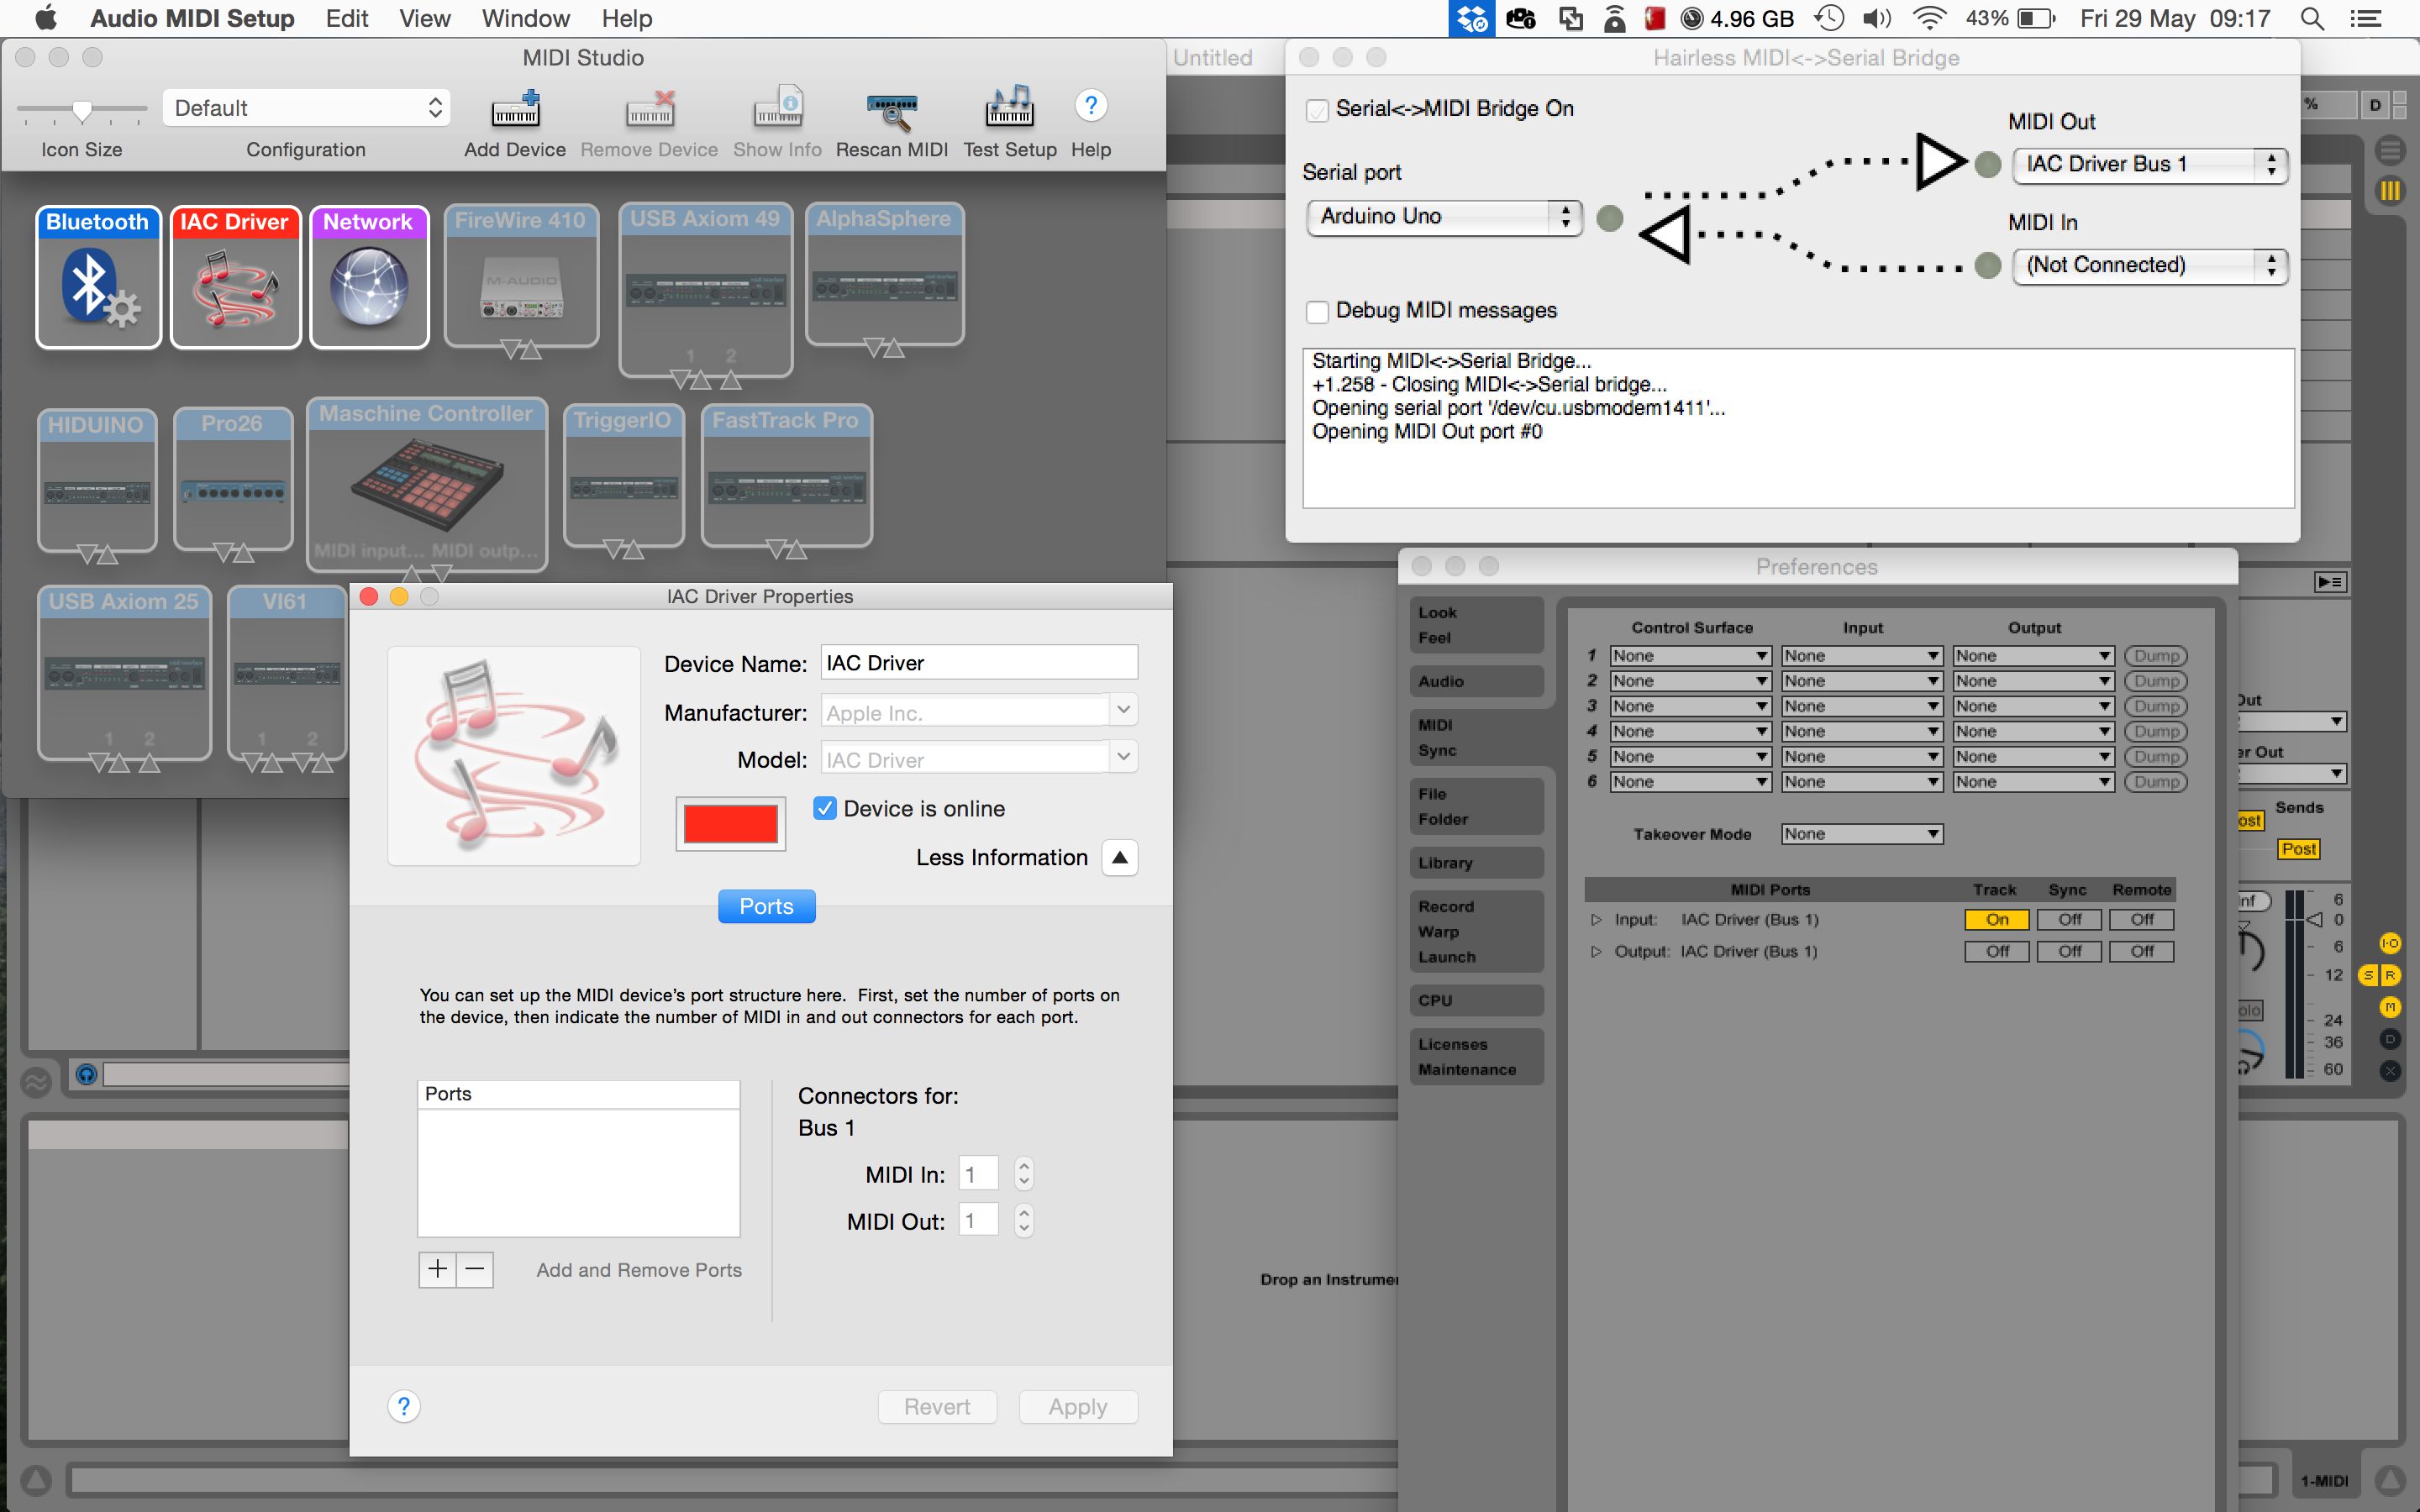
左:シリアルブリッジに設定無毛MIDI:OS Xの右上の仮想MIDIポートを設定します。右下:Abletonのライブでの仮想MIDIポートに接続します。
最後に、あなたは、コンピュータ上のすべての必要なソフトウェアを起動して接続する必要があります:
仮想MIDIポートを設定します。
あなたは、Windows上にある場合:
- loopMIDIを開きます
- をクリックしてください
- アプリケーションを実行したまま
あなたはOS X上にある場合:
- 起動
- に行きます
- をダブルクリックします
- ことを確認してください
- アプリケーションを閉じます
Arduinoの仮想MIDIポートに無毛MIDIツーシリアルブリッジを接続します。
- 毛のない起動
- 設定左側の
- 設定右側の
- 確認してください
- アプリケーションを実行したまま
仮想ポートにあなたのDAW / MIDI機器のソフトウェアを接続します。
- お使いのDAWやMIDI機器を起動します
- その下に
注意してください -あなたのArduinoをHIDUINOでハッキングされている場合は、1と2ドン、手順
これが完了したら、あなたは今、おもちゃのピアノを使用してMIDI機器からのノートをトリガーすることができるはずです。
アクション内の音響おもちゃのピアノのMIDIコントローラの短いビデオデモを見ます:
Conclusion
そのため
あなたは、次のMIDIハックイベントに参加している中で興味深いものである場合にも、目を離さないMIDIハックウェブサイト告知のため。このような音楽Hackdayや音楽技術フェストとして世界中で毎年開催されている同様の音楽ハイテクハッカーソン、ならびに様々なワンオフや地域のイベントのいくつもあります。

Discussion
You could connect a different type of sensor or electronic source and get results without changing the code, however it will only create a note based on the first reading it gets over the threshold (due to the logic implemented for turning piezo inputs into MIDI notes). Using just electrical current to trigger a reading would be very similar to using a simple push button (where pressing the button completes the circuit and creates a reading), so I'd recommend looking at Arduino button tutorials for that.
It sounds like your piezo sensors are not properly connected to the Arduino. Check that they are connected to the correct pins. You may also need to correct the value of NUM_OF_KEYS in the code if you are using less than 16 sensors/keys. You may also need to up the value of THRESHOLD in the code if your piezos are particularly sensitive.
thanks for answering me so fast , I'll check that the wires are connected correctly, I have another doubt about the code it in the end you said : "repeat the below code for each anaolog input/piezo sensor", and I 'm trying to do with a arduino uno with only 3 pins I changed all that you said , but the end I do not know where to get the code to be copied to each piezo I have and also do not know where it ends.
look I change this:
NUM_OF_KEYS = 3;
midiNote[NUM_OF_KEYS] = {86, 84, 83}
triggerSensor[NUM_OF_KEYS] = {A0, A1, A2}
IN THIS PART I WILL NEED TO PUT SOME NUMBER? -> (int count; count < NUM_OF_KEYS; count++)
Im sorry for all this question but im very lost with this and thank you so much for your help and sorry for my english.
Im from Brasil.
NUM_OF_KEYS, midiNote, and triggerSensor are the only values you need to change, which you have correctly done. The "repeat the below code for each anaolog input/piezo sensor" comment is actually a description of what the below 'for' loop does, rather than being an instruction. You shouldn't have to change any code in that section for it to work.
Thank you so much, this time again made ​​the piezos cables and worked, thanks for your help I buy one arduino mega
and when it comes I gonna do with the 16 piezos.
please let me ask you one more question?! can I put on this project potentiometers or one pitch bend?
Glad you got it working.
If you want to attach something like a potentiometer you'll need to change the code for reading from that particular analogue input. However the code needed here is a lot simpler - see https://www.arduino.cc/en/Tutorial/AnalogReadSerial to lean how to do this.
_____
#include
____
He's answering me this
#include
^
exit status 1
#include expects "FILENAME" or
Do you have an idea?
Thanks,
Florent
Thanks for the kind words and for spotting this mistake.
The code above has now been updated to the correct version.
Thanks,
Liam.
Project = allow young people to explore (play) the out-of-reach pipe organ from a wireless-midi capable keyboard.
So far... I have an arduino, a wireless midi transmitter/receiver (Medeli WIMIDI - tested and quite surprised by performance), a breadboard (cables, female midi socket etc).
I want to connect the wireless midi transmitter to the out socket of the remote keyboard and the wireless midi receiver to the arduino (I need to solder connect to arduino via breadboard). With the arduino midi library I presume I will then be able to receive the incoming midi signal ? This is where it becomes tricky for me to ascertain next steps!... I then want to translate the midi in to individual note signals (much like what you have done in this article). Is this possible?
If this is doable, my last sticking point is how to get the individual note signals 'transferred' to the organ console. I have seen an article where someone attaches a solenoid for each note to a wooden board and then rests the board over the top of the organ keyboard. However, the organ we are planning to work on already has access to the rear of the keyboard and each note has a visible switch (2 cables to each note) on a low voltage (12v) system. Is it possible to intercept each of these switches with the arduino outputs for each note? My apologies if this is a stupid question!?
This is an awesome tutorial. It'll help me a lot with what I want to do cause the setting is similar but usage is completely different.
I wonder if the amount of the contact mics can be different? Is there any maximum we can connect?
Also, is it possible to use condenser mics instead of piezos, possibly with a little trick?? Otherwise do you have any suggestions of how I can do it?
Thanks a lot!
The number of piezo sensors you can connect depends on the number of analog inputs that your microcontroller has e.g. on an Arduino Mega you have 16 analog inputs. However it is possible to expand this number using multiplexer components - see https://playground.arduino.cc/Learning/4051. There are also Arduino IO expander shields that can do this for you.
Regarding using consider mics instead, the extra complexity depends on whether you are just trying to detect a sound level, or trying to capture actual sound data. For just detecting sound levels see http://www.learningaboutelectronics.com/Articles/Arduino-microphone-circuit.php as an example, however recording actual audio is more complex (e.g. see http://www.instructables.com/id/Arduino-Audio-Input/).
Thanks a lot for your answer.
I have an Ard.Mega and I indeed only need to use them to retrieve vibration data - not sound.
Do you think I can use your setup the same, but differ the code to make it receive only vibration level - say from 0 to 100? In that case, would you mind sharing how the code shall be?
Many thanks.
I had a question. You used 18 piezo. But the Arduino mega allows only 16 input. What ambi missing?
""""const int THRESHOLD = {5,6,8,4,2,5,7,8,5,6};""""
What is the highest treshold value ?
Can you please tell me how i can separately change treshold, and limit the maximum & minumum velocity of each individual piezo?
If possible, write me another command line where i can adust the time amount for the gap between two stroke to avoid double triggering problem.
Thank you.
The highest value a piezo sensor can send using an Arduino is 1023, so threshold values could be anything up to this.
If you just want to 'clip' limit the velocity value, you could change the values on lines 'if (midiVelocityVal[count] > 127) midiVelocityVal[count] = 127;' to set a lower max value, and you could do the same kind of thing for the minimum limit e.g. 'if (midiVelocityVal[count] < 10) midiVelocityVal[count] = 10;'.
To limit how often a stoke can happen you could use the Arduino Millis Library (https://www.arduino.cc/en/Reference/Millis) to store a time for every stoke and then only process a new stroke if it's time is greater than the last time by a certain amount.
I saw padcycles in some sketch. I think it's about avoiding double triggering. I am not sure though. I tried Google. Didn't get enough learning about that term.
I have been playing my DIY arduino midi drum for a year.
your code works flawlessly. Recently i have decided to use a foot switch instead of using 2 separate pads for closed & open hat.
I use Arduino meda...Can you please guide me how the momentary switch should be wired to my arduino ?
And what modification i have to make into my current code for activating the switch functionality ?
My current Code is given below...
/*
Midi drum ..with 10 piezo.. no pedal(2 separate pad with 2 separate piezo for closed hat and open hat), Kick,snare, open hat, closed hat, tom1, tom2, tom3, crash1, crash2, ride
*/
#include
MIDI_CREATE_DEFAULT_INSTANCE();
//========================================================================================
//Set this value to the number of keys/piezos you are using
const int NUM_OF_KEYS = 10;
//Adjust this value to change the sensitivity of the piezos
const int THRESHOLD = 10;
//Set this value to the number of microseconds you want each MIDI note to last for
const int NOTE_LENGTH = 50;
//Adjust this value to set the range of MIDI note velocity values
const int VEL_SENSE_VAL = 10;
//Change this number to set what MIDI channel the MIDI notes are set to
const int midiChan = 1;
//Change these numbers to set what MIDI note number each key/piezo will send.
//Also make sure that the total number of numbers here matches the value of NUM_OF_KEYS
const int midiNote[NUM_OF_KEYS] = {36, 38, 60, 61, 49, 52, 48, 47, 43, 84};
//Change these values to set which analog input pins you are using
//Also make sure that the total number of values here matches the value of NUM_OF_KEYS
const int triggerSensor[NUM_OF_KEYS] = {A0, A1, A2, A3, A4, A5, A6, A7, A8, A9,};
//=======================================================================================
//Variables for storing certain values
int triggerVal[NUM_OF_KEYS] = {0};
bool noteIsOn[NUM_OF_KEYS] = {false};
int midiNoteTime[NUM_OF_KEYS] = {0};
int midiVelocityVal[NUM_OF_KEYS] = {0};
void setup()
{
MIDI.begin(MIDI_CHANNEL_OMNI);
Serial.begin(115200); //REMOVE THIS LINE IF USING HIDUINO INSTEAD OF HAIRLESS
}
void loop()
{
//repeat the below code for each anaolog input/piezo sensor
for (int count; count < NUM_OF_KEYS; count++)
{
//read the piezo value
triggerVal[count] = analogRead(triggerSensor[count]);
//if the value is over the threshold and there isn't currently a note on for this piezo
if (triggerVal[count] > THRESHOLD && noteIsOn[count] == false)
{
//get a velocity value based on the value
midiVelocityVal[count] = triggerVal[count] * (127.0 / 1523.0);
//increase sensitivity
midiVelocityVal[count] *= VEL_SENSE_VAL;
//make sure we don't go out of range
if (midiVelocityVal[count] > 127)
midiVelocityVal[count] = 80;
//send a MIDI note-on message
MIDI.sendNoteOn (midiNote[count], midiVelocityVal[count], midiChan);
//flag that the note is on
noteIsOn[count] = true;
//start a timer for the note to be on for
midiNoteTime[count] = NOTE_LENGTH;
}
//if the note is currently on
if (noteIsOn[count] == true)
{
//reduce the time value by 1
midiNoteTime[count]--;
//if time value equals 0
if (midiNoteTime[count] == 0)
{
//turn off the note
MIDI.sendNoteOff (midiNote[count], 0, midiChan);
noteIsOn[count] = false;
}
}
}
//pause the loop
delay(1);
}
I want to add a momentary switch as a foot pedal which will triggers note between 61 & 60 ( Closed & open HiHat). Thank You
Want to join the discussion?
Create an account or login to get started!