
A NonLinear Educating Company
Transformar um piano de brinquedo do vintage em um controlador MIDI Usando Arduino
Liam Lacey on Jul 31, 2015 in DIY & Hacking | 25 comments
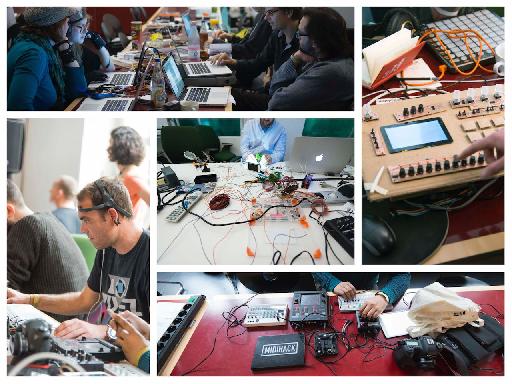
Em maio 2015 eu participei MIDI corte
Se você ler um artigo anterior da mina , você saberia que eu recomendo a plataforma Arduino para fazer controladores MIDI DIY. Eu escolhi Arduino para este projeto sobre as outras plataformas sugeridas, uma vez que fornece-lhe com um monte de controle sobre o que fazer com os dados de entrada / saída, no entanto, ainda é extremamente novato amigável com um monte de apoio oficial e guias. Este guia destina-se a indivíduos que são iniciantes na electrónica, desenvolvimento de software, e Arduino.
Aqui está uma lista de coisas que você precisa para este projeto. Todos os componentes eletrônicos mencionados aqui podem ser comprados a partir de qualquer boa loja de eletrônicos DIY / hobby, como SparkFun.
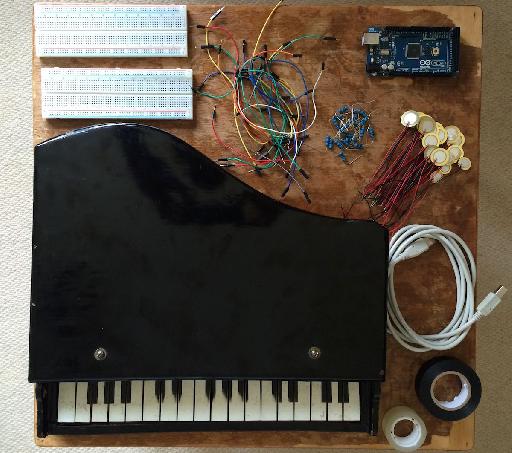
What You Will Need for this Project
- Um piano de brinquedo de madeira acústico. Eu comprei o meu piano de brinquedo fora do eBay por cerca de US $ 15, onde geralmente há alguns disponíveis, no entanto você também pode ocasionalmente encontrá-los em lojas de caridade e mercados de pulga. Este projeto é baseado em torno de pianos com um mecanismo pelo qual as chaves causar um martelo para golpear algum tipo de ressonância objeto; usando um teclado eletrônico brinquedo não vai funcionar aqui.
- Placa Arduino. Este é o microcontrolador que será
- Elementos Piezo. Sensores de elemento Piezo são utilizados para detectar vibrações e choques, e são componentes populares para usar especialmente em produtos de gatilho de tambor de bricolage e comerciais. Vamos usá-los para detectar prensas das chaves, e você vai precisar de um desses para cada tecla. Você terá de considerar o tamanho dos piezos que necessita com base no tamanho das cabeças de martelo dentro de piano
- Resistores 1M Ohm. As resistências estão a componente mais básica e comum em circuitos eléctricos, e são usados para resistir ao fluxo de electricidade. Você vai precisar de um desses para cada tecla / piezo.
- Fios. Arduino e fios amigável-breadboard, também conhecidos como fios de ligação macho-para-homem, será o mais fácil de usar, e vamos usá-los para conectar todos os componentes para o Arduino. Você vai precisar de 2 para cada tecla / piezo, assim como punhado de extras.
- Breadboards-solda menos. Breadboards-solda menos permitem criar circuitos eletrônicos sem a necessidade de soldar tudo junto. Você pode precisar de um par destes, dependendo de quantas teclas de seu piano de brinquedo tem.
- Cabo USB
- Fita adesiva de dupla face
- O software Arduino. O software Arduino é usado para programar a placa Arduino para fazer o que quer que ele faça. Esta é livremente disponível na página Arduino Software e pode ser executado no Mac OS X, Windows e Linux. Você também vai precisar fazer o download do MIDI Biblioteca Arduino.
- Software porta MIDI Serial-to-MIDI e virtual. Você vai precisar de algum software serial-to-MIDI para converter as mensagens que saem do Arduino em mensagens MIDI. Eu recomendo o livre calvo MIDI para aplicação Ponte de série, no entanto, há uma série de outros disponíveis. Você também vai precisar para usar uma porta virtual de MIDI para conectar a saída de calvo à entrada da sua DAW ou instrumento MIDI. Por isso eu recomendo loopMIDI no Windows ou no Mac OS X, você pode usar a sua built-in driver IAC. Em alternativa, é possível
- Software MIDI. Você
Step 1—Prepare your Piano
Antes que você possa começar a inserir os componentes eletrônicos em seu piano, você precisará remover as barras de som, ou modificá-los para que você possa montar os piezos a eles. O conjunto de varas em meu piano foram aparafusado ao lado de baixo do topo, então eu simplesmente desaparafusada-los para removê-los, e, em seguida, parafusado em um bloco de madeira que eu poderia apertar os sensores piezo para. Uma opção alternativa seria a de fixar uma fina peça plana de material (por exemplo, papelão, madeira) para a parte inferior das hastes que as piezos podem ser corrigidos para, no entanto, você pode achar que é mais difícil para anexar algo para as hastes, além de você Pode também encontrar as hastes vai ficar no caminho ao tentar inserir os componentes eletrônicos.
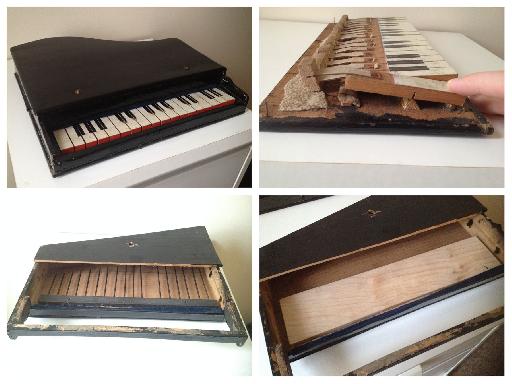
A partir dos ponteiros do relógio superior esquerdo
Outra modificação que você pode precisar fazer para seu piano é a adição de um ponto / ponto à superfície do martelo que vai atacar os piezos. Se as cabeças de martelo são mais largas do que o círculo interno dos piezos eles não podem desencadear os sensores adequadamente, de modo a superar esse problema com meu piano Gravei pequenas bolas de solda para os martelos para criar um ponto levantado.
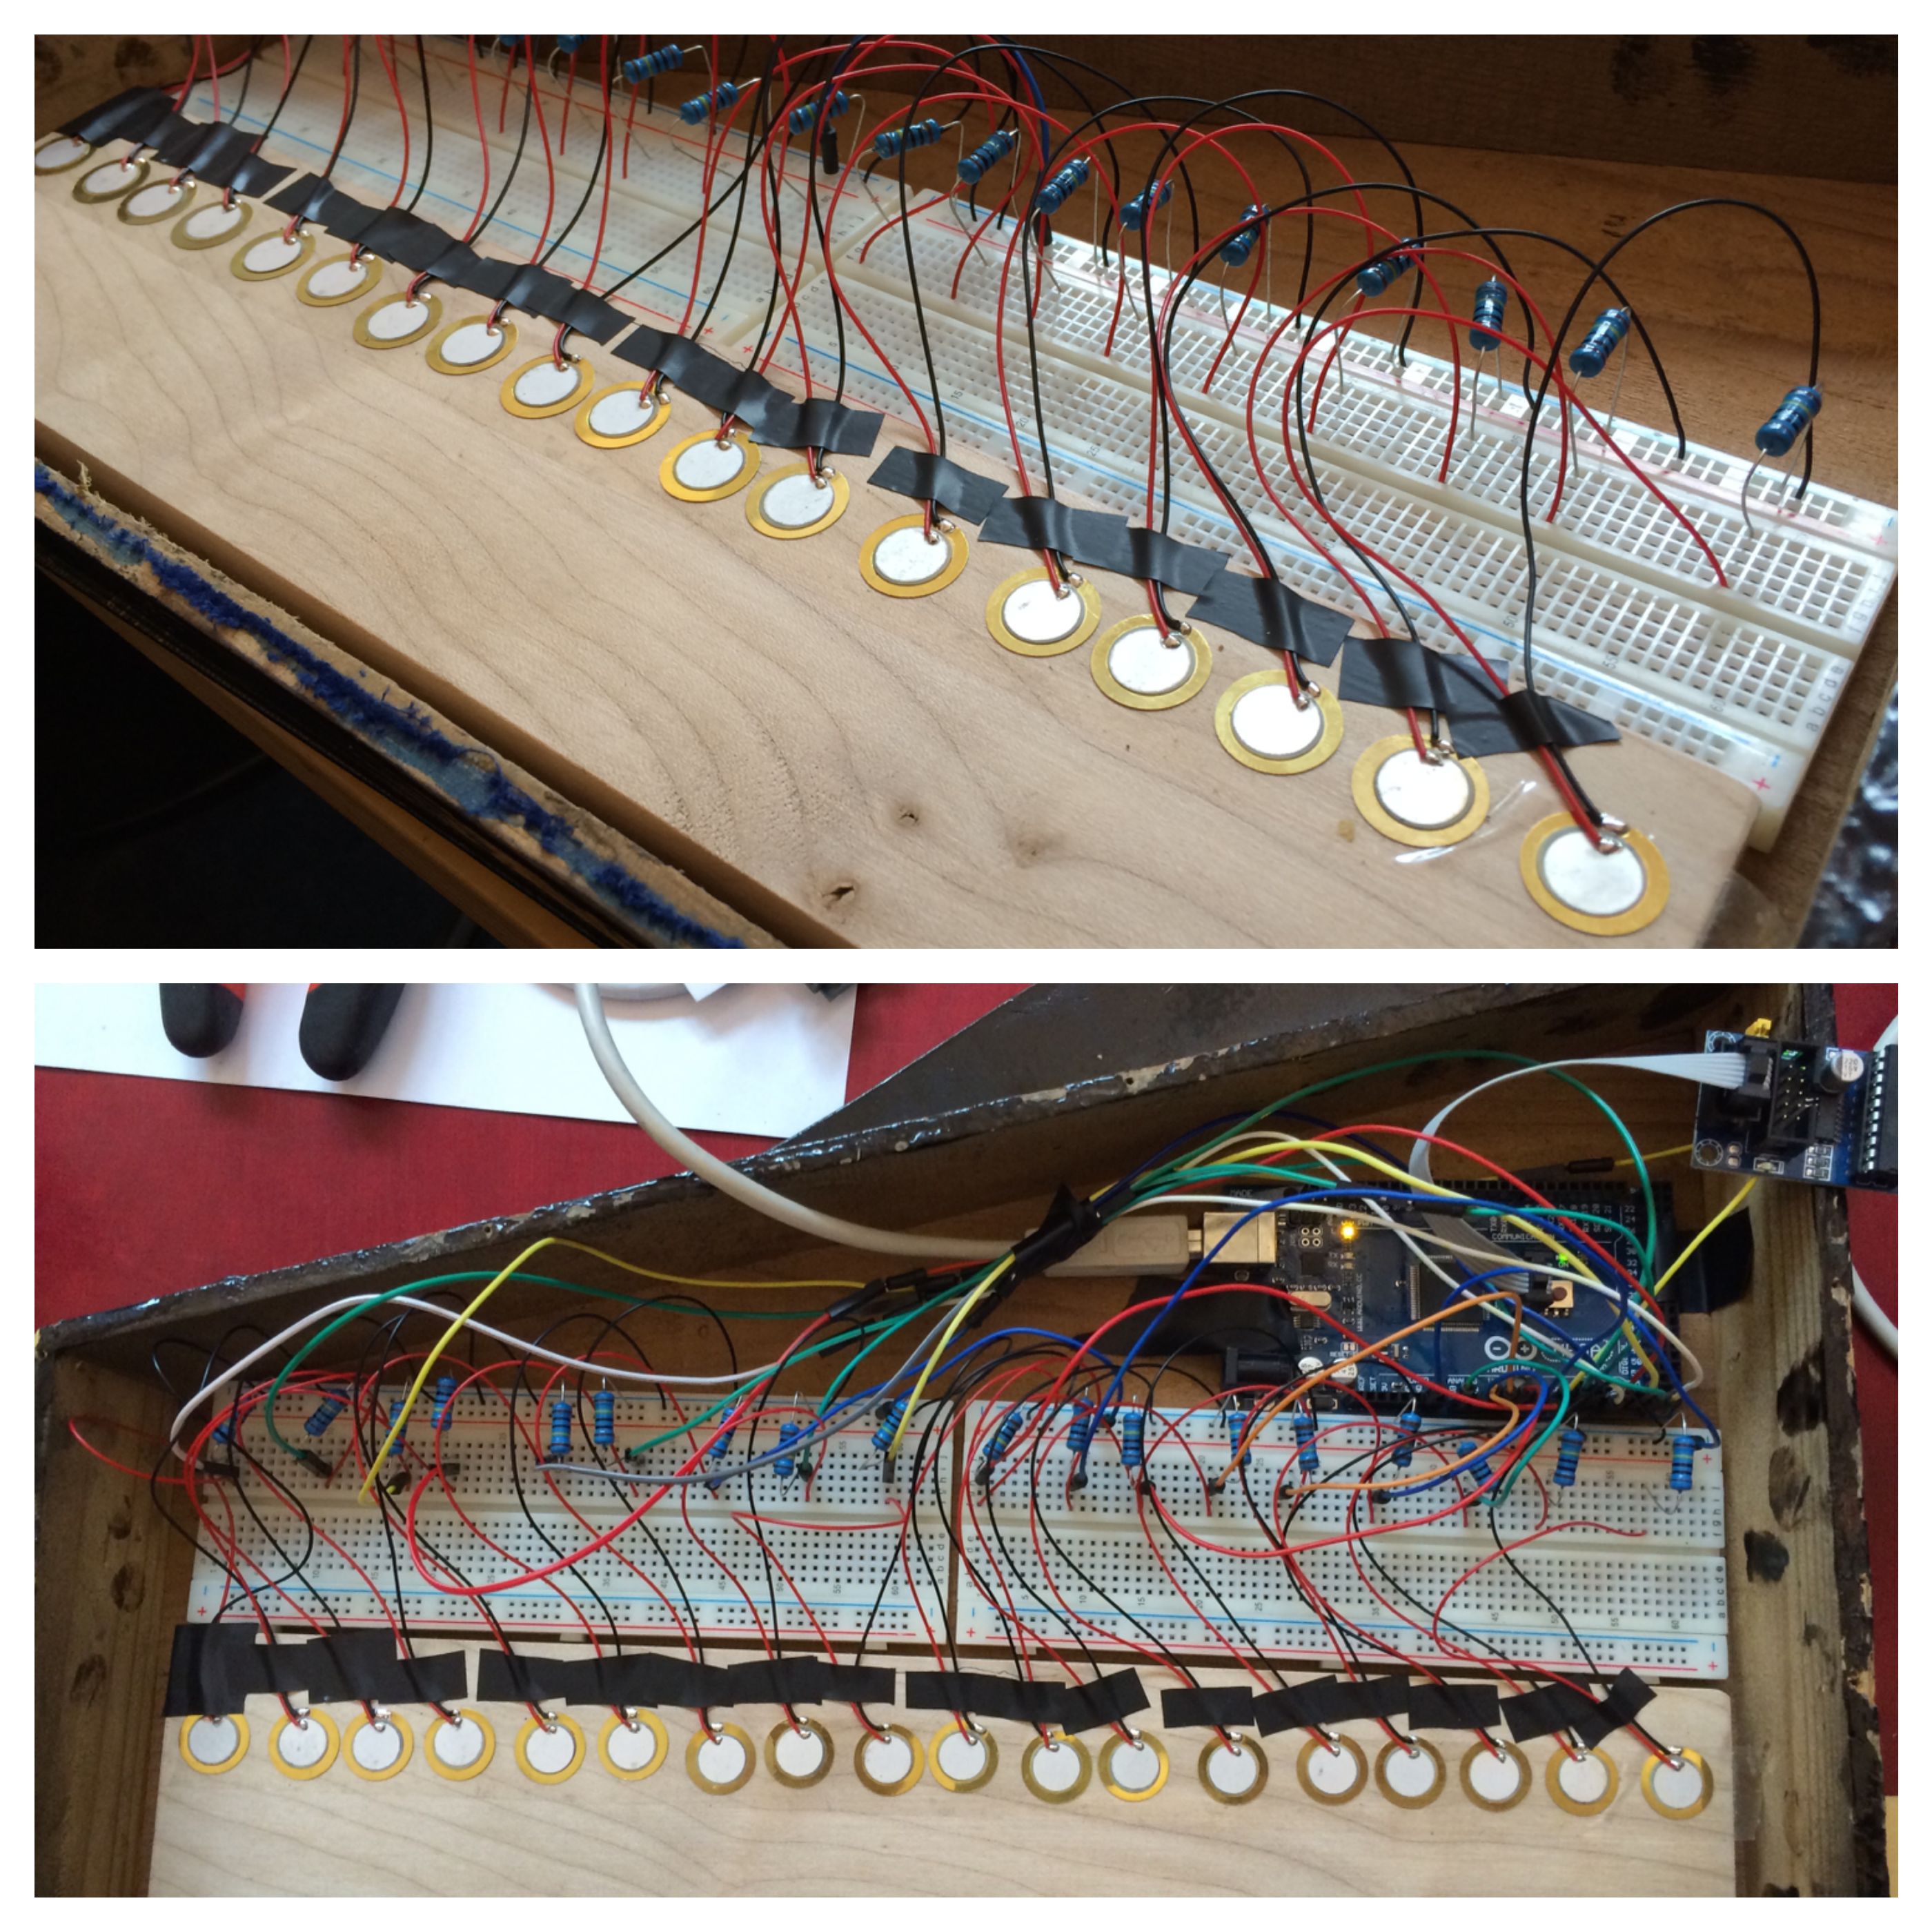
Step 2—Attach the Piezos
Vamos agora colocar os sensores piezo para o lado de baixo do topo do piano, onde os mecanismos de martelo normalmente atacar as hastes de som quando as teclas são pressionadas. Se o piano é feito à mão como a minha, você provavelmente vai achar que os martelos aren
Uma vez que você
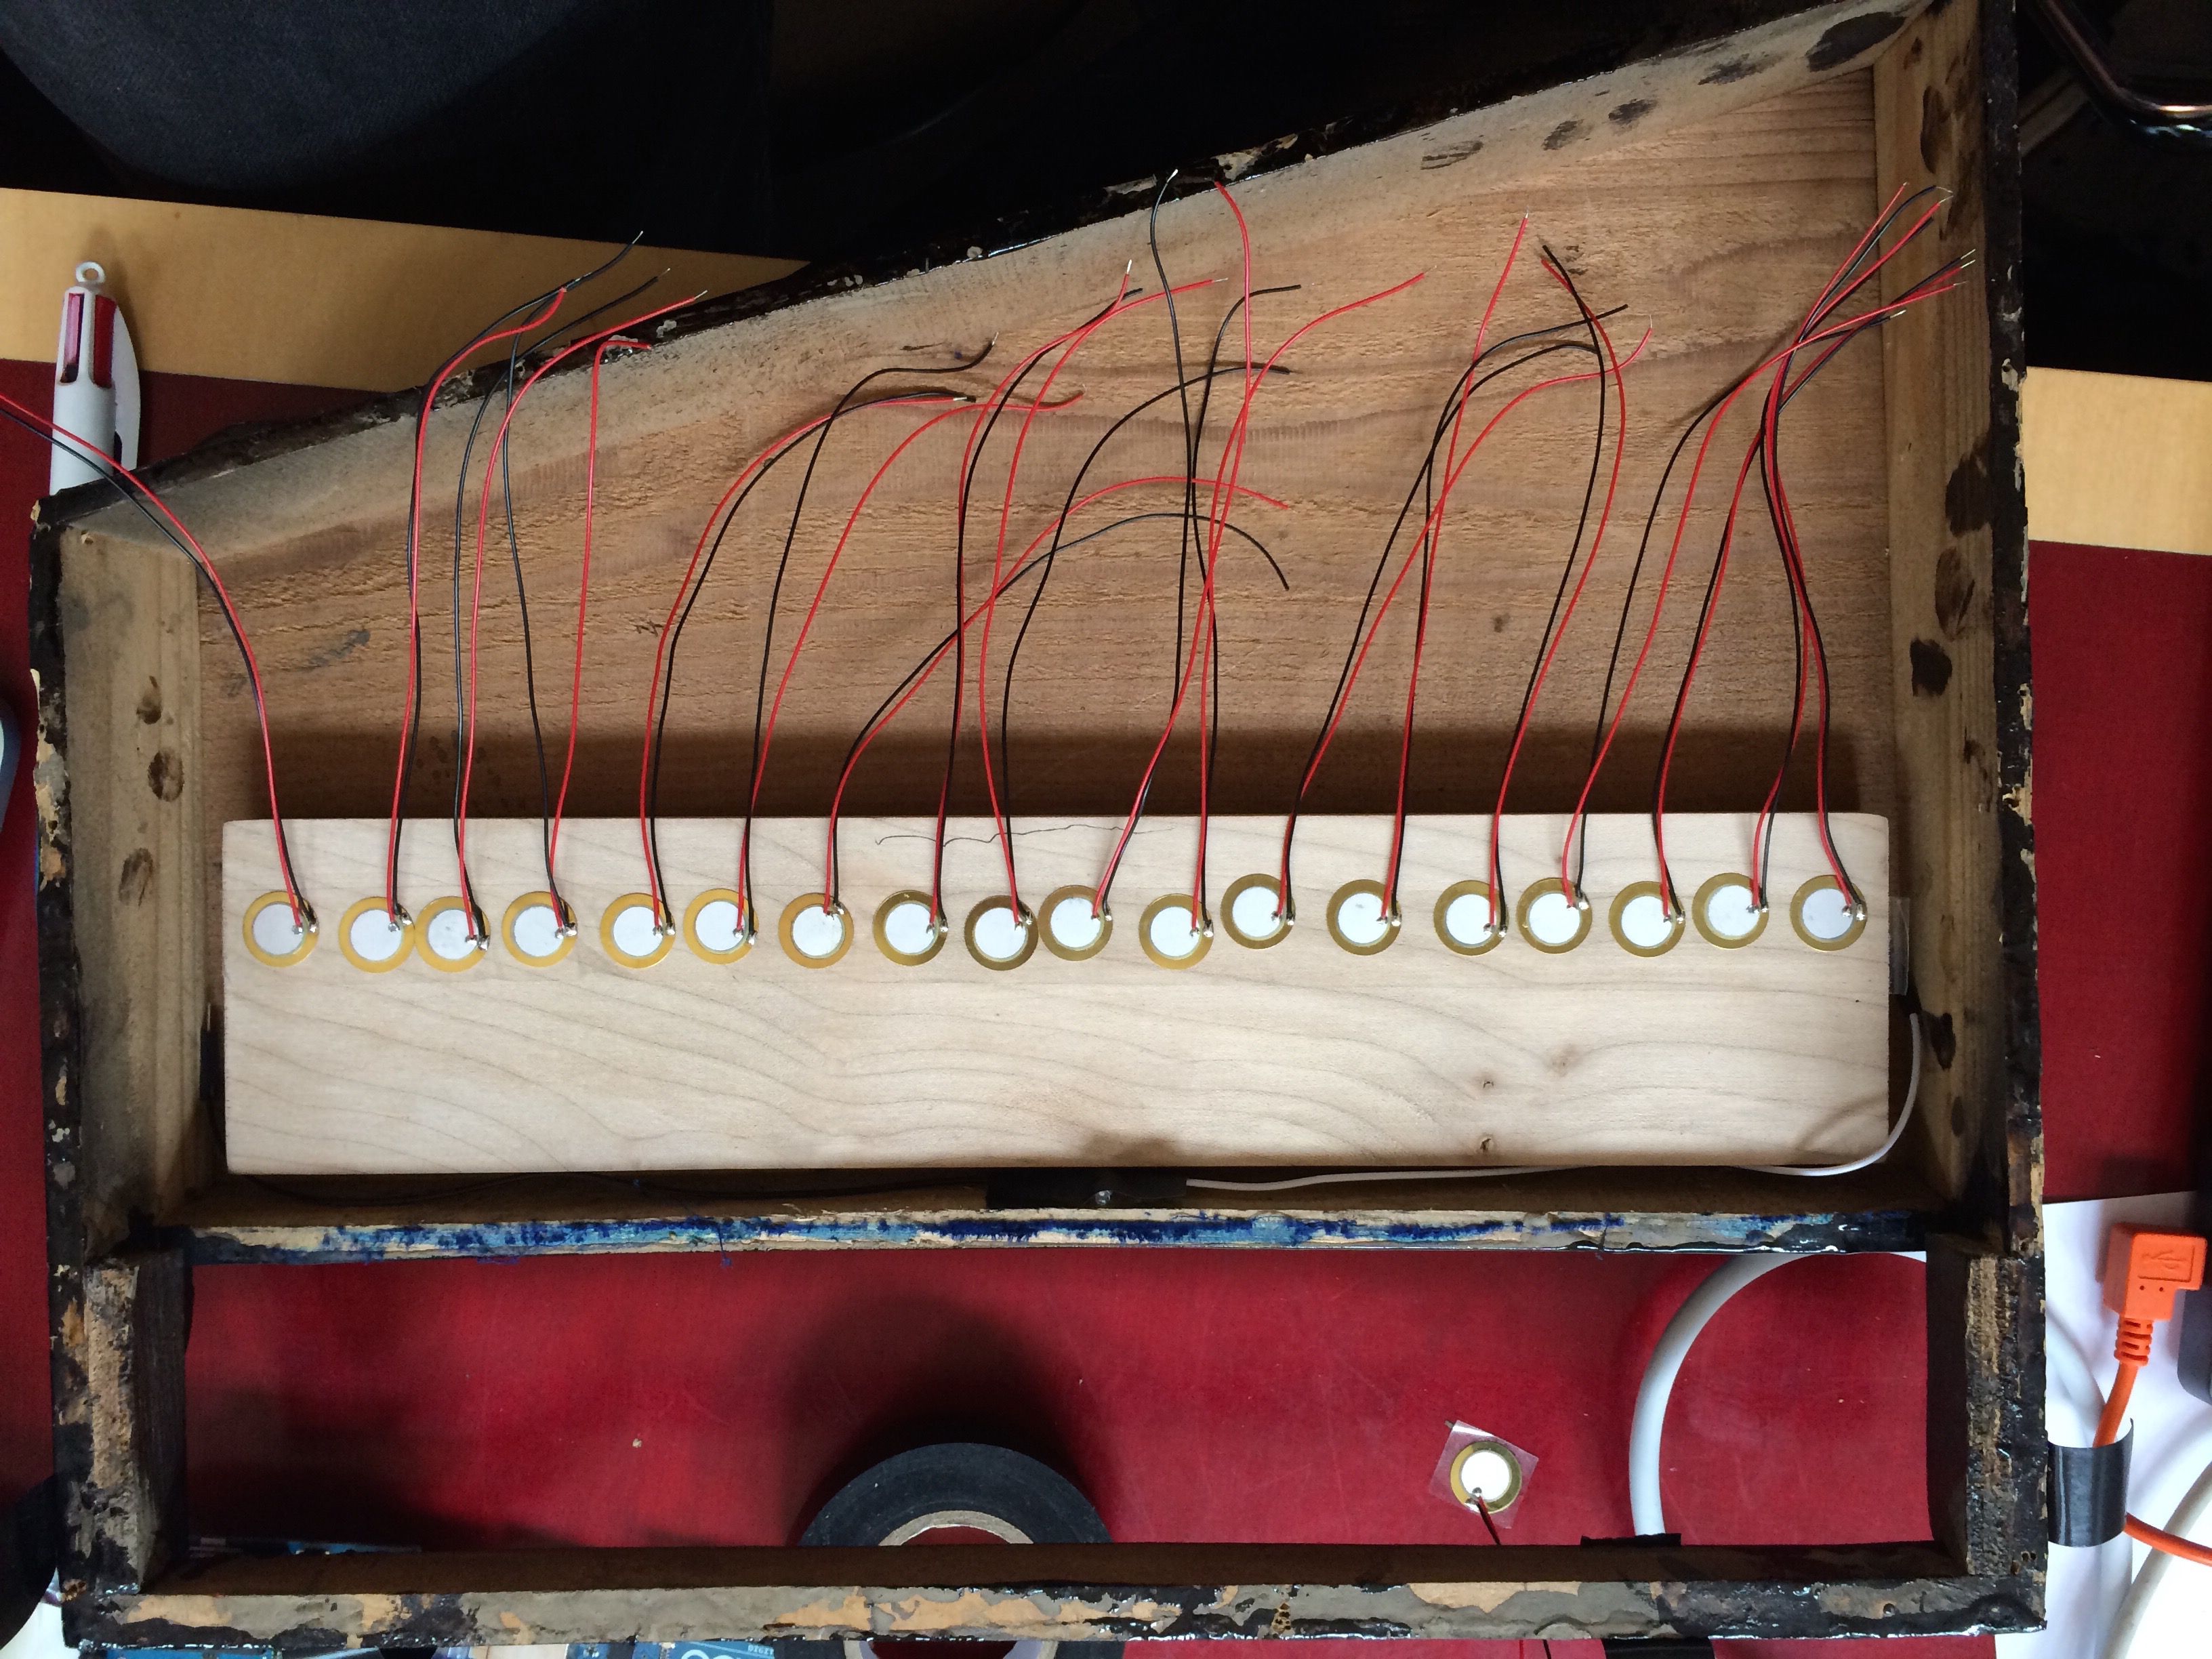
Os sensores piezo ligados
Step 3—Complete the Circuitry
A fim de completar o circuito primeiro você precisa anexar a placa de ensaio / s e placa Arduino para o interior do piano. Se seu piano abre a partir do fundo como o meu fez você provavelmente terá que furar as tábuas para o lado de baixo do topo, no entanto, se o piano abre a partir do topo você provavelmente poderia concluir o projeto por apenas colocar as placas na parte inferior sem a necessidade de ficar los para baixo. Coloque a placa de ensaio / s mais próximo para os piezos, com o Arduino, por outro lado.
Em seguida, você precisa anexar os componentes da placa de ensaio / s. Há duas seções principais para a maioria dos breadboards (como mostrado no diagrama abaixo)
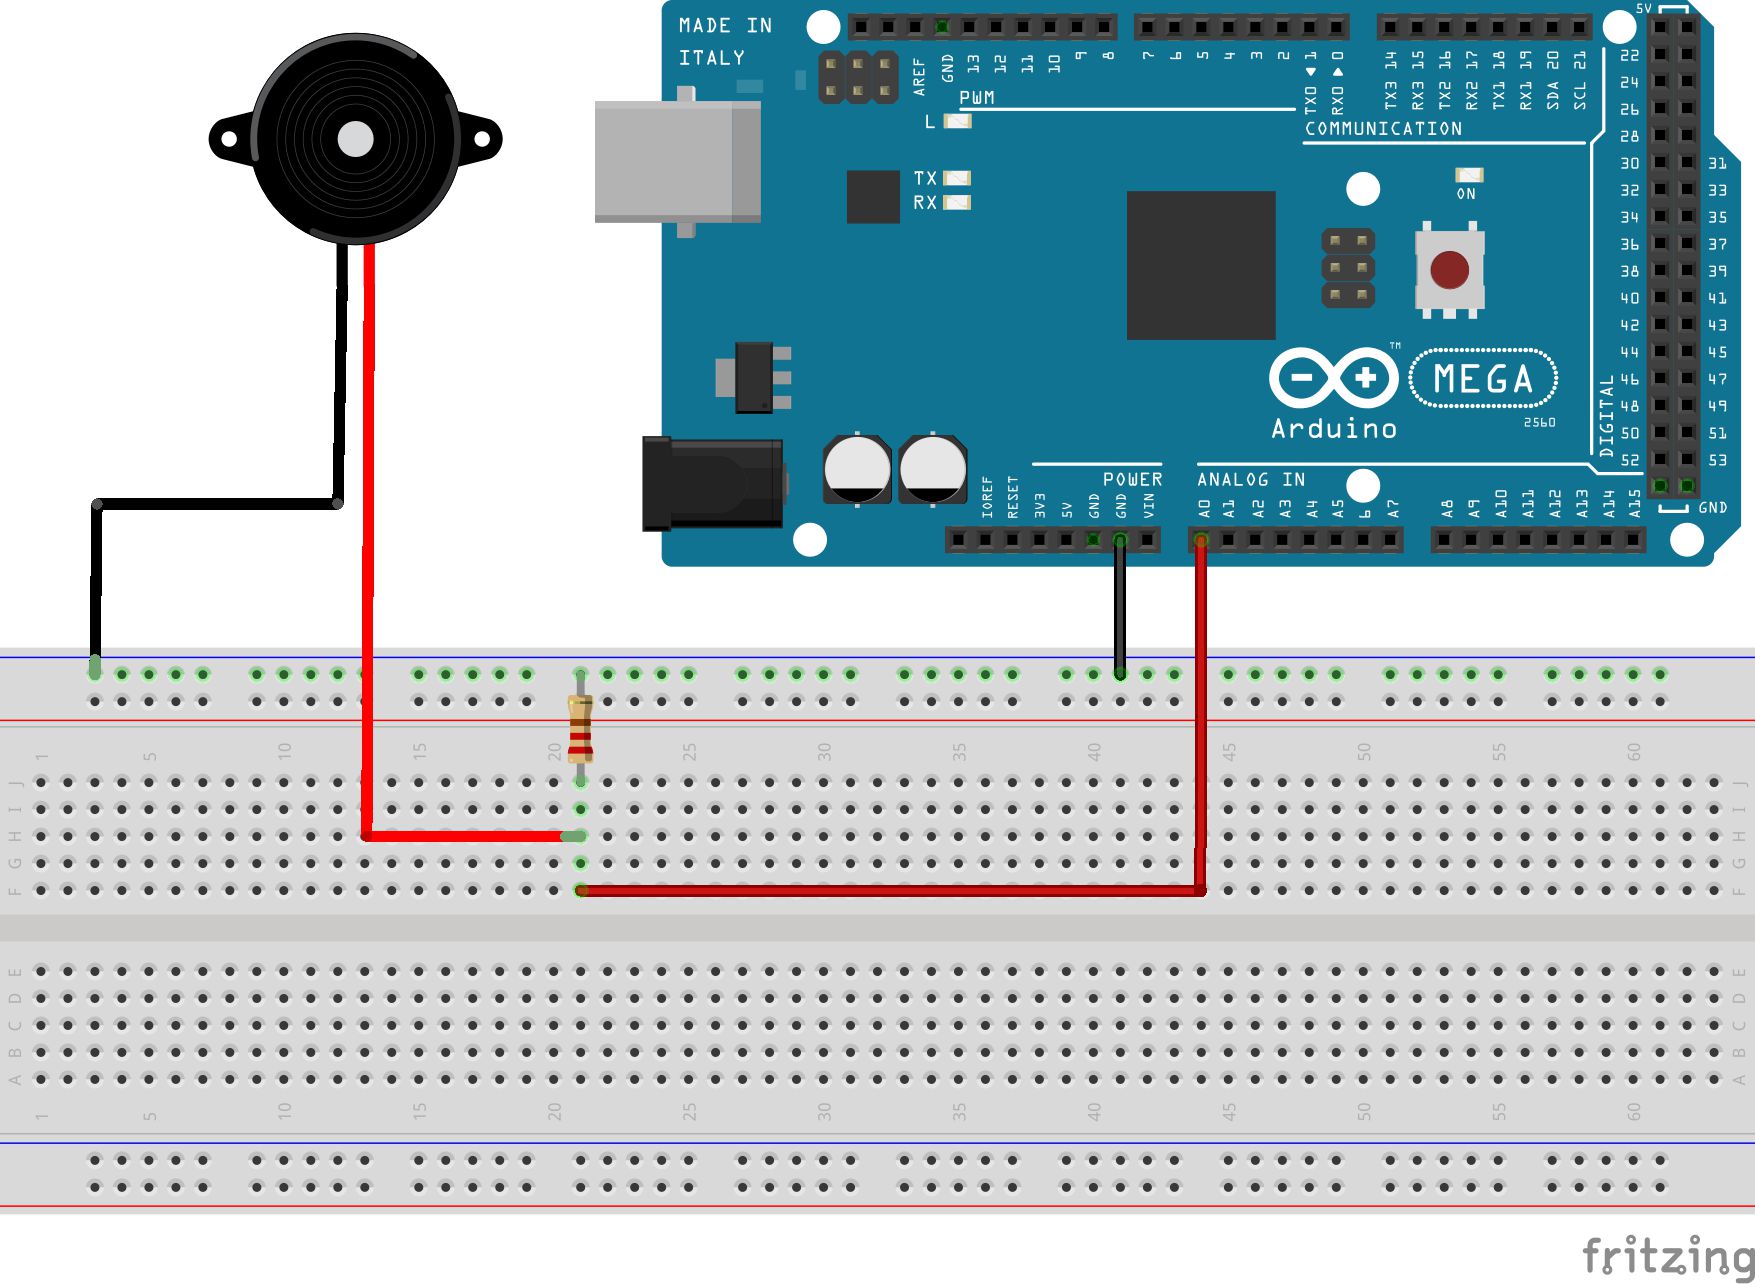
Como conectar um único sensor piezo para uma placa Arduino
Como apresentado no diagrama anterior, para cada tecla / piezo, a (solo) de fio a partir do piezo preto necessita de ser ligado a uma das tiras de barramento de terra, enquanto que o (sinal) fio vermelho necessita de ser ligado a um dos terminais tiras. Em seguida, você precisa conectar um resistor (em qualquer orientação) a partir da barra de terminais para a faixa de terreno; um fio a partir da régua de terminais de um dos pinos de entrada analógica do Arduino, e um outro fio a partir da tira de chão para um dos pinos de terra. Você, então, precisa repetir este circuito para cada piezo, utilizando uma tira de terminais diferente e Arduino pino de entrada analógica de cada vez, como demonstrado no diagrama a seguir.
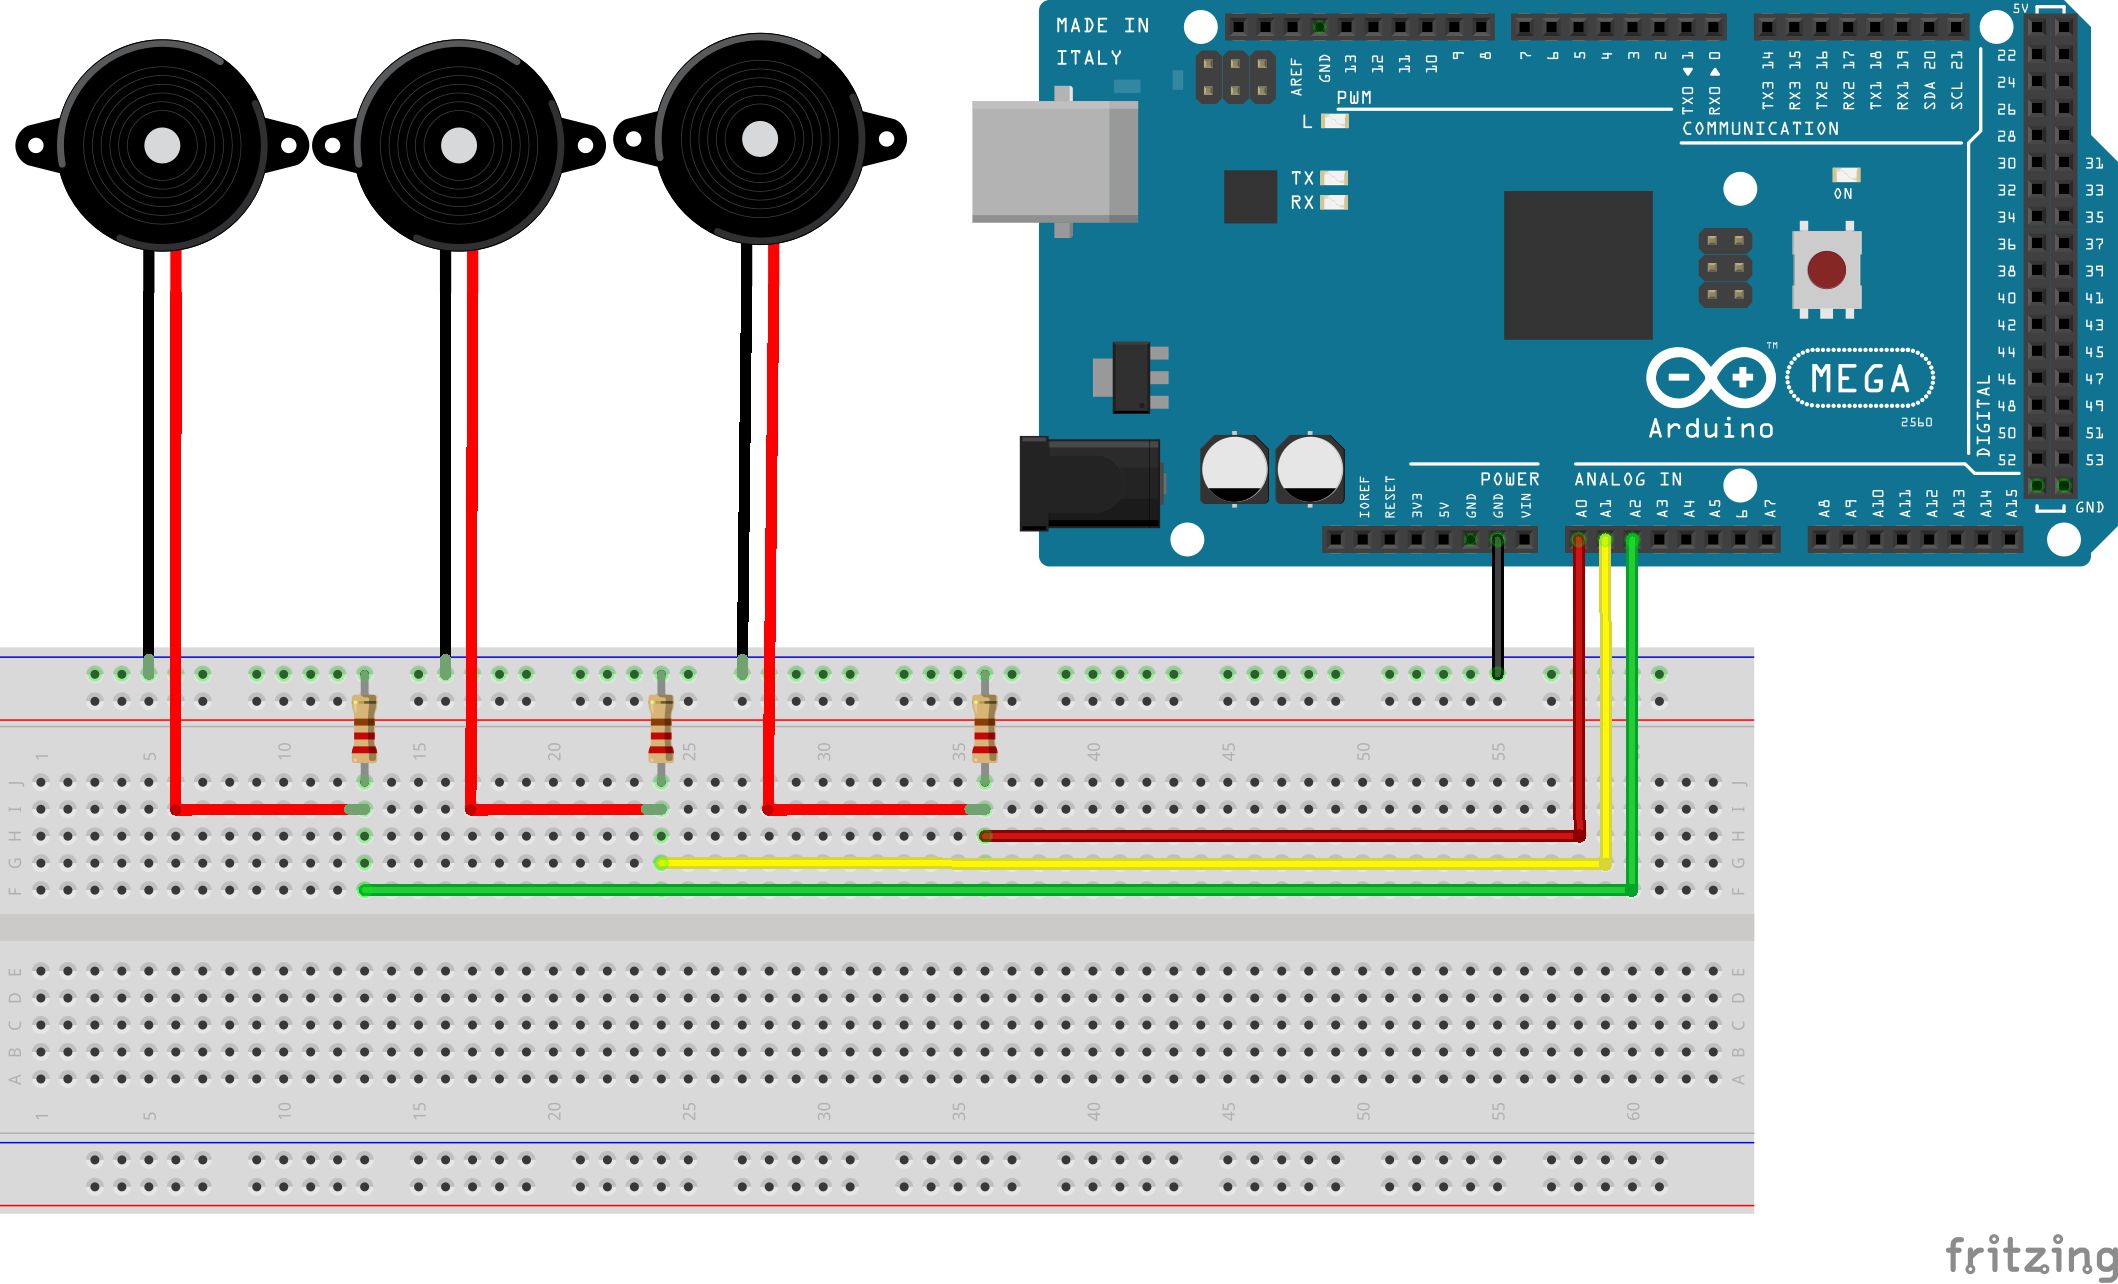
Como conectar vários sensores piezo para uma placa Arduino
Eu recomendo o uso de fios diferentes cores para cada conexão de entrada analógica, como isso torna mais fácil para ver o que
Topo
Step 4—Edit and Upload the Code
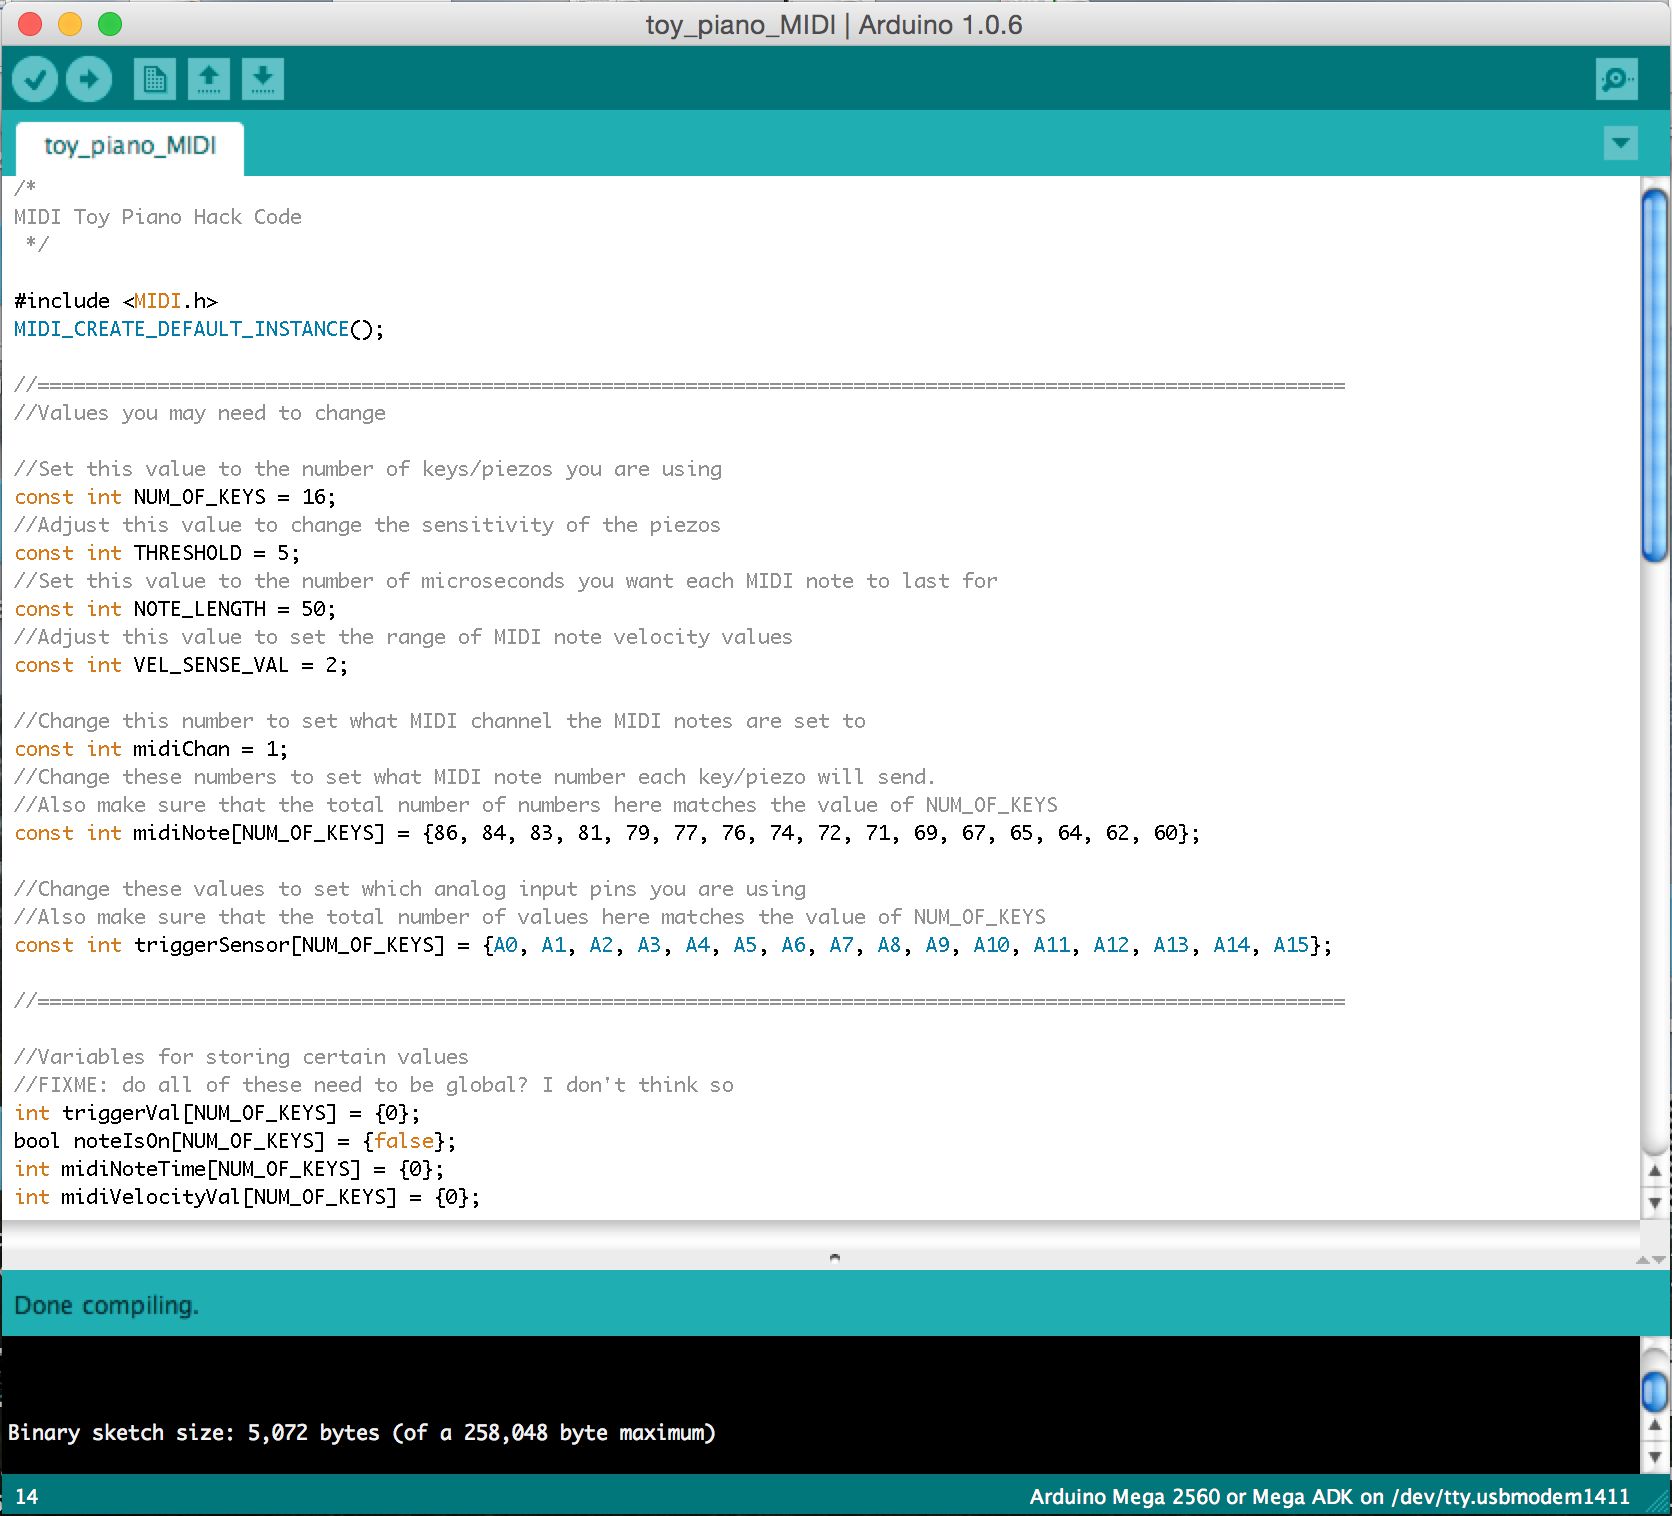
Depois que o hardware e os componentes eletrônicos são completos, então você precisa fazer upload de algum software para a placa Arduino que vai virar leituras dos piezos em notas MIDI. Depois de ter baixado e instalado tanto o software Arduino eo MIDI Biblioteca Arduino, abra o aplicativo Arduino e copie o código abaixo para o editor de texto Arduino:
/*
MIDI Toy Piano Hack Code
*/

#include
MIDI_CREATE_DEFAULT_INSTANCE();

//========================================================================================
//Values you may need to change

//Set this value to the number of keys/piezos you are using
const int NUM_OF_KEYS = 16;
//Adjust this value to change the sensitivity of the piezos
const int THRESHOLD = 5;
//Set this value to the number of microseconds you want each MIDI note to last for
const int NOTE_LENGTH = 50;
//Adjust this value to set the range of MIDI note velocity values
const int VEL_SENSE_VAL = 2;

//Change this number to set what MIDI channel the MIDI notes are set to
const int midiChan = 1;
//Change these numbers to set what MIDI note number each key/piezo will send.
//Also make sure that the total number of numbers here matches the value of NUM_OF_KEYS
const int midiNote[NUM_OF_KEYS] = {86, 84, 83, 81, 79, 77, 76, 74, 72, 71, 69, 67, 65, 64, 62, 60};

//Change these values to set which analog input pins you are using
//Also make sure that the total number of values here matches the value of NUM_OF_KEYS
const int triggerSensor[NUM_OF_KEYS] = {A0, A1, A2, A3, A4, A5, A6, A7, A8, A9, A10, A11, A12, A13, A14, A15};

//=======================================================================================

//Variables for storing certain values
int triggerVal[NUM_OF_KEYS] = {0};
bool noteIsOn[NUM_OF_KEYS] = {false};
int midiNoteTime[NUM_OF_KEYS] = {0};
int midiVelocityVal[NUM_OF_KEYS] = {0};

void setup()
{
    MIDI.begin(MIDI_CHANNEL_OMNI);
}

void loop()
{
    //repeat the below code for each anaolog input/piezo sensor
    for (int count; count < NUM_OF_KEYS; count++)
    {
        //read the piezo value
        triggerVal[count] = analogRead(triggerSensor[count]);

        //if the value is over the threshold and there isn't currently a note on for this piezo
        if (triggerVal[count] > THRESHOLD && noteIsOn[count] == false)
        {
            //get a velocity value based on the value
            midiVelocityVal[count] = triggerVal[count] * (127.0/1023.0);

            //increase sensitivity
            midiVelocityVal[count] *= VEL_SENSE_VAL;

            //make sure we don't go out of range
            if (midiVelocityVal[count] > 127)
            midiVelocityVal[count] = 127;

            //send a MIDI note-on message
            MIDI.sendNoteOn (midiNote[count], midiVelocityVal[count], midiChan);

            //flag that the note is on
            noteIsOn[count] = true;

            //start a timer for the note to be on for
            midiNoteTime[count] = NOTE_LENGTH;
        }

        //if the note is currently on
        if (noteIsOn[count] == true)
        {
            //reduce the time value by 1
            midiNoteTime[count]--;

            //if time value equals 0
            if (midiNoteTime[count] == 0)
            {
                //turn off the note
                MIDI.sendNoteOff (midiNote[count], 0, midiChan);
                noteIsOn[count] = false;
            }

        }

    }

    //pause the loop
    delay(1);
}
Ensinar-lhe como usar o software Arduino e como codificar é um pouco além do escopo deste artigo, então eu
- NUM_OF_KEYS
- LIMITE
- NOTE_LENGTH
- VEL_SENSE_VAL
- midiChan
- midiNote
- triggerSensor
O software Arduino
Uma vez que você
- Vá para
- Conecte sua placa Arduino ao computador via USB.
- Vá para
- Vá para
- Vá para
Observe
Step 5—Connect the Software
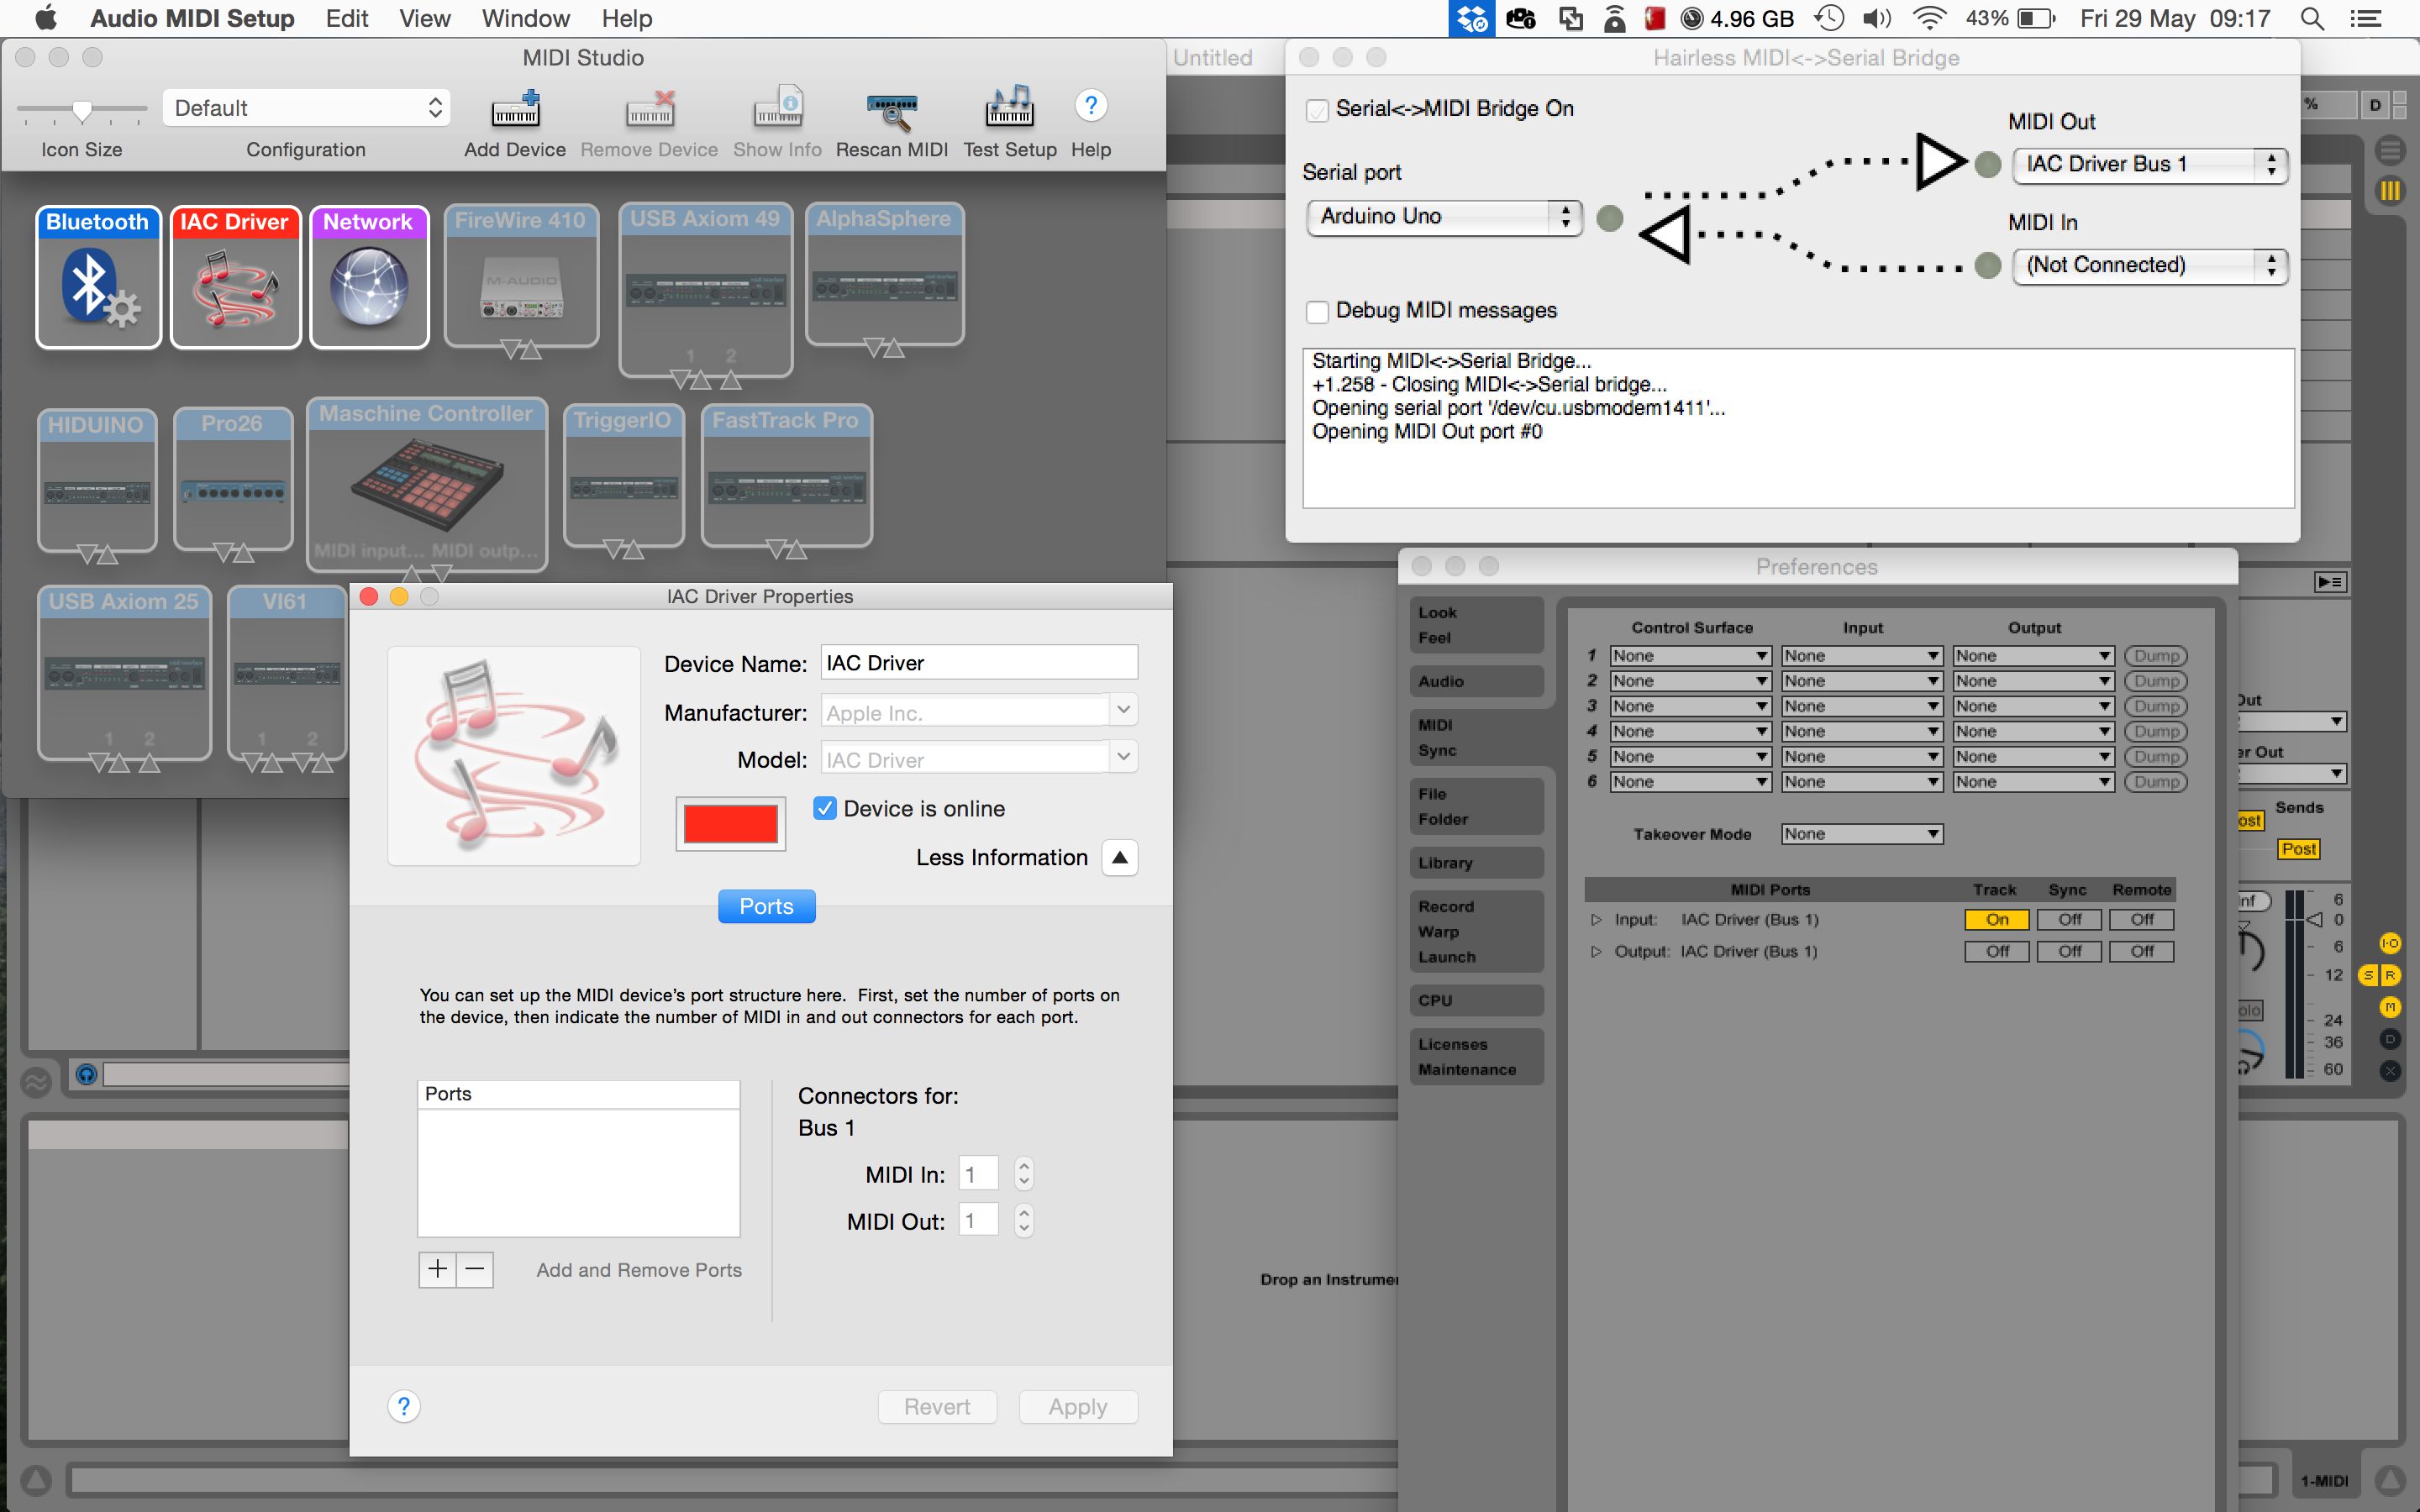
Esquerda: Configurar uma porta MIDI virtual no OS X. Superior direito: Configurando calvo MIDI para Ponte de série. Inferior direito: Conexão à porta MIDI virtual no Ableton Live.
Finalmente, você precisa iniciar e conectar todos os softwares necessários no seu computador:
Configurar uma porta MIDI virtual:
Se você estiver no Windows:
- Abra loopMIDI
- Clique no
- Deixar o aplicativo em execução
Se você está no OS X:
- Lançar o
- Vá para
- Clique duas vezes no
- Certifique-se de que o
- Feche o aplicativo
Conecte calvo MIDI-to-Serial Bridge para o Arduino ea porta MIDI virtual:
- Lançamento calvo
- No lado esquerdo definir o
- Na mão direita lado definir o
- Verifique se o
- Deixar o aplicativo em execução
Conectá-lo software instrumento DAW / MIDI à porta virtual:
- Inicie o seu DAW ou instrumento MIDI
- Abaixo dele,
Por favor, note - se o seu Arduino é cortado com HIDUINO, as etapas 1 e 2 don
Uma vez que este tenha sido concluído agora você deve ser capaz de desencadear notas de seus instrumentos MIDI com o piano de brinquedo.
Assista a um curto vídeo de demonstração do controlador MIDI acústico piano de brinquedo em ação:
Conclusion
De modo que
Além disso, se você é interessante em participar no próximo evento MIDI Hack, manter um olho sobre o site MIDI corte para anúncios. Há também um par de hackathons semelhantes tecnologia música que são realizadas anualmente em todo o mundo, tais como Música Hackday e Música Tecnologia Fest, bem como vários one-off e eventos locais.

Discussion
You could connect a different type of sensor or electronic source and get results without changing the code, however it will only create a note based on the first reading it gets over the threshold (due to the logic implemented for turning piezo inputs into MIDI notes). Using just electrical current to trigger a reading would be very similar to using a simple push button (where pressing the button completes the circuit and creates a reading), so I'd recommend looking at Arduino button tutorials for that.
It sounds like your piezo sensors are not properly connected to the Arduino. Check that they are connected to the correct pins. You may also need to correct the value of NUM_OF_KEYS in the code if you are using less than 16 sensors/keys. You may also need to up the value of THRESHOLD in the code if your piezos are particularly sensitive.
thanks for answering me so fast , I'll check that the wires are connected correctly, I have another doubt about the code it in the end you said : "repeat the below code for each anaolog input/piezo sensor", and I 'm trying to do with a arduino uno with only 3 pins I changed all that you said , but the end I do not know where to get the code to be copied to each piezo I have and also do not know where it ends.
look I change this:
NUM_OF_KEYS = 3;
midiNote[NUM_OF_KEYS] = {86, 84, 83}
triggerSensor[NUM_OF_KEYS] = {A0, A1, A2}
IN THIS PART I WILL NEED TO PUT SOME NUMBER? -> (int count; count < NUM_OF_KEYS; count++)
Im sorry for all this question but im very lost with this and thank you so much for your help and sorry for my english.
Im from Brasil.
NUM_OF_KEYS, midiNote, and triggerSensor are the only values you need to change, which you have correctly done. The "repeat the below code for each anaolog input/piezo sensor" comment is actually a description of what the below 'for' loop does, rather than being an instruction. You shouldn't have to change any code in that section for it to work.
Thank you so much, this time again made ​​the piezos cables and worked, thanks for your help I buy one arduino mega
and when it comes I gonna do with the 16 piezos.
please let me ask you one more question?! can I put on this project potentiometers or one pitch bend?
Glad you got it working.
If you want to attach something like a potentiometer you'll need to change the code for reading from that particular analogue input. However the code needed here is a lot simpler - see https://www.arduino.cc/en/Tutorial/AnalogReadSerial to lean how to do this.
_____
#include
____
He's answering me this
#include
^
exit status 1
#include expects "FILENAME" or
Do you have an idea?
Thanks,
Florent
Thanks for the kind words and for spotting this mistake.
The code above has now been updated to the correct version.
Thanks,
Liam.
Project = allow young people to explore (play) the out-of-reach pipe organ from a wireless-midi capable keyboard.
So far... I have an arduino, a wireless midi transmitter/receiver (Medeli WIMIDI - tested and quite surprised by performance), a breadboard (cables, female midi socket etc).
I want to connect the wireless midi transmitter to the out socket of the remote keyboard and the wireless midi receiver to the arduino (I need to solder connect to arduino via breadboard). With the arduino midi library I presume I will then be able to receive the incoming midi signal ? This is where it becomes tricky for me to ascertain next steps!... I then want to translate the midi in to individual note signals (much like what you have done in this article). Is this possible?
If this is doable, my last sticking point is how to get the individual note signals 'transferred' to the organ console. I have seen an article where someone attaches a solenoid for each note to a wooden board and then rests the board over the top of the organ keyboard. However, the organ we are planning to work on already has access to the rear of the keyboard and each note has a visible switch (2 cables to each note) on a low voltage (12v) system. Is it possible to intercept each of these switches with the arduino outputs for each note? My apologies if this is a stupid question!?
This is an awesome tutorial. It'll help me a lot with what I want to do cause the setting is similar but usage is completely different.
I wonder if the amount of the contact mics can be different? Is there any maximum we can connect?
Also, is it possible to use condenser mics instead of piezos, possibly with a little trick?? Otherwise do you have any suggestions of how I can do it?
Thanks a lot!
The number of piezo sensors you can connect depends on the number of analog inputs that your microcontroller has e.g. on an Arduino Mega you have 16 analog inputs. However it is possible to expand this number using multiplexer components - see https://playground.arduino.cc/Learning/4051. There are also Arduino IO expander shields that can do this for you.
Regarding using consider mics instead, the extra complexity depends on whether you are just trying to detect a sound level, or trying to capture actual sound data. For just detecting sound levels see http://www.learningaboutelectronics.com/Articles/Arduino-microphone-circuit.php as an example, however recording actual audio is more complex (e.g. see http://www.instructables.com/id/Arduino-Audio-Input/).
Thanks a lot for your answer.
I have an Ard.Mega and I indeed only need to use them to retrieve vibration data - not sound.
Do you think I can use your setup the same, but differ the code to make it receive only vibration level - say from 0 to 100? In that case, would you mind sharing how the code shall be?
Many thanks.
I had a question. You used 18 piezo. But the Arduino mega allows only 16 input. What ambi missing?
""""const int THRESHOLD = {5,6,8,4,2,5,7,8,5,6};""""
What is the highest treshold value ?
Can you please tell me how i can separately change treshold, and limit the maximum & minumum velocity of each individual piezo?
If possible, write me another command line where i can adust the time amount for the gap between two stroke to avoid double triggering problem.
Thank you.
The highest value a piezo sensor can send using an Arduino is 1023, so threshold values could be anything up to this.
If you just want to 'clip' limit the velocity value, you could change the values on lines 'if (midiVelocityVal[count] > 127) midiVelocityVal[count] = 127;' to set a lower max value, and you could do the same kind of thing for the minimum limit e.g. 'if (midiVelocityVal[count] < 10) midiVelocityVal[count] = 10;'.
To limit how often a stoke can happen you could use the Arduino Millis Library (https://www.arduino.cc/en/Reference/Millis) to store a time for every stoke and then only process a new stroke if it's time is greater than the last time by a certain amount.
I saw padcycles in some sketch. I think it's about avoiding double triggering. I am not sure though. I tried Google. Didn't get enough learning about that term.
I have been playing my DIY arduino midi drum for a year.
your code works flawlessly. Recently i have decided to use a foot switch instead of using 2 separate pads for closed & open hat.
I use Arduino meda...Can you please guide me how the momentary switch should be wired to my arduino ?
And what modification i have to make into my current code for activating the switch functionality ?
My current Code is given below...
/*
Midi drum ..with 10 piezo.. no pedal(2 separate pad with 2 separate piezo for closed hat and open hat), Kick,snare, open hat, closed hat, tom1, tom2, tom3, crash1, crash2, ride
*/
#include
MIDI_CREATE_DEFAULT_INSTANCE();
//========================================================================================
//Set this value to the number of keys/piezos you are using
const int NUM_OF_KEYS = 10;
//Adjust this value to change the sensitivity of the piezos
const int THRESHOLD = 10;
//Set this value to the number of microseconds you want each MIDI note to last for
const int NOTE_LENGTH = 50;
//Adjust this value to set the range of MIDI note velocity values
const int VEL_SENSE_VAL = 10;
//Change this number to set what MIDI channel the MIDI notes are set to
const int midiChan = 1;
//Change these numbers to set what MIDI note number each key/piezo will send.
//Also make sure that the total number of numbers here matches the value of NUM_OF_KEYS
const int midiNote[NUM_OF_KEYS] = {36, 38, 60, 61, 49, 52, 48, 47, 43, 84};
//Change these values to set which analog input pins you are using
//Also make sure that the total number of values here matches the value of NUM_OF_KEYS
const int triggerSensor[NUM_OF_KEYS] = {A0, A1, A2, A3, A4, A5, A6, A7, A8, A9,};
//=======================================================================================
//Variables for storing certain values
int triggerVal[NUM_OF_KEYS] = {0};
bool noteIsOn[NUM_OF_KEYS] = {false};
int midiNoteTime[NUM_OF_KEYS] = {0};
int midiVelocityVal[NUM_OF_KEYS] = {0};
void setup()
{
MIDI.begin(MIDI_CHANNEL_OMNI);
Serial.begin(115200); //REMOVE THIS LINE IF USING HIDUINO INSTEAD OF HAIRLESS
}
void loop()
{
//repeat the below code for each anaolog input/piezo sensor
for (int count; count < NUM_OF_KEYS; count++)
{
//read the piezo value
triggerVal[count] = analogRead(triggerSensor[count]);
//if the value is over the threshold and there isn't currently a note on for this piezo
if (triggerVal[count] > THRESHOLD && noteIsOn[count] == false)
{
//get a velocity value based on the value
midiVelocityVal[count] = triggerVal[count] * (127.0 / 1523.0);
//increase sensitivity
midiVelocityVal[count] *= VEL_SENSE_VAL;
//make sure we don't go out of range
if (midiVelocityVal[count] > 127)
midiVelocityVal[count] = 80;
//send a MIDI note-on message
MIDI.sendNoteOn (midiNote[count], midiVelocityVal[count], midiChan);
//flag that the note is on
noteIsOn[count] = true;
//start a timer for the note to be on for
midiNoteTime[count] = NOTE_LENGTH;
}
//if the note is currently on
if (noteIsOn[count] == true)
{
//reduce the time value by 1
midiNoteTime[count]--;
//if time value equals 0
if (midiNoteTime[count] == 0)
{
//turn off the note
MIDI.sendNoteOff (midiNote[count], 0, midiChan);
noteIsOn[count] = false;
}
}
}
//pause the loop
delay(1);
}
I want to add a momentary switch as a foot pedal which will triggers note between 61 & 60 ( Closed & open HiHat). Thank You
Want to join the discussion?
Create an account or login to get started!