
A NonLinear Educating Company
Drehen einer alten Spielzeug-Klavier in einen MIDI-Controller verwenden Arduino
Liam Lacey on Jul 31, 2015 in DIY & Hacking | 25 comments
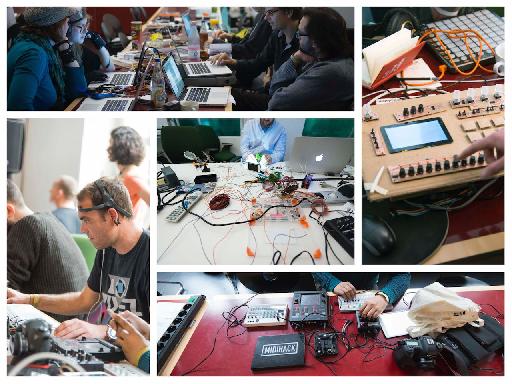
Im Mai 2015 besuchte ich MIDI Hack
Wenn Sie eine Lesen vorherigen Artikel von mir , würden Sie wissen, dass ich sehr empfehlen die Arduino-Plattform für die Herstellung DIY MIDI-Controller. Ich entschied mich für Arduino für dieses Projekt über die anderen vorgeschlagenen Plattformen, wie es Ihnen mit viel Kontrolle darüber, was Sie mit den Ein- / Ausgabedaten zu tun, aber es ist immer noch extrem Anfängerfreundlich mit viel offizielle Unterstützung und Führungen. Dieses Handbuch richtet sich an Personen, die Anfänger bei Elektronik, Software-Entwicklung, und Arduino interessiert sind.
Hier ist eine Liste der Dinge, die Sie für dieses Projekt benötigen. Alle hier genannten elektronischen Komponenten kann von jedem guten DIY / Hobby-Elektronik-Geschäft gekauft werden, wie SparkFun.
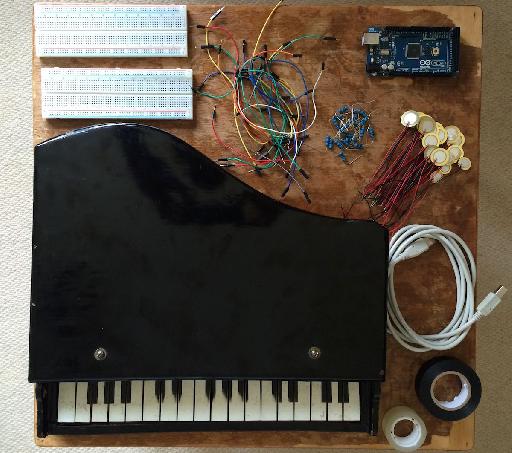
What You Will Need for this Project
- Eine akustische Holzspielzeug Klavier. Ich habe meine Spielzeugklavier off von eBay für rund $ 15, wo es in der Regel ein paar zur Verfügung, aber Sie auch gelegentlich finden sie in Wohltätigkeitsläden und Flohmärkte. Dieses Projekt wird rund um Klaviere mit einem Mechanismus, bei dem die Tasten bewirken ein Hammer, eine Art von Resonanz-Objekt zu schlagen auf Basis; mit einem Spielzeug elektronische Tastatur funktioniert hier nicht.
- Arduino Board. Dies ist der Mikrocontroller, der sein wird
- Piezo-Elemente. Piezoelement-Sensoren zur Erfassung Vibrationen und Stößen verwendet und sind beliebte Komponenten insbesondere im Bau- und Gewerbe Drum-Trigger-Produkte zu verwenden. Diese werden wir nutzen, um Maschinen von den Tasten zu erkennen, und Sie werden eine davon muss für jede Taste. Sie müssen die Größe der Piezos benötigen Sie basierend auf der Größe der Hammerköpfe innerhalb des Klavier betrachten
- 1M Ohm-Widerstände. Widerstände sind die grundlegendsten und gemeinsames Bauteil in elektrischen Schaltungen, und werden verwendet, um den Stromfluss zu widerstehen. Sie werden einer von ihnen müssen für jede Taste / Piezo.
- Wires. Arduino und Breadboard freundliche Drähte, auch als männlich-zu-Mann-Drahtbrücken bekannt ist, wird am einfachsten zu bedienen sein, und wir werden diese verwenden, um alle Komponenten zu dem Arduino zu verbinden. Sie werden 2 müssen für jede Taste / Piezo sowie Handvoll Extras.
- Lötfreien Steckbretter. Lötfreien Steckbretter erlauben Ihnen, elektronische Schaltkreise ohne die Notwendigkeit, alles zusammen zu löten erstellen. Möglicherweise müssen Sie ein paar von ihnen, je nachdem wie viele Schlüssel Ihrer toy piano hat.
- USB Kabel
- Doppelseitiges Klebeband
- Die Arduino Software. Das Arduino-Software wird verwendet, um das Arduino-Board zu programmieren, um zu tun, was wir wollen, es zu tun. Dies ist auf der frei verfügbaren Seite Arduino Software und kann auf OS X, Windows und Linux laufen. Sie müssen auch die Arduino MIDI-Bibliothek herunterladen.
- Serial-to-MIDI und virtuellen MIDI-Port-Software. Sie werden einige Seriell-zu-MIDI-Software benötigen, um die Nachrichten kommen aus dem Arduino in MIDI-Befehle zu konvertieren. Ich empfehle die kostenlose Hairless MIDI to Serial Bridge-Anwendung, aber es gibt eine Reihe von anderen zur Verfügung. Sie müssen auch einen virtuellen MIDI-Port verwenden, um die Leistung von Hairless mit dem Eingang Ihrer DAW oder MIDI-Instrument zu verbinden. Dazu empfehle ich loopMIDI unter Windows oder auf OS X können Sie die eingebaute IAC-Treiber zu verwenden. Alternativ ist es möglich,
- MIDI-Software. Sie
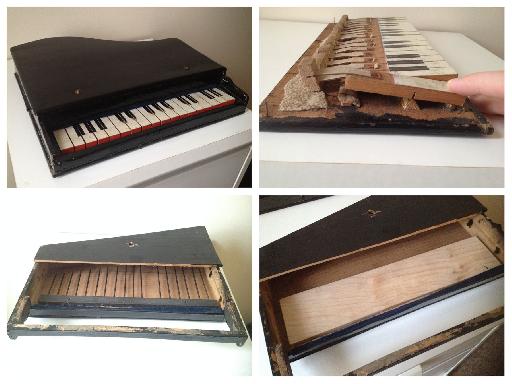
Step 1—Prepare your Piano
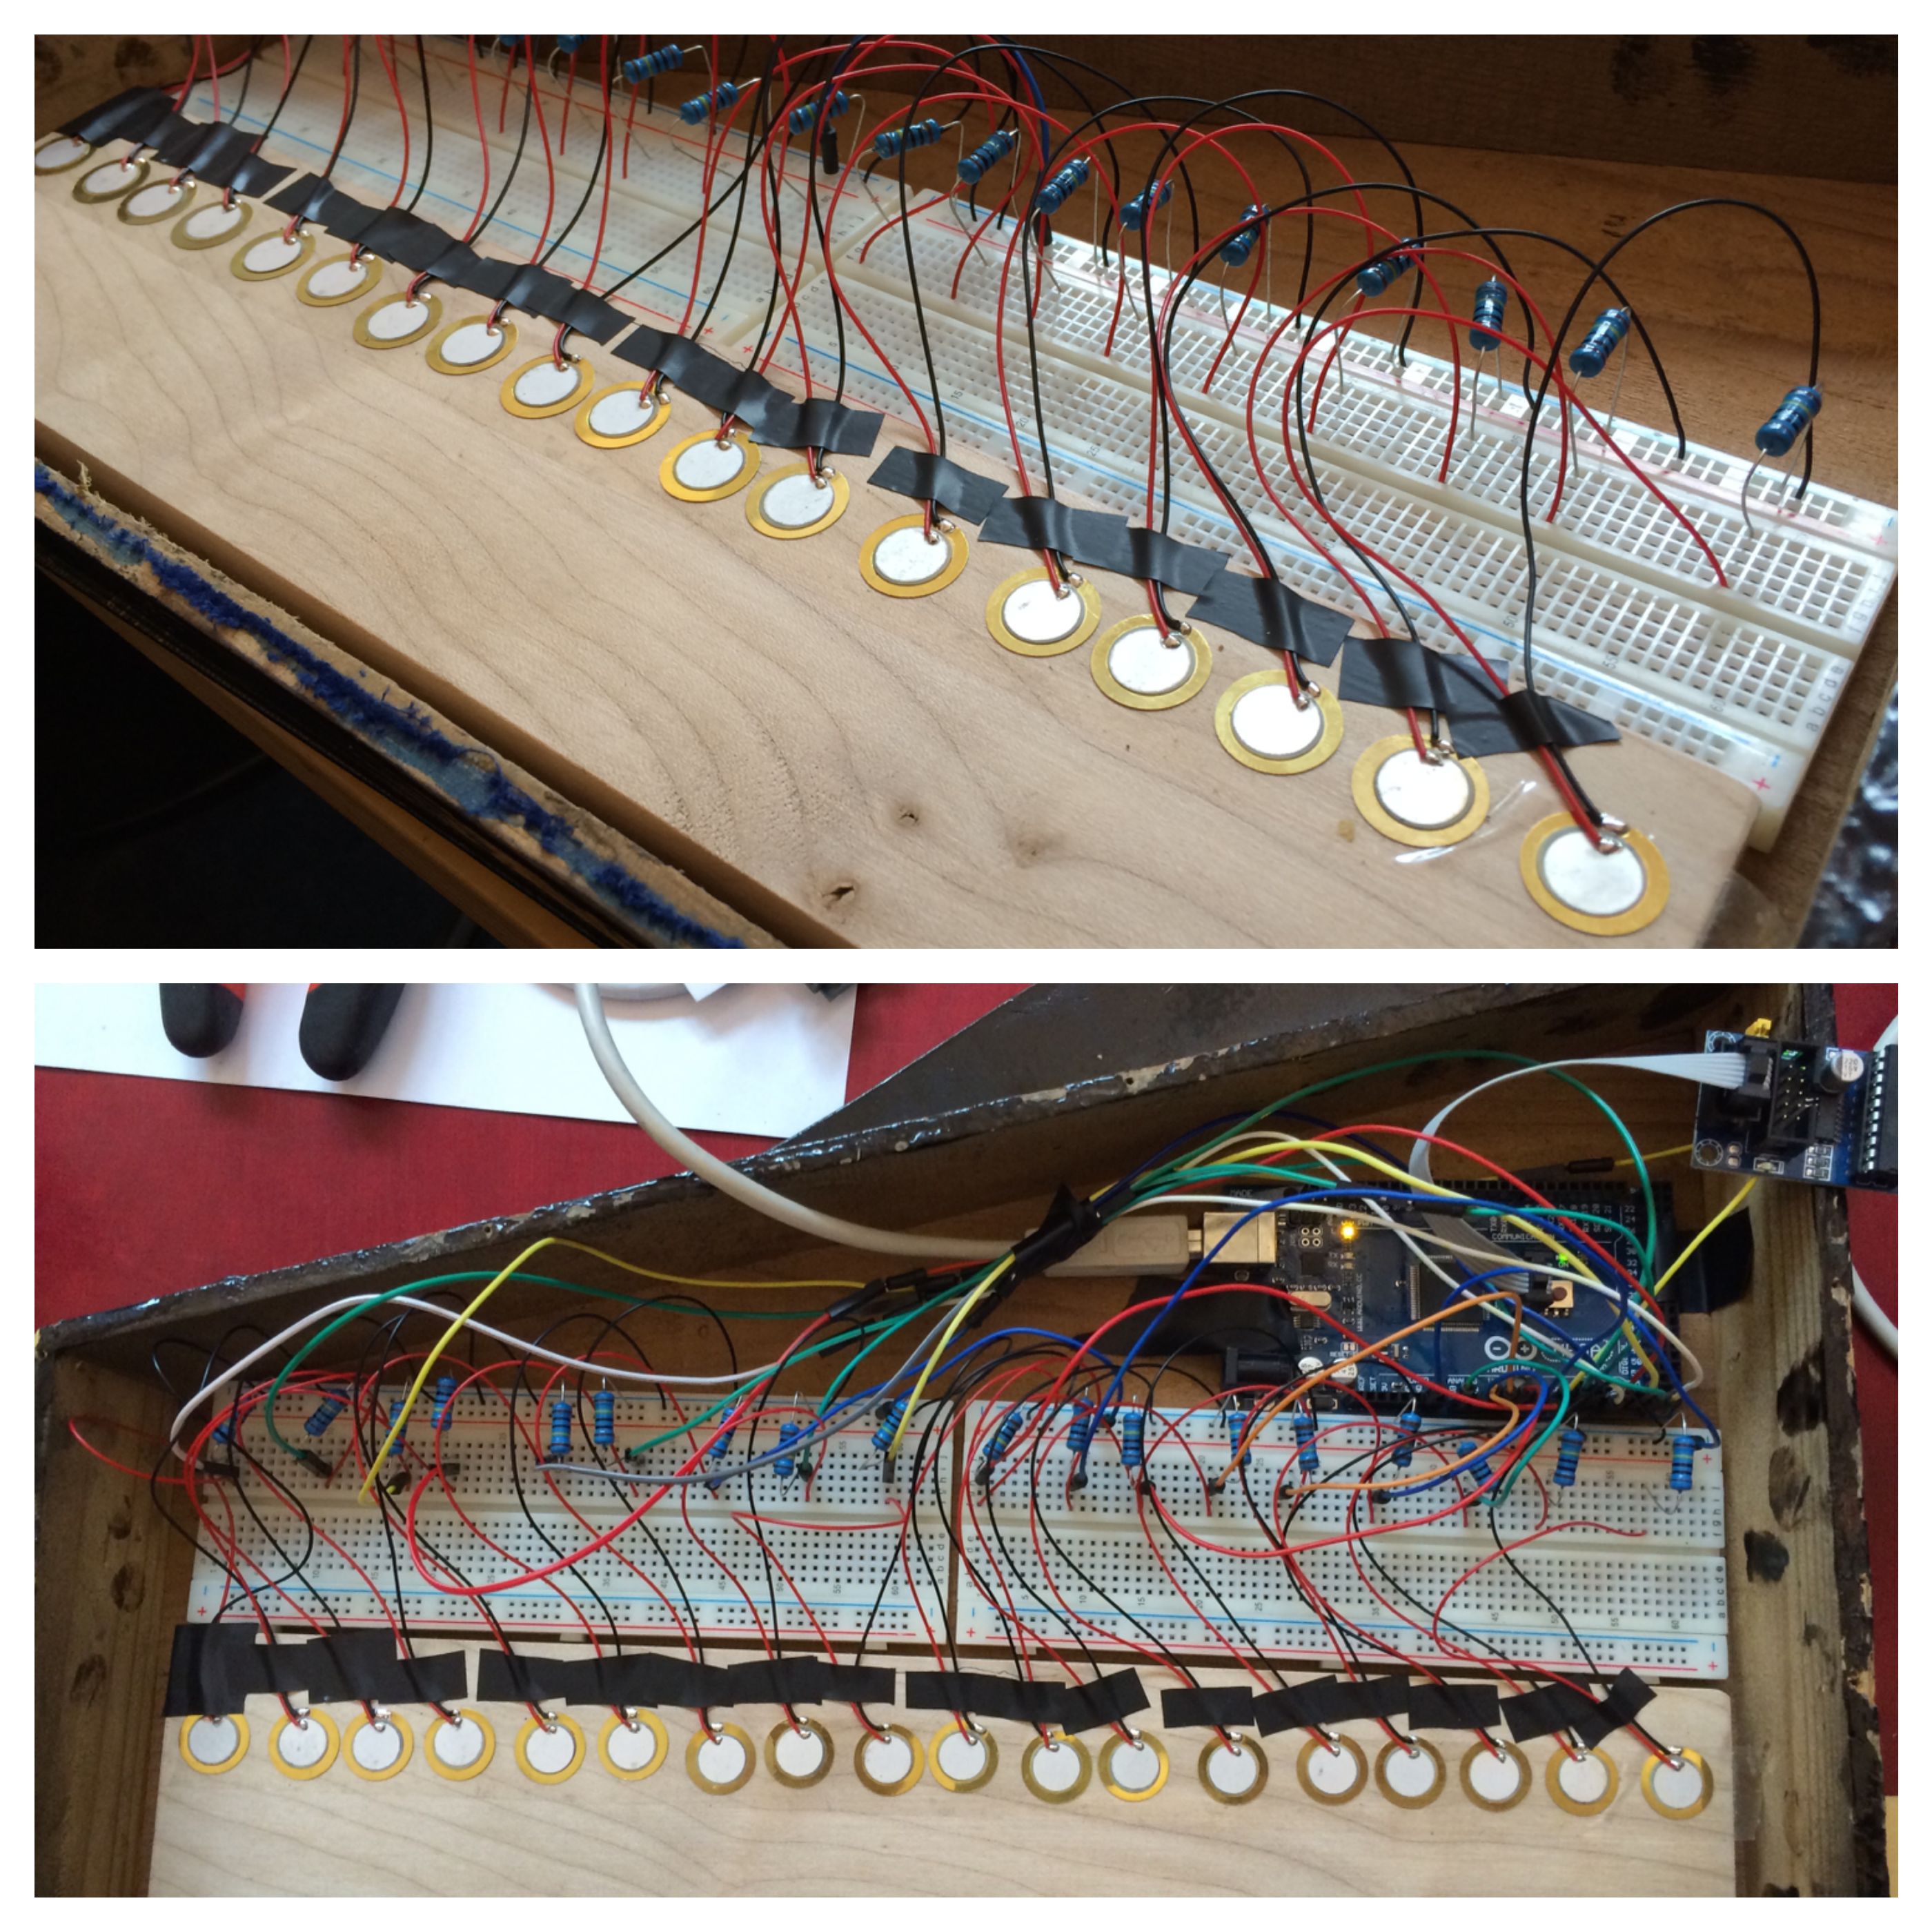
Bevor Sie beginnen Einsetzen der Elektronik in Ihr Klavier, müssen Sie die Klangstäbe zu entfernen oder sie so ändern, dass Sie die Piezos, sie montieren. Der Satz von Stangen in mein Klavier wurden an die Unterseite der oberen eingeschraubt, so dass ich einfach abgeschraubt, um sie zu entfernen, und dann in einen Holzblock, dass ich die Piezosensoren zur Befestigung angeschraubt. Eine Alternative wäre, einen dünnen, flachen Stück Material (zB Karton, Holz) auf die Unterseite der Stäbe, die die Piezos können repariert werden zu beheben, aber Sie finden es schwieriger, etwas zu den Stangen zu befestigen, plus Sie Vielleicht finden Sie auch die Stäbe werden in der Art und Weise, wenn Sie versuchen, die Elektronikeinsatz zu bekommen.
Von oben links im Uhrzeigersinn
Eine weitere Änderung, die Sie benötigen, um auf Ihre Klavier tun müssen, ist das Hinzufügen eines Spike / Punkt, um die Oberfläche der Hammer, der Piezos schlagen wird. Wenn die Hammerköpfe sind breiter als der innere Kreis der Piezos sie können die Sensoren nicht richtig auslösen, so dass dieses Problem mit meinem Klavier zu überwinden ich mit Klebeband kleine Kugeln aus Lot auf den Hämmern auf einen erhöhten Punkt zu erstellen.
Step 2—Attach the Piezos
Wir werden nun das Piezo-Sensoren an der Unterseite des oberen Rand des Klaviers, wo die Schlagwerke würden in der Regel schlagen die Klangstäbe, wenn die Tasten gedrückt werden. Wenn Ihr Klavier ist handgemacht wie meines, werden Sie wahrscheinlich feststellen, dass die Hämmer aren
Wenn du
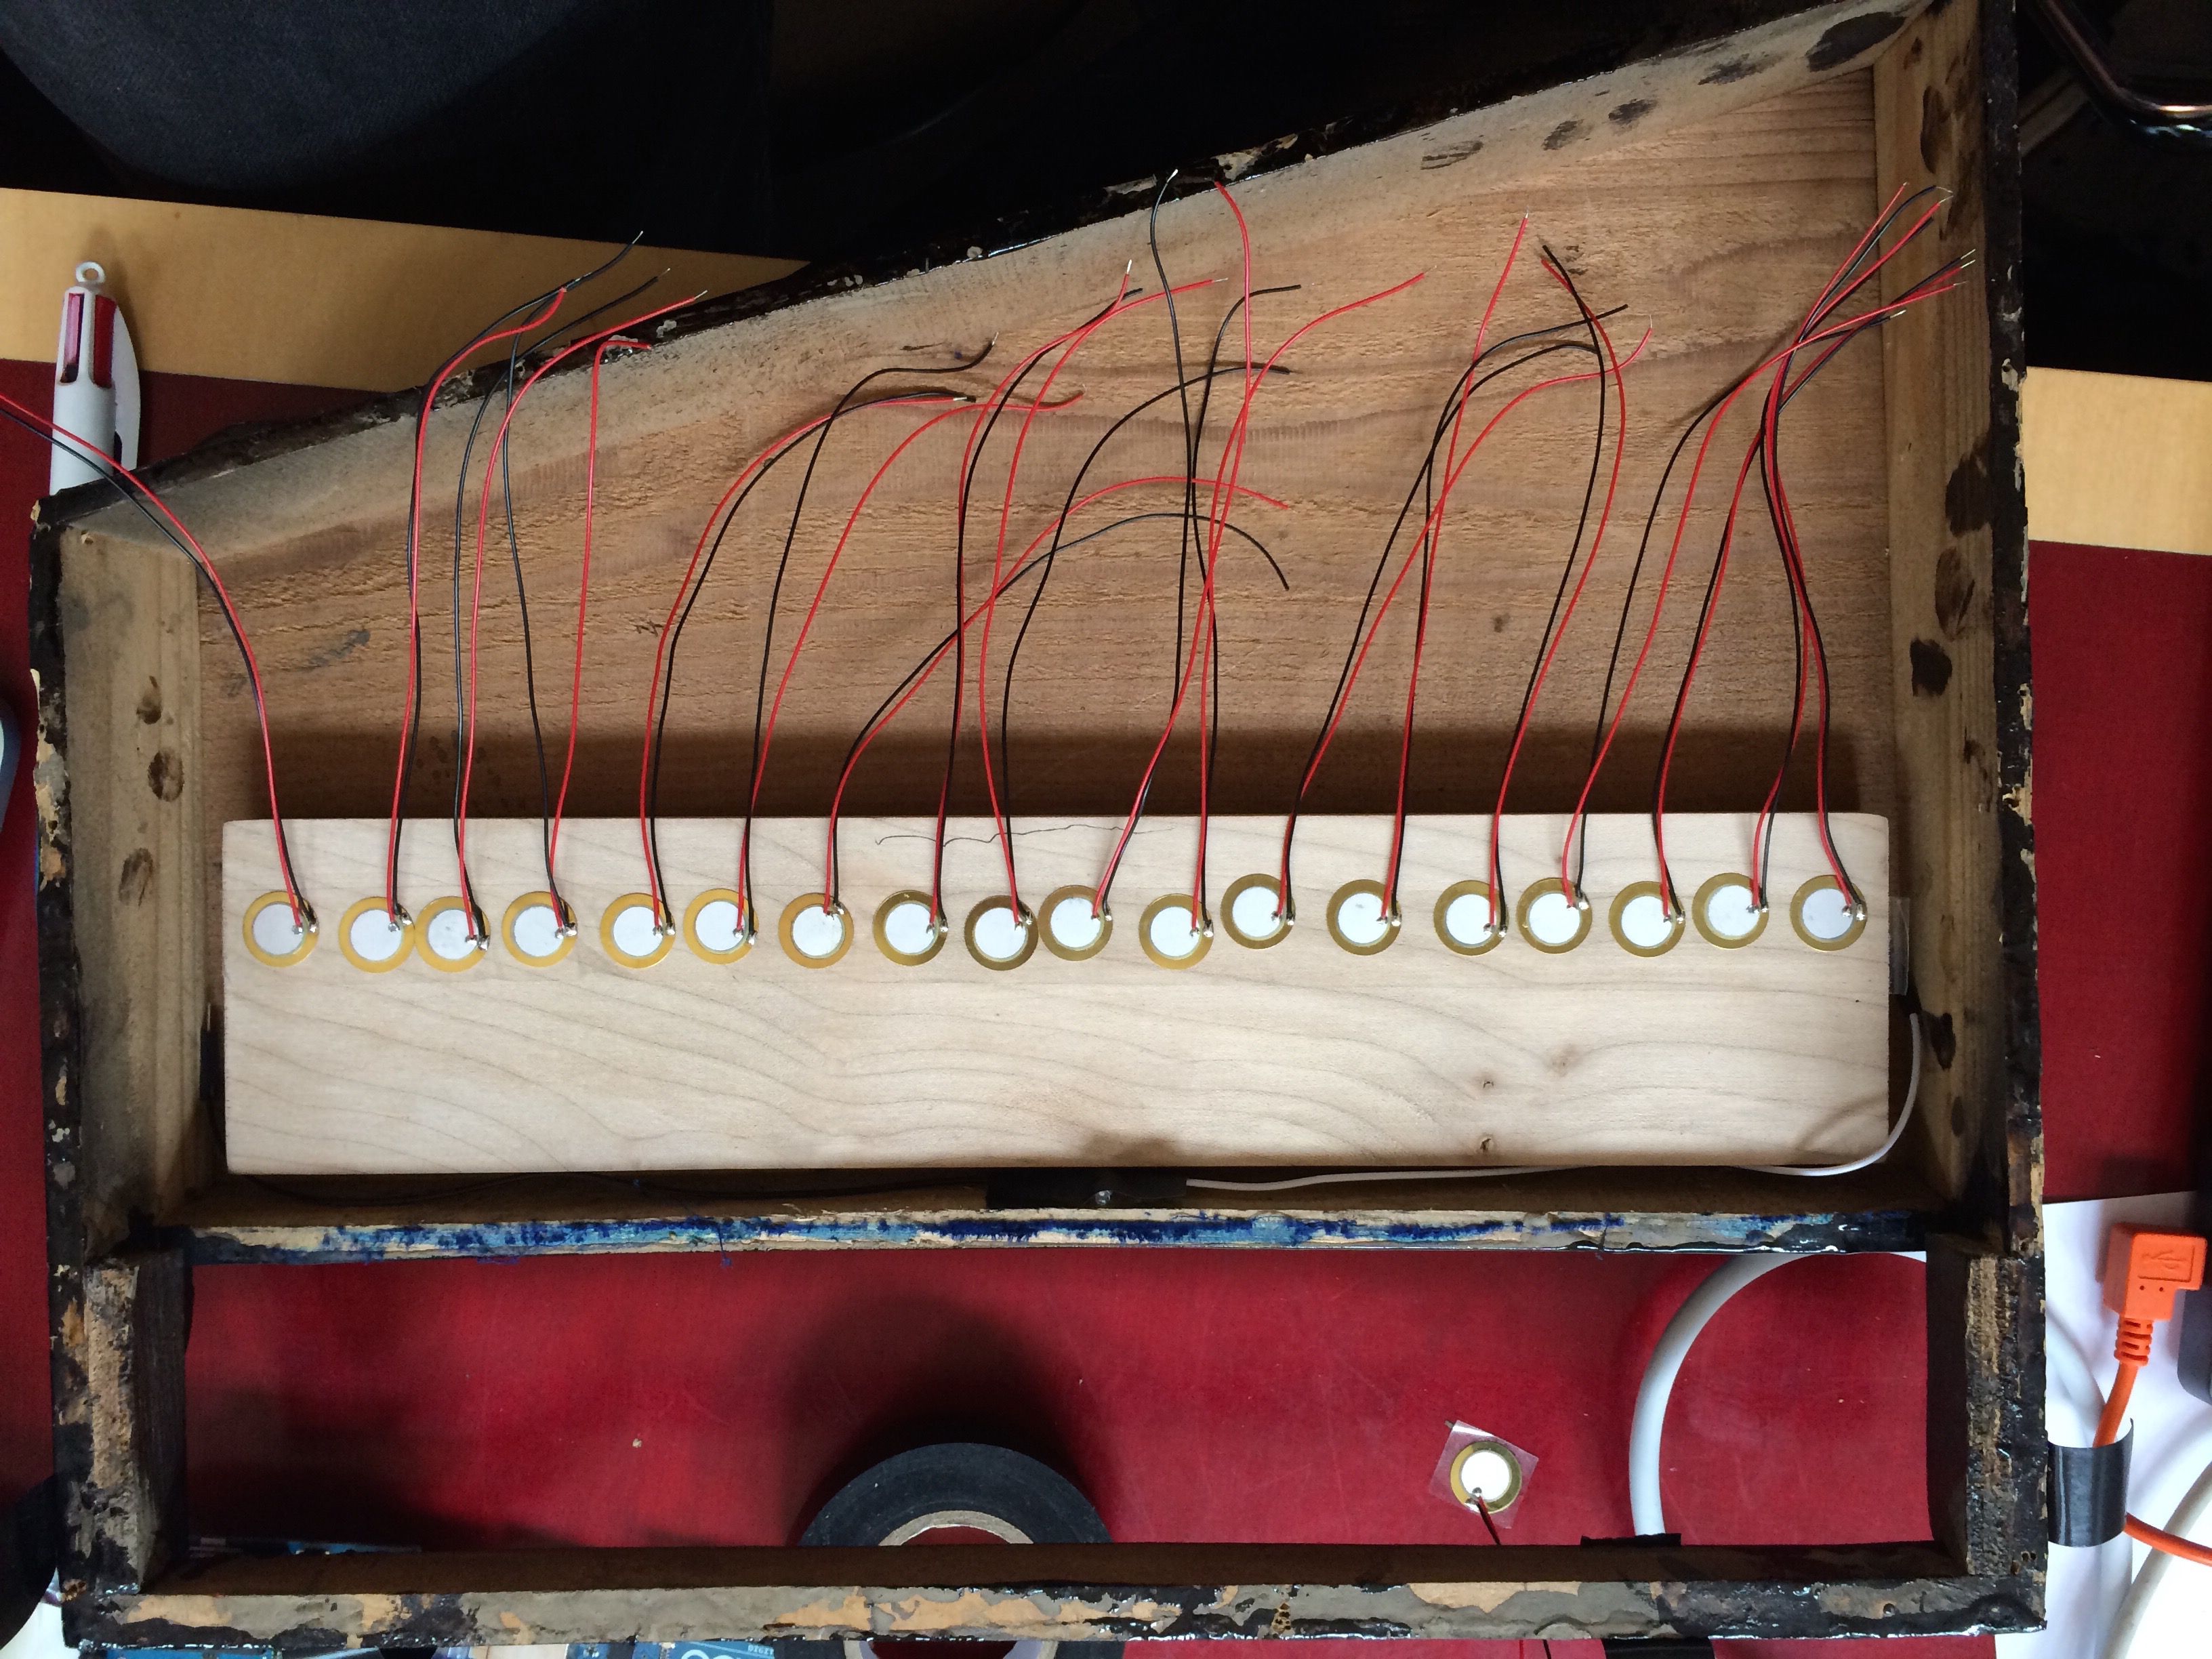
Die angebrachten Piezosensoren
Step 3—Complete the Circuitry
Um die Schaltung zu vervollständigen, müssen Sie zuerst die Steckbrett / s und Arduino-Board an der Innenseite des Klaviers zu befestigen. Wenn Ihr Klavier öffnet von unten wie meins haben Sie wahrscheinlich benötigen, um die Bretter zu der Unterseite der oberen bleiben, aber wenn das Klavier öffnet von oben könnte man wahrscheinlich das Projekt abzuschließen, indem nur Platzieren von Platten in Boden, ohne zu kleben sie nieder. Platzieren Sie die Steckbrett / s am nächsten an den Piezos mit der Arduino auf der anderen Seite.
Als nächstes müssen Sie die Komponenten mit dem Steckbrett / s anschließen. Es gibt zwei Hauptbereiche für die meisten Montageplatten (wie in der folgenden Abbildung gezeigt)
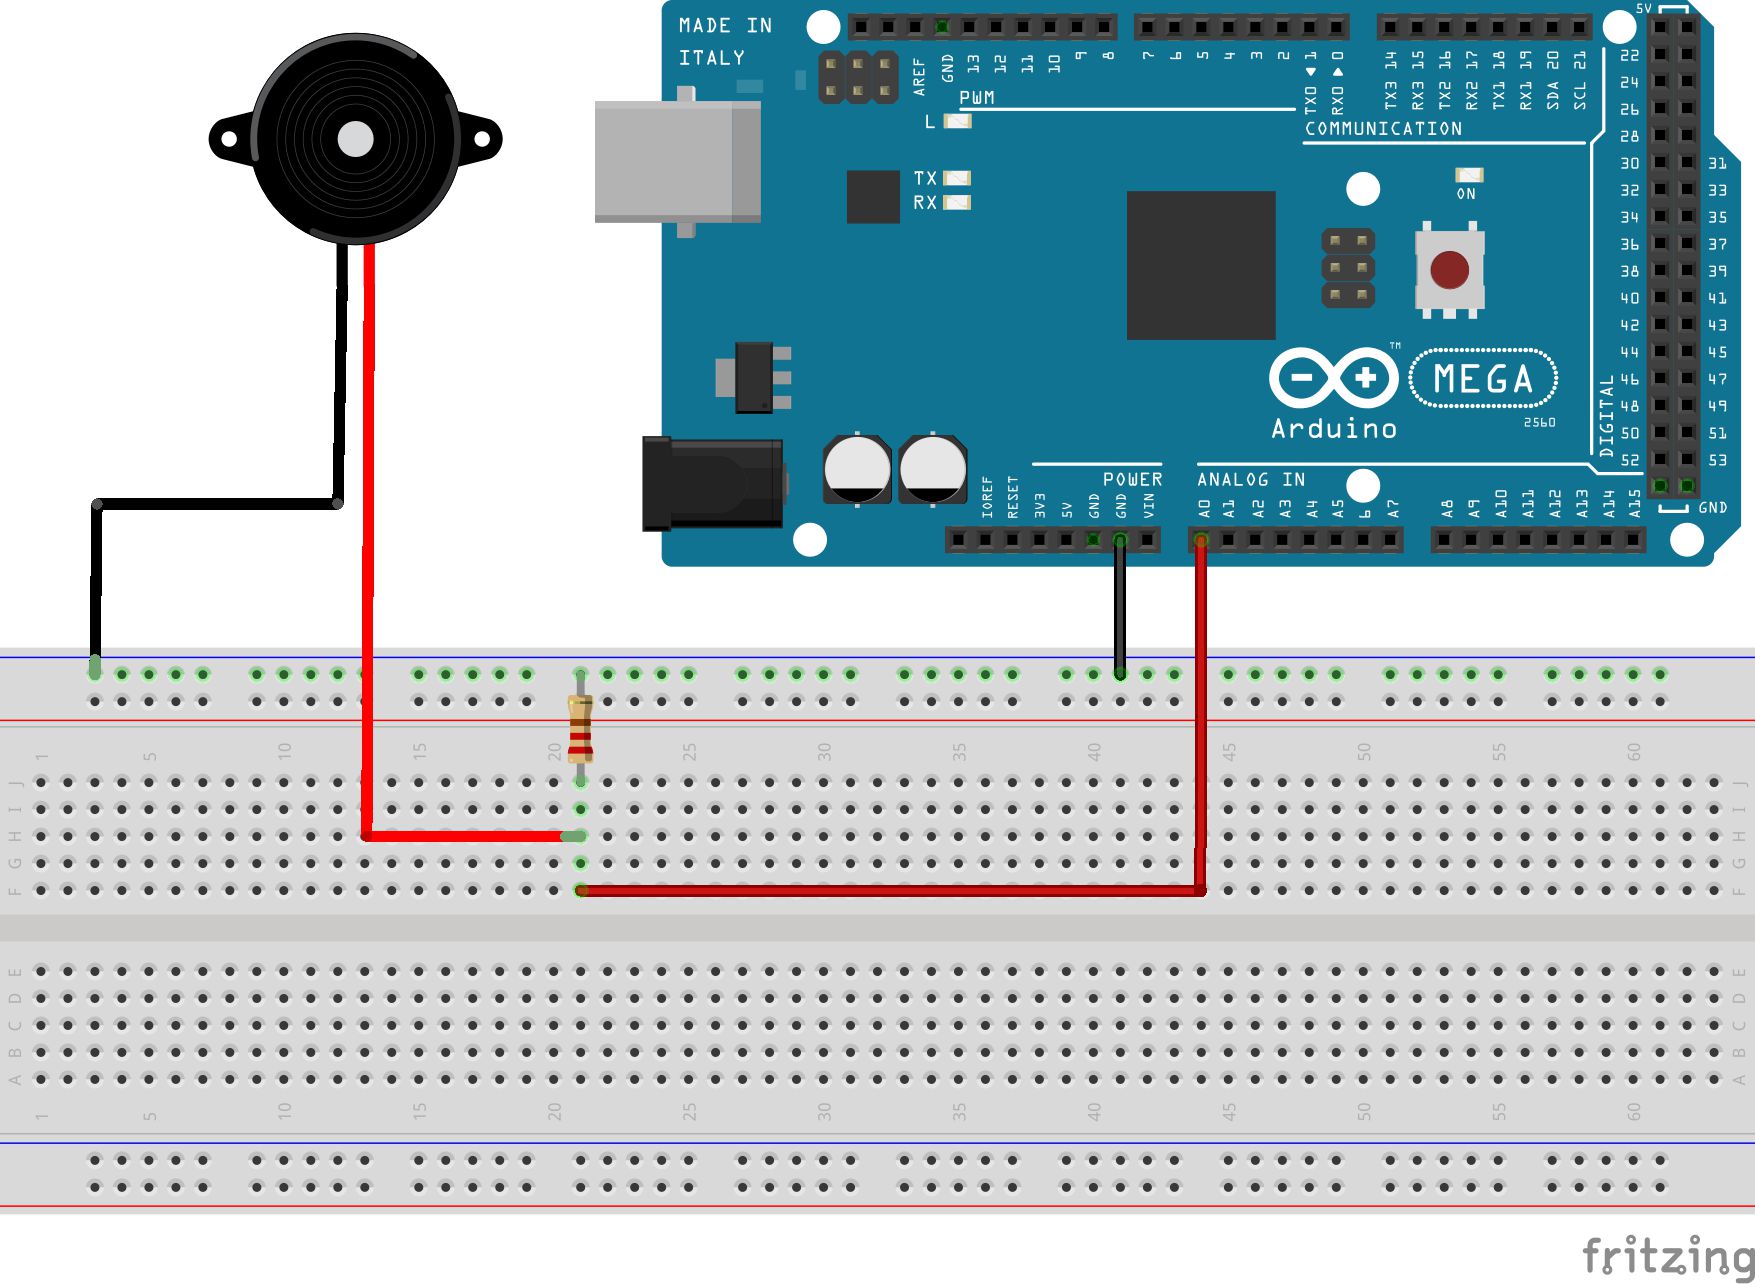
Wie, um eine einzelne Piezo-Sensor zu einem Arduino-Board anschließen
Wie in dem vorherigen Diagramm dargestellt, für jeden piezo / der die schwarze (Masse) Leitung vom piezo muss an einer der Massebus Streifen verbunden werden, während die rote (Signal) Draht muss zu einer der Anschlussklemme angeschlossen wird Streifen. Sie müssen dann einen Widerstand von der Klemmleiste auf den Boden Streifen zu verbinden (in jeder Richtung); die Leitung von der Klemmleiste zu einem der analogen Eingangsstifte am Arduino, und ein anderer Draht von dem Erdungsstreifen auf eine der Masse-Pins. Sie müssen dann diese Schaltung für jeden Piezo wiederholen, mit einer anderen Klemmleiste und Arduino analogen Eingangsstift jedes Mal, wie in der folgenden Abbildung gezeigt.
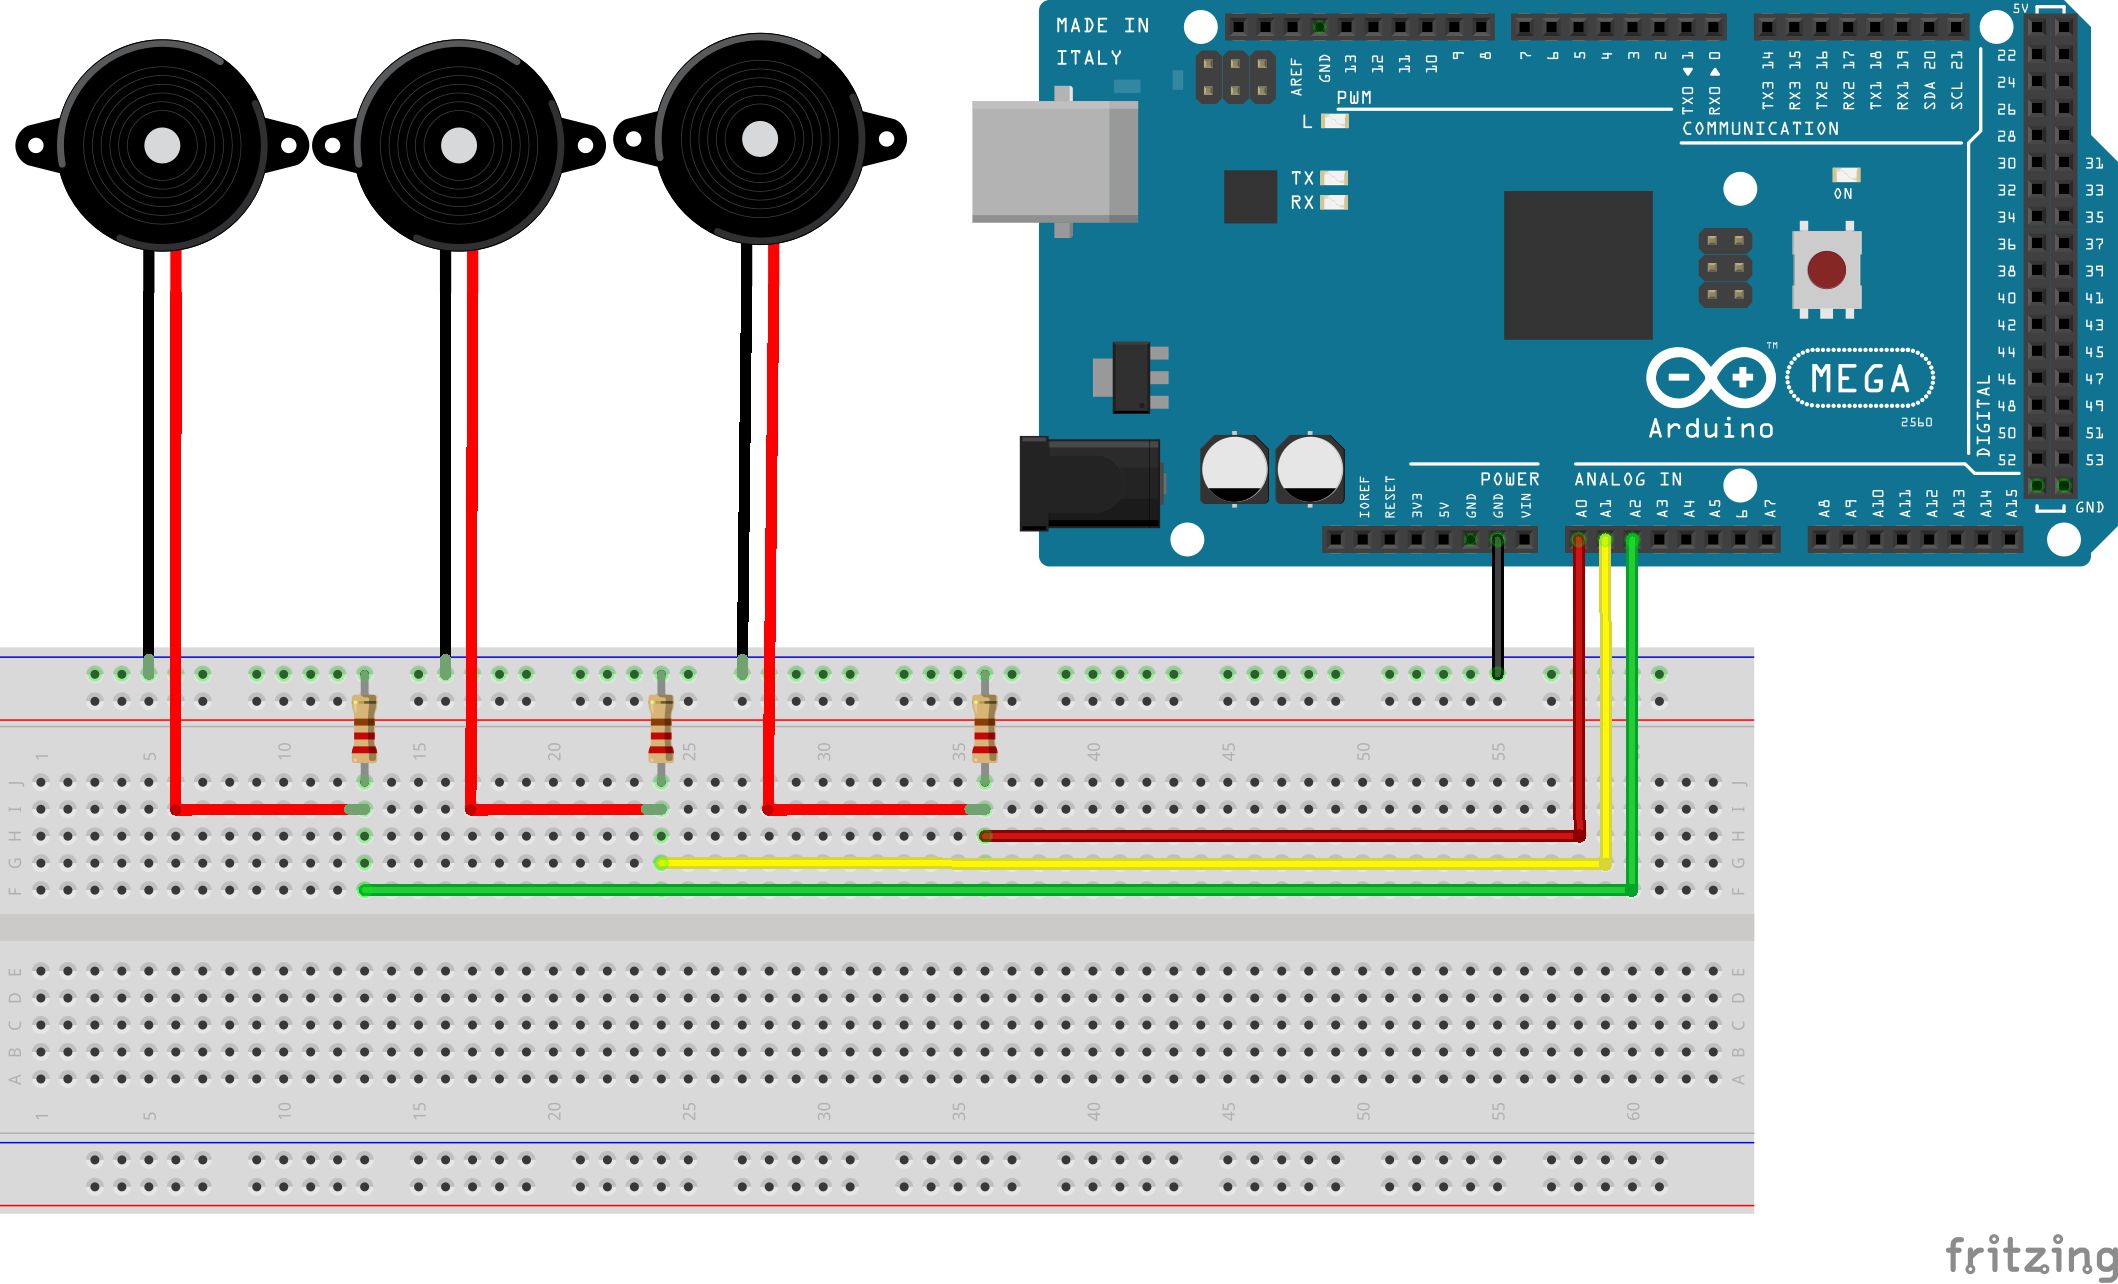
Wie kann man mehrere Piezosensoren auf einem Arduino-Board anschließen
Ich empfehle, mit den vielfarbigen Drähte für jeden analogen Eingang Verbindung, da dies macht es einfacher, was zu sehen
Top
Step 4—Edit and Upload the Code
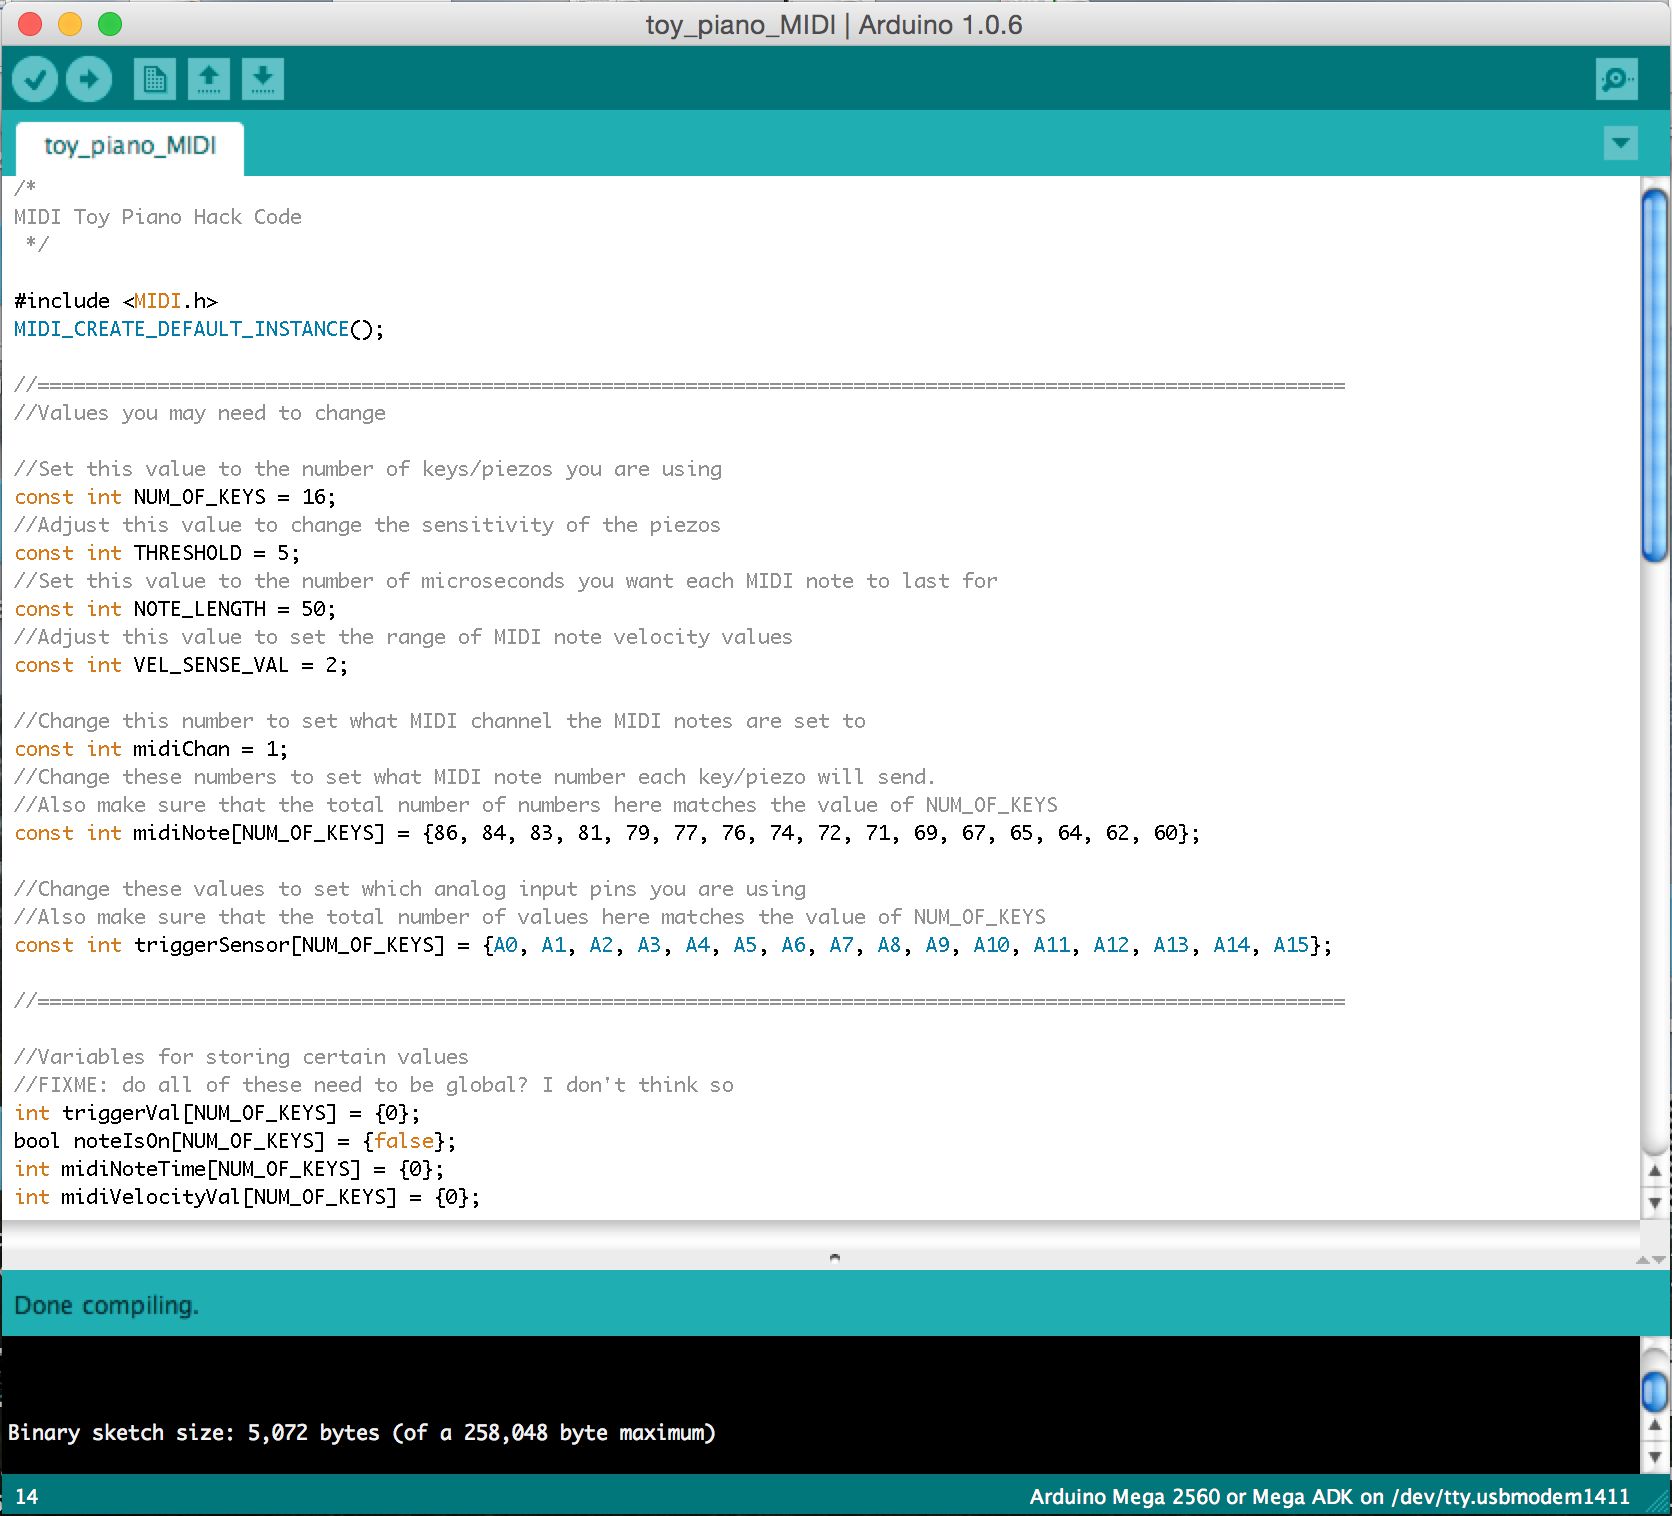
Nachdem die Hardware und die Elektronik komplett sind, dann müssen Sie einige Software auf das Arduino-Board, die Messwerte von den Piezos in MIDI-Noten verwandeln wird hochgeladen werden. Sobald Sie heruntergeladen und sowohl die Arduino-Software und die Arduino MIDI-Bibliothek installiert haben, öffnen Sie die Arduino-Anwendung und kopieren Sie den folgenden Code in die Arduino-Texteditor:
/*
MIDI Toy Piano Hack Code
*/

#include
MIDI_CREATE_DEFAULT_INSTANCE();

//========================================================================================
//Values you may need to change

//Set this value to the number of keys/piezos you are using
const int NUM_OF_KEYS = 16;
//Adjust this value to change the sensitivity of the piezos
const int THRESHOLD = 5;
//Set this value to the number of microseconds you want each MIDI note to last for
const int NOTE_LENGTH = 50;
//Adjust this value to set the range of MIDI note velocity values
const int VEL_SENSE_VAL = 2;

//Change this number to set what MIDI channel the MIDI notes are set to
const int midiChan = 1;
//Change these numbers to set what MIDI note number each key/piezo will send.
//Also make sure that the total number of numbers here matches the value of NUM_OF_KEYS
const int midiNote[NUM_OF_KEYS] = {86, 84, 83, 81, 79, 77, 76, 74, 72, 71, 69, 67, 65, 64, 62, 60};

//Change these values to set which analog input pins you are using
//Also make sure that the total number of values here matches the value of NUM_OF_KEYS
const int triggerSensor[NUM_OF_KEYS] = {A0, A1, A2, A3, A4, A5, A6, A7, A8, A9, A10, A11, A12, A13, A14, A15};

//=======================================================================================

//Variables for storing certain values
int triggerVal[NUM_OF_KEYS] = {0};
bool noteIsOn[NUM_OF_KEYS] = {false};
int midiNoteTime[NUM_OF_KEYS] = {0};
int midiVelocityVal[NUM_OF_KEYS] = {0};

void setup()
{
    MIDI.begin(MIDI_CHANNEL_OMNI);
}

void loop()
{
    //repeat the below code for each anaolog input/piezo sensor
    for (int count; count < NUM_OF_KEYS; count++)
    {
        //read the piezo value
        triggerVal[count] = analogRead(triggerSensor[count]);

        //if the value is over the threshold and there isn't currently a note on for this piezo
        if (triggerVal[count] > THRESHOLD && noteIsOn[count] == false)
        {
            //get a velocity value based on the value
            midiVelocityVal[count] = triggerVal[count] * (127.0/1023.0);

            //increase sensitivity
            midiVelocityVal[count] *= VEL_SENSE_VAL;

            //make sure we don't go out of range
            if (midiVelocityVal[count] > 127)
            midiVelocityVal[count] = 127;

            //send a MIDI note-on message
            MIDI.sendNoteOn (midiNote[count], midiVelocityVal[count], midiChan);

            //flag that the note is on
            noteIsOn[count] = true;

            //start a timer for the note to be on for
            midiNoteTime[count] = NOTE_LENGTH;
        }

        //if the note is currently on
        if (noteIsOn[count] == true)
        {
            //reduce the time value by 1
            midiNoteTime[count]--;

            //if time value equals 0
            if (midiNoteTime[count] == 0)
            {
                //turn off the note
                MIDI.sendNoteOff (midiNote[count], 0, midiChan);
                noteIsOn[count] = false;
            }

        }

    }

    //pause the loop
    delay(1);
}
Lehre, wie man die Arduino-Software verwenden und wie man Code ist ein wenig über den Rahmen dieses Artikels, so dass ich
- NUM_OF_KEYS
- THRESHOLD
- NOTE_LENGTH
- VEL_SENSE_VAL
- Midichan
- midiNote
- triggerSensor
Die Arduino Software
Wenn du
- Gehe zu
- Verbinden Sie Ihren Arduino Board an den Computer via USB.
- Gehe zu
- Gehe zu
- Gehe zu
Bitte beachten Sie
Step 5—Connect the Software
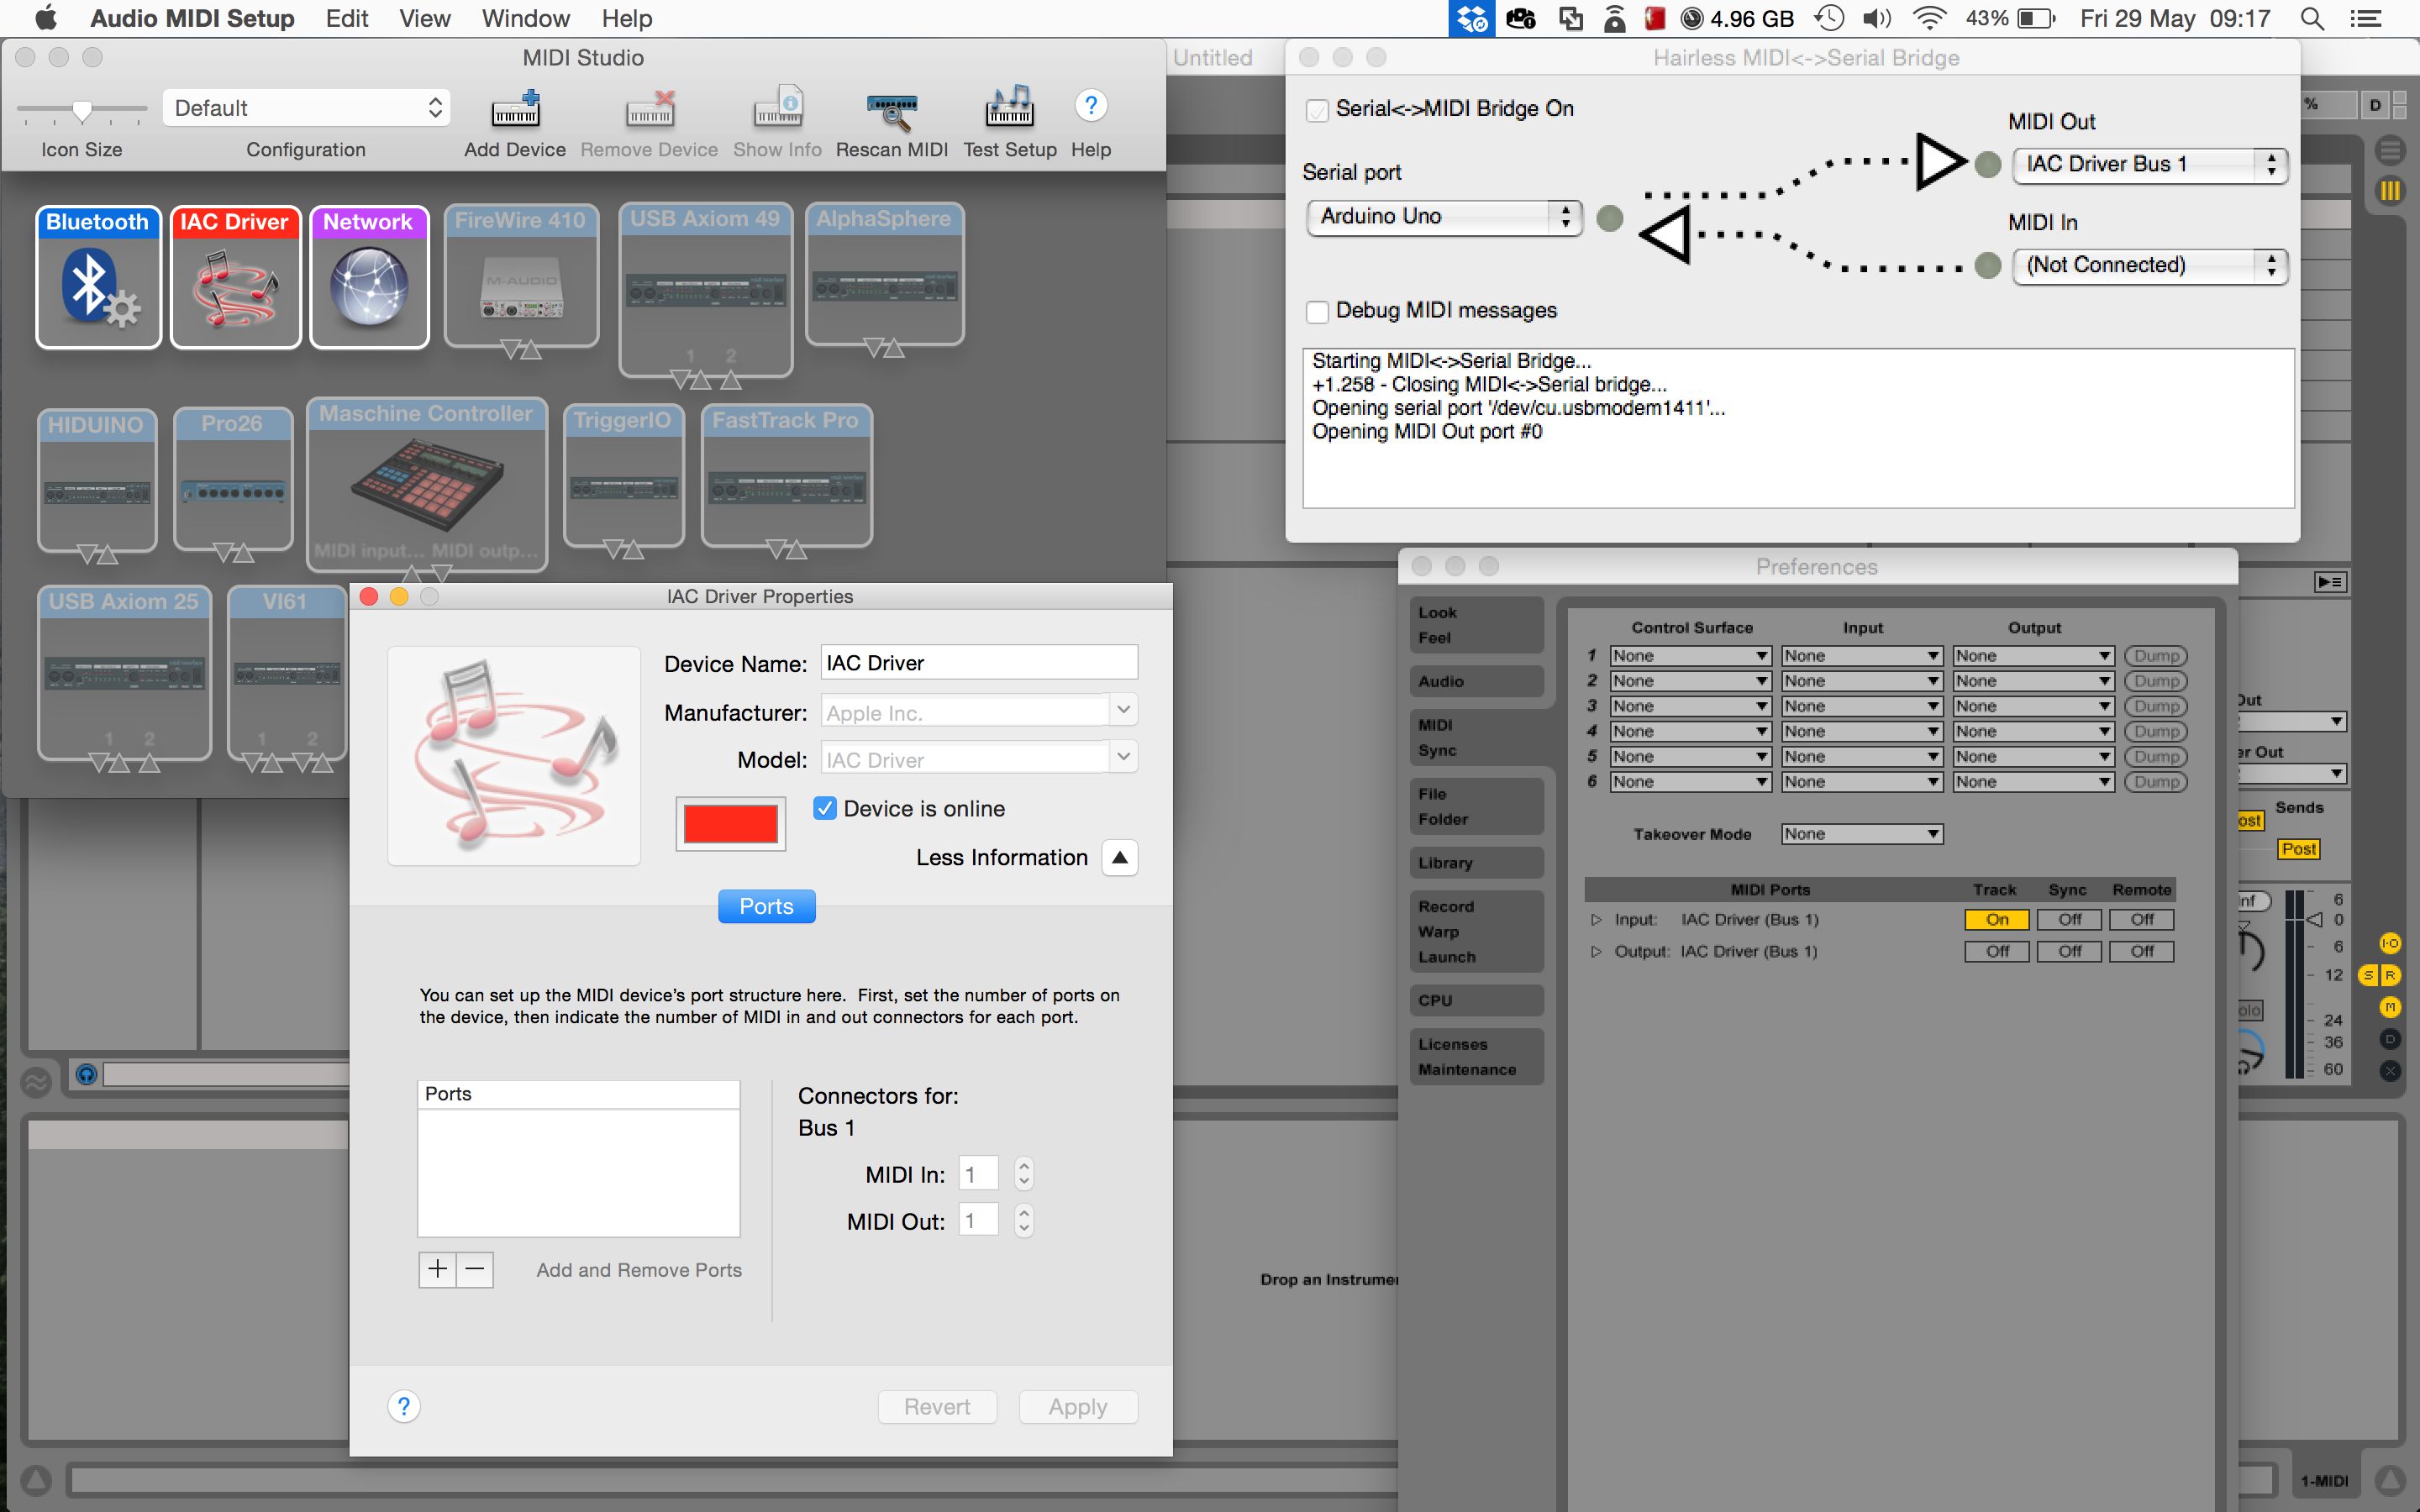
Links: Die Einrichtung eines virtuellen MIDI-Port auf OS X. Oben rechts: Konfigurieren von Hairless MIDI to Serial Bridge. Unten rechts: Verbinden mit dem virtuellen MIDI-Port in Ableton Live.
Schließlich müssen Sie starten und eine Verbindung alle erforderlichen Software auf Ihrem Computer:
Einrichten einer virtuellen MIDI-Port:
Wenn Sie unter Windows:
- Öffnen Sie loopMIDI
- Klicken Sie auf die
- Beenden der Anwendung
Wenn Sie auf OS X:
- Starten Sie die
- Gehe zu
- Klicken Sie doppelt auf das
- Stellen Sie sicher, dass die
- Schließen Sie die Anwendung
Schließen Hairless MIDI-to-Serial-Brücke in die Arduino und der virtuellen MIDI-Port:
- Starten Hairless
- Auf der linken Seite setzen die
- Auf der rechten Seite setzen die
- Sicherstellen, dass die
- Beenden der Anwendung
Verbinden Sie DAW / MIDI-Instruments-Software auch den virtuellen Anschluss:
- Starten Sie Ihre DAW oder MIDI-Instrument
- Darunter
Bitte beachten Sie - wenn Ihr Arduino mit HIDUINO gehackt, Schritte 1 und 2 don
Sobald dies abgeschlossen ist, sollten Sie nun in der Lage, um Notizen von Ihrem MIDI-Instrumente mit der Toy Piano auszulösen.
Sehen Sie sich ein kurzes Video-Demo des akustischen Toy Piano MIDI-Controller in Aktion:
Conclusion
So dass
Auch, wenn Sie an der Teilnahme an der nächsten MIDI Hack Event interessant sind, halten Sie ein Auge auf dem MIDI Hack Website für Durchsagen. Es gibt auch ein paar ähnliche Musik tech Hackathons, die jährlich in der ganzen Welt stattfinden, wie zum Beispiel Musik Hackday und Musik Technologie Fest, sowie verschiedene einmalige und lokale Veranstaltungen.
Erfahren Sie mehr über MIDI hier.

Discussion
You could connect a different type of sensor or electronic source and get results without changing the code, however it will only create a note based on the first reading it gets over the threshold (due to the logic implemented for turning piezo inputs into MIDI notes). Using just electrical current to trigger a reading would be very similar to using a simple push button (where pressing the button completes the circuit and creates a reading), so I'd recommend looking at Arduino button tutorials for that.
It sounds like your piezo sensors are not properly connected to the Arduino. Check that they are connected to the correct pins. You may also need to correct the value of NUM_OF_KEYS in the code if you are using less than 16 sensors/keys. You may also need to up the value of THRESHOLD in the code if your piezos are particularly sensitive.
thanks for answering me so fast , I'll check that the wires are connected correctly, I have another doubt about the code it in the end you said : "repeat the below code for each anaolog input/piezo sensor", and I 'm trying to do with a arduino uno with only 3 pins I changed all that you said , but the end I do not know where to get the code to be copied to each piezo I have and also do not know where it ends.
look I change this:
NUM_OF_KEYS = 3;
midiNote[NUM_OF_KEYS] = {86, 84, 83}
triggerSensor[NUM_OF_KEYS] = {A0, A1, A2}
IN THIS PART I WILL NEED TO PUT SOME NUMBER? -> (int count; count < NUM_OF_KEYS; count++)
Im sorry for all this question but im very lost with this and thank you so much for your help and sorry for my english.
Im from Brasil.
NUM_OF_KEYS, midiNote, and triggerSensor are the only values you need to change, which you have correctly done. The "repeat the below code for each anaolog input/piezo sensor" comment is actually a description of what the below 'for' loop does, rather than being an instruction. You shouldn't have to change any code in that section for it to work.
Thank you so much, this time again made ​​the piezos cables and worked, thanks for your help I buy one arduino mega
and when it comes I gonna do with the 16 piezos.
please let me ask you one more question?! can I put on this project potentiometers or one pitch bend?
Glad you got it working.
If you want to attach something like a potentiometer you'll need to change the code for reading from that particular analogue input. However the code needed here is a lot simpler - see https://www.arduino.cc/en/Tutorial/AnalogReadSerial to lean how to do this.
_____
#include
____
He's answering me this
#include
^
exit status 1
#include expects "FILENAME" or
Do you have an idea?
Thanks,
Florent
Thanks for the kind words and for spotting this mistake.
The code above has now been updated to the correct version.
Thanks,
Liam.
Project = allow young people to explore (play) the out-of-reach pipe organ from a wireless-midi capable keyboard.
So far... I have an arduino, a wireless midi transmitter/receiver (Medeli WIMIDI - tested and quite surprised by performance), a breadboard (cables, female midi socket etc).
I want to connect the wireless midi transmitter to the out socket of the remote keyboard and the wireless midi receiver to the arduino (I need to solder connect to arduino via breadboard). With the arduino midi library I presume I will then be able to receive the incoming midi signal ? This is where it becomes tricky for me to ascertain next steps!... I then want to translate the midi in to individual note signals (much like what you have done in this article). Is this possible?
If this is doable, my last sticking point is how to get the individual note signals 'transferred' to the organ console. I have seen an article where someone attaches a solenoid for each note to a wooden board and then rests the board over the top of the organ keyboard. However, the organ we are planning to work on already has access to the rear of the keyboard and each note has a visible switch (2 cables to each note) on a low voltage (12v) system. Is it possible to intercept each of these switches with the arduino outputs for each note? My apologies if this is a stupid question!?
This is an awesome tutorial. It'll help me a lot with what I want to do cause the setting is similar but usage is completely different.
I wonder if the amount of the contact mics can be different? Is there any maximum we can connect?
Also, is it possible to use condenser mics instead of piezos, possibly with a little trick?? Otherwise do you have any suggestions of how I can do it?
Thanks a lot!
The number of piezo sensors you can connect depends on the number of analog inputs that your microcontroller has e.g. on an Arduino Mega you have 16 analog inputs. However it is possible to expand this number using multiplexer components - see https://playground.arduino.cc/Learning/4051. There are also Arduino IO expander shields that can do this for you.
Regarding using consider mics instead, the extra complexity depends on whether you are just trying to detect a sound level, or trying to capture actual sound data. For just detecting sound levels see http://www.learningaboutelectronics.com/Articles/Arduino-microphone-circuit.php as an example, however recording actual audio is more complex (e.g. see http://www.instructables.com/id/Arduino-Audio-Input/).
Thanks a lot for your answer.
I have an Ard.Mega and I indeed only need to use them to retrieve vibration data - not sound.
Do you think I can use your setup the same, but differ the code to make it receive only vibration level - say from 0 to 100? In that case, would you mind sharing how the code shall be?
Many thanks.
I had a question. You used 18 piezo. But the Arduino mega allows only 16 input. What ambi missing?
""""const int THRESHOLD = {5,6,8,4,2,5,7,8,5,6};""""
What is the highest treshold value ?
Can you please tell me how i can separately change treshold, and limit the maximum & minumum velocity of each individual piezo?
If possible, write me another command line where i can adust the time amount for the gap between two stroke to avoid double triggering problem.
Thank you.
The highest value a piezo sensor can send using an Arduino is 1023, so threshold values could be anything up to this.
If you just want to 'clip' limit the velocity value, you could change the values on lines 'if (midiVelocityVal[count] > 127) midiVelocityVal[count] = 127;' to set a lower max value, and you could do the same kind of thing for the minimum limit e.g. 'if (midiVelocityVal[count] < 10) midiVelocityVal[count] = 10;'.
To limit how often a stoke can happen you could use the Arduino Millis Library (https://www.arduino.cc/en/Reference/Millis) to store a time for every stoke and then only process a new stroke if it's time is greater than the last time by a certain amount.
I saw padcycles in some sketch. I think it's about avoiding double triggering. I am not sure though. I tried Google. Didn't get enough learning about that term.
I have been playing my DIY arduino midi drum for a year.
your code works flawlessly. Recently i have decided to use a foot switch instead of using 2 separate pads for closed & open hat.
I use Arduino meda...Can you please guide me how the momentary switch should be wired to my arduino ?
And what modification i have to make into my current code for activating the switch functionality ?
My current Code is given below...
/*
Midi drum ..with 10 piezo.. no pedal(2 separate pad with 2 separate piezo for closed hat and open hat), Kick,snare, open hat, closed hat, tom1, tom2, tom3, crash1, crash2, ride
*/
#include
MIDI_CREATE_DEFAULT_INSTANCE();
//========================================================================================
//Set this value to the number of keys/piezos you are using
const int NUM_OF_KEYS = 10;
//Adjust this value to change the sensitivity of the piezos
const int THRESHOLD = 10;
//Set this value to the number of microseconds you want each MIDI note to last for
const int NOTE_LENGTH = 50;
//Adjust this value to set the range of MIDI note velocity values
const int VEL_SENSE_VAL = 10;
//Change this number to set what MIDI channel the MIDI notes are set to
const int midiChan = 1;
//Change these numbers to set what MIDI note number each key/piezo will send.
//Also make sure that the total number of numbers here matches the value of NUM_OF_KEYS
const int midiNote[NUM_OF_KEYS] = {36, 38, 60, 61, 49, 52, 48, 47, 43, 84};
//Change these values to set which analog input pins you are using
//Also make sure that the total number of values here matches the value of NUM_OF_KEYS
const int triggerSensor[NUM_OF_KEYS] = {A0, A1, A2, A3, A4, A5, A6, A7, A8, A9,};
//=======================================================================================
//Variables for storing certain values
int triggerVal[NUM_OF_KEYS] = {0};
bool noteIsOn[NUM_OF_KEYS] = {false};
int midiNoteTime[NUM_OF_KEYS] = {0};
int midiVelocityVal[NUM_OF_KEYS] = {0};
void setup()
{
MIDI.begin(MIDI_CHANNEL_OMNI);
Serial.begin(115200); //REMOVE THIS LINE IF USING HIDUINO INSTEAD OF HAIRLESS
}
void loop()
{
//repeat the below code for each anaolog input/piezo sensor
for (int count; count < NUM_OF_KEYS; count++)
{
//read the piezo value
triggerVal[count] = analogRead(triggerSensor[count]);
//if the value is over the threshold and there isn't currently a note on for this piezo
if (triggerVal[count] > THRESHOLD && noteIsOn[count] == false)
{
//get a velocity value based on the value
midiVelocityVal[count] = triggerVal[count] * (127.0 / 1523.0);
//increase sensitivity
midiVelocityVal[count] *= VEL_SENSE_VAL;
//make sure we don't go out of range
if (midiVelocityVal[count] > 127)
midiVelocityVal[count] = 80;
//send a MIDI note-on message
MIDI.sendNoteOn (midiNote[count], midiVelocityVal[count], midiChan);
//flag that the note is on
noteIsOn[count] = true;
//start a timer for the note to be on for
midiNoteTime[count] = NOTE_LENGTH;
}
//if the note is currently on
if (noteIsOn[count] == true)
{
//reduce the time value by 1
midiNoteTime[count]--;
//if time value equals 0
if (midiNoteTime[count] == 0)
{
//turn off the note
MIDI.sendNoteOff (midiNote[count], 0, midiChan);
noteIsOn[count] = false;
}
}
}
//pause the loop
delay(1);
}
I want to add a momentary switch as a foot pedal which will triggers note between 61 & 60 ( Closed & open HiHat). Thank You
Want to join the discussion?
Create an account or login to get started!