
Bitwig is an amazing new DAW that pioneers new ground, as well as embodies many of the elements that we love from other DAWs. One feature that is particularly enticing for those of us that are constantly recording multiple sources, such as multi-mic setups, or even those of us that just like to have things labeled for studio organization, would be the ability to setup custom input and output configurations. In this tutorial, I'd like to show you how this works, and offer some suggestions for usage.
Step 1 - Inputs
I'm currently rocking a well used, well loved MOTU traveler that, as you can see below, is nicely adorned with several audio inputs and outputs. And, we all know that in order to really get the best usage out such an audio interface, especially in a studio, we need to set these inputs up for easy access. Otherwise, it's just going to be this scenario, every time you need to select a piece of hardware gear, or record from guitar, going into a certain input, etc…
“Hey, can you play again? I think it might be Input 6...”
Let's get rid of this scenario, now! Going into Preferences (Command-<), I'll locate the Audio page, selectable from the top.

Currently, I've got my audio interface selected for both Input and Output. Now, let's get those additional inputs going…

By default, I have a stereo input setup, using inputs 1 and 2 on my audio interface. I'm going to go ahead and delete this, by selecting the small X button near the label.

Once this input has been deleted. I'll press the Add Mono button, as I'd like to set up my main mic, going into my audio interface's physical input 4 (labeled on the unit). Once I press Add Mono, you'll notice a new Mono Input appears, labeled appropriately…

As I'd like to use input 4, on the audio interface, I'll select input 4, instead of 1…

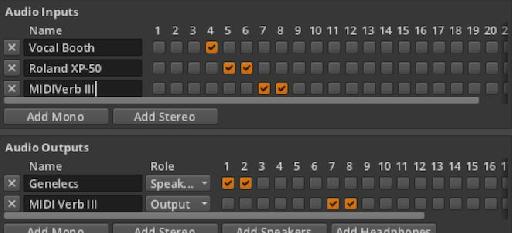
Now that the input is set up, let's go ahead and label it for easy selection, within the Mix panel's IO drop-down menu. As this mic is actually in my vocal booth, I'll go ahead and label it simply, “Vocal Booth”. It's the only mic, and it makes good sense, right?

Now, when I leave Preferences and go to the Input drop-down menu, located on any audio track within the Mix page (or, in the Arrange page), I get the new, handy option of selecting my Vocal Booth…with the right, bloody, input! This is awesome, but it gets even better! I can do the same thing for my hardware synthesizer, rocking a stereo output!
This time, I'll use the Add Stereo button…

Once created, I'll select inputs 5 and 6 as the source inputs and label the input as 'Roland XP-50'…

The beauty about having all your inputs set up and labeled means that there is less time digging around behind gear to figure out what goes where, and more sitting down at the desk, mixing, tracking and getting the mix finished. And, because you can just keep on creating custom inputs, that appear in your input menu, you can get all your studio devices taken care of quickly and easily in one shot, so that they appear in Bitwig as options!
Step 2. Outputs
Bitwig provides a few more options for outputs, and thankfully so. If you're rocking multiple speaker sets, multiple headphone mixes, and so on, you're going to love this. I know I do! I use multiple outputs all the time for custom mixes for other performers with me on stage and in the studio. I like sending click tracks to the drummer, and I like a personal mix of my own when singing and playing keys. For the moment, let's just set up some speakers!
I'll delete the Stereo Output, using the small X box again, as we discussed in the last step, and press the Add Speakers button. The main significance of choosing speakers over Outputs, is that this stereo output will now be labeled as Speakers, by default. As you know, simply having labels for your outputs alone is helpful, especially when you're running multiple outputs to different pieces of gear and... people! I'll go ahead and label the speakers as 'Genelecs'. This will differentiate this set perfectly within my Output drop-down menu. And, as I add more speakers to my setup, I can add them virtually in Bitwig.

I can also set up outputs that go to effects processors, samplers, and headphone mixes. Let's set up an effects processor, now. I'll press Add Stereo Output, set the physical output ports to 7 & 8, where the MOTU output is going out 7 and 8 to the stereo right and left input on my MIDIVerb III, and label appropriately.

Okay, so far so good! Now, let's create an input to go into the outputs of the MIDIVerb III. In the Inputs section of the Audio page, I'll create another set of Stereo inputs, with ports 7 & 8, on the input of my audio interface. I'll label this MIDIVerb III, again.

Now, when I go to create a Hardware FX Router from the Device and Preset Browser, I'm able to easily select the inputs and outputs for my MIDIVerb III, with no problems. Or, I could also set this up on an Effects Track.

Conclusion
Labeling can seem pretty boring, and not really worth your time, at first. But, if you can set aside your time to get some labeled inputs and outputs identified before that session guitarist comes in, I guarantee you'll be more than pleased with how fast things go. And, remember, physical multiple inputs and outputs can be used again within custom inputs and outputs!
Also, I'd like to say that I'm so pleased that Bitwig had this feature in, at launch. I feel that it's a sign of good things to come from Bitwig!

Discussion
Want to join the discussion?
Create an account or login to get started!