
When it comes to creative basslines within Ableton, or any other DAW, side-chaining tends to be the first method that rolls off of anyone's tongue. And, it's generally in conjunction with a Compressor. In this tutorial, I'd like to focus on side-chaining, and basslines, but with a different method. I will show you how to create a great bassline from a pad, with a filter, specifically Auto Filter.
Step 1 - Choose a Pad
Pads are great bass fodder, as they tend to have an incredible amount of low resonant frequencies ready to pop out, once you get a filter on the case to boost. I'll start off with a very basic pad melody played predominantly in 1/2 and 1/4 notes. Somber, to put it lightly...

For the pad, I'm using Hybrid 3, an amazing soft synth with a very wide frequency range. I chose the pad, Gentle Warmth, as it is highly reminiscent of the warm pads that we all know and love from every classic synth. With that being said, any warm pad, or sawtooth based pad will work for this exercise.
Step 2 - Filter It!
Once my pad melody is in place, I'll apply an Auto Filter and simply lower the Cutoff Frequency with the XY controller. By cutting off the high frequencies and raising the Q, or Resonance, I'm already able to get a low, sub type of sound with little effort. However, it gets even better...

Step 3 - Modulate
This is where things get fun and interesting, as well as highly different from a Compressor-based sidechain scenario. I'll create a second MIDI track and name it Modulator. I'll drop a Simpler on this track and place a sample within it, that has a short, choppy attack. I used a bass sample, but feel free to experiment. I end up making a pattern like this…


I would recommend patterns with quick, choppy gate times to give the full effect. Once we're done, back on the Pad Track, I'll open the Sidechain section of the Auto Filter and select Modulator as my 'Audio From' source and enable Sidechain.

Step 4 - Play It
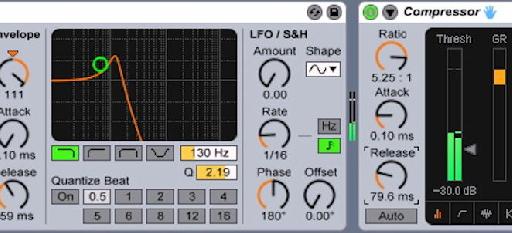
Okay, we're almost ready to play this, but we need one more setting that will actually make it work. I'll start raising the Envelope knob on the Auto Filter while the sequencer is running. This will help me dial it in and allow me to tweak the Attack and Release time to get the sound that I'm looking for. Keep in mind, the more Envelope, the more effect!

I also end up placing a compressor on the track, as well. This allows me to boost the signal, and get my work a little more forward in the mix.
Now, let's give it a listen and see how we've done!

See? A night and day change from where we were at. And, if I incorporate a Gate, I can use additional side-chaining to cut out any additional low frequencies that might muddy up the bottom end. Keep in mind, this is a very basic approach to this trick. If you start enabling the LFO and add some additional notes to the modulator pattern, you can get some mind blowing basslines that really take things to the next level.
Learn more about Ableton Live at AskVideo.com here.

Discussion
Want to join the discussion?
Create an account or login to get started!