
In punta di oggi esploreremo alcune delle Logic potenti funzionalità di automazione ancora sottoutilizzati. Ci sono due tipi di automazione: Track-based e Regione-based (HyperDraw - da non confondere con l'editor Hyper). Logic offre una traccia molto sofisticato sistema basato su di automazione che consente di automatizzare completamente (o cambiare nel tempo) le impostazioni praticamente su tutti i channel strip, effetti e strumenti. Questo può portare la vita in più per i vostri mix. Diamo uno sguardo ad alcune di queste Power-User punte di automazione.
Fase 1 - Curve zione Autom
Logic has a dedicated Automation Curve Tool. In all honesty I never use it anymore. Once you master the key command to create your own curves, there really is no need to switch between the Pointer tool and the Automation Curve Tool!
1. In primo luogo consentire l'automazione dal menu Disponi locali zona: Visualizza
2. Creare un paio di nodi. Sto lavorando con la creazione di una dissolvenza liscia volume su questa pista.
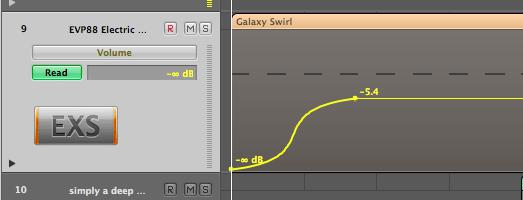
3. Hold down the Shift and Control keys and position the Pointer tool over the line between the nodes.
4. Drag to the right or left to create an S-curve or up/down to create concave or convex curve.
Nota: Per ripristinare la curva torna a una linea retta, è sufficiente tenere premuto Shift Control e semplice clic sulla curva!
Fase 2 - Regolare e invertire i dati di automazione traccia
Quindi, hai voluto molto tempo per disegnare accuratamente in alcuni automazione del volume complessi (per esempio) e ora si desidera regolare velocemente i livelli parametro complessivo di nodi multipli ....
1. Tenere premuto il tasto Shift e trascinare un'area di selezione su tutti i nodi che si desidera regolare.
2. Trascinare su un nodo o una linea di spostare tutti i nodi su, giù, sinistra o destra .... o
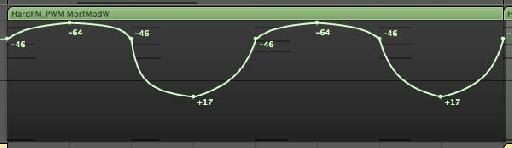
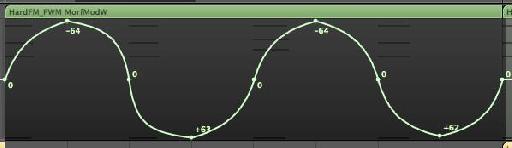
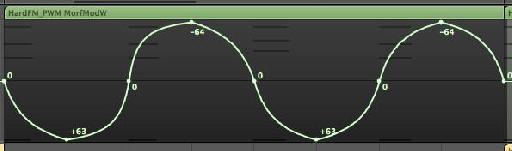
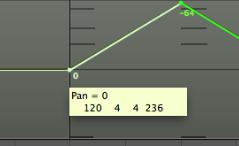
3. Trascinare all'interno dell'area evidenziata (ma non su un nodo o linea) per invertire il valore di automazione. In questo modo tutti i nodi sullo zero statico e si muove su più nodi estremi / - valori.
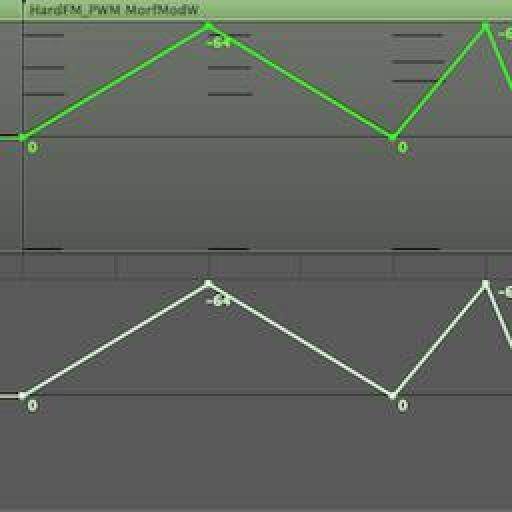
Provate a vedere la differenza! Nella foto qui sotto ho usato come un modo semplice per invertire le impostazioni Pan in pista.
Fase 3 - I dati di automazione copia ad un altro parametro
Spesso è possibile trovare l'automazione si creano per un parametro che sia audio migliore quando applicato ad un altro parametro o ti piacerebbe copiarlo su un altro parametro ... In questo esempio, ho disegnato automazione del volume su questa pista, ma mi piacerebbe copiarlo per fare una panoramica di automazione sulla stessa traccia.
1. Selezionare l'automazione.
2. Tenendo premuto il (alt) Comando o Opzione, fare clic sul menu di automazione parametro nell'intestazione pista.
3. Scegli Pan (o il parametro che si desidera copiare i dati di automazione esistenti) e poi rilasciare il tasto Opzione.
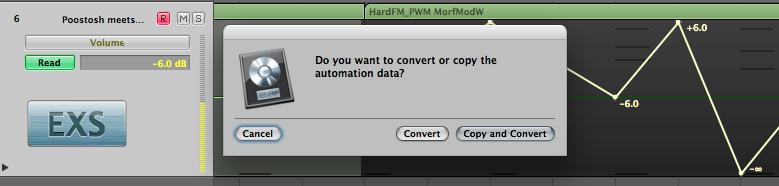
Una finestra di dialogo offre due opzioni. Se si desidera mantenere i dati di automazione esistenti e copiarlo sul parametro selezionato, scegliere Copia e Converti.
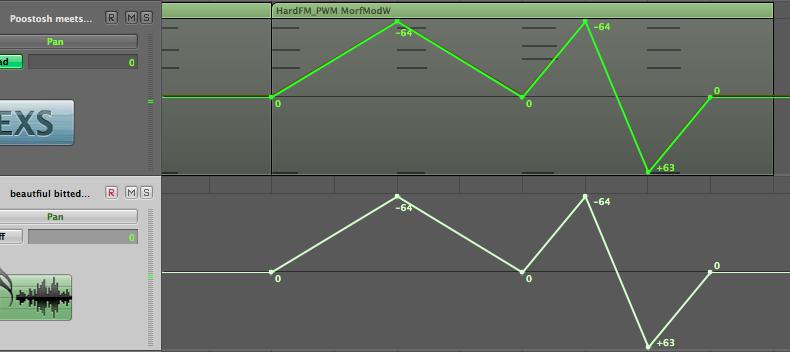
Fase 4 - Track Automation Copia tra le tracce
E 'facile copiare i dati di automazione traccia a un'altra sezione dello stesso brano. Basta selezionare i nodi e Opzione-trascinare la selezione nella posizione desiderata.
Molti utenti credono che sia molto difficile per copiare i dati di automazione pista tra due tracce. Mentre ci sono molte tecniche per fare questo, ecco la più semplice (e forse il più trascurato) modo di raggiungere questo obiettivo.
1. Selezionare l'automazione della traccia e scegliere Modifica
2. Scegliere la traccia che si desidera copiare la traccia di automazione.
3. Scegliere Modifica
Fase 5 - Snap alla griglia e Automazione Compensazione
Disegno di automazione a posizioni specifiche in materia di rete logica può essere difficile se non si utilizzano le opzioni di automazione a scatto.
Dal menu Snap nella zona Arrange, scegliere Snap Automation.
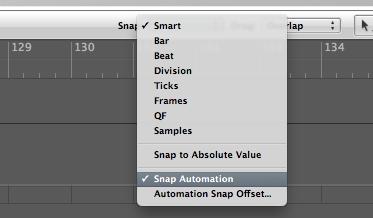
Creazione, lo spostamento o la copia di nodi appena ricevuto un bel po 'più facile agganciate alla griglia!
Tuttavia, è possibile notare che la posizione dei nodi è compensato da un paio di zecche. Fare clic e tenere su un nodo. Nel mio caso la posizione del nodo è compensato da -5 tick.
Per modificare l'offset di un altro valore o rimuovere completamente il tuo modo di automazione succede esattamente il valore della griglia desiderato, andare a Logic Pro
Qui è possibile modificare il valore di Snap Offset a 0 o un altro valore in base tick.

Interessati a saperne di più su di automazione? Controllare le

Discussion
I wonder why there is an automation "snap offset" and why it isn't 0 by default? Seems a bit weird to me.
The offset is there in case of latency caused by audio hardware or plug-in delays. There's also the case that if the project uses a lot of CPU power then it may have an affect upon Logic reading the automation in time.
Thanks for the kind words! If you have any topics you'd like covered in these blog posts do let me know :)
Rounik
Thanks for the useful tips.
Just wanted to precise that the inverting automation work only with the pan. I tried with plug-ins where there's a 0 value at the centre and still it brings all the nodes up/down but doesn't invert them like it works with the pan.
Also for some reasons, I often get inverted converted automation data depending what and where I'm copying. But that must be an issue on my side. :)
Cheers.
That is another great automation tip - and one of my faves. Thanks for sharing it!
There's even a way to edit, copy, move, stretch, etc track based automation without converting it to Region based automation, while treating it like a region!
Steve H has done a very cool TNT video (videos 29-31) on this here:
http://www.macprovideo.com/tutorial/logic9303tnt2
Thanks!
I've just tried to replicate this and it doesn't work with Mute or Solo (which are essentially either On or OFF only.
In fact, I only use it for Pan settings or parameter values where 0 is common...
I wonder if you convert the Track Automation data to Region Automation data (Hyper Draw) you should have more control over the Mute data in the Event List... it'll make it easier to edit...
Can you pop by the Logic forums here and post a new thread with this question? I'll be able to help out there more easily with pictures etc.
http://www.macprovideo.com/forum/
Thanks!
Want to join the discussion?
Create an account or login to get started!