
في تلميح اليوم سوف نستكشف بعض المنطق القوي ، وميزات أتمتة ناقصا حتى الان. هناك نوعان من أتمتة : المسار القائم على المنطقة والقائم على (HyperDraw -- لا ينبغي الخلط بينه وبين محرر هايبر). منطق ملامح متطورة للغاية نظام الأتمتة المستندة إلى المسار الذي يسمح لك لأتمتة بالكامل (أو تتغير مع مرور الوقت) الإعدادات على جميع شرائح تقريبا قناة والآثار والصكوك. وهذا يمكن أن يعيد الحياة اضافية ليمزج الخاص بك. دعونا نلقي نظرة على بعض من هذه النصائح محترف المستخدم التنفيذ.
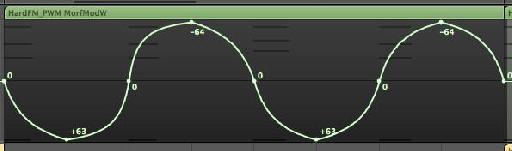
الخطوة 1 -- المنحنيات أوجه Autom
Logic has a dedicated Automation Curve Tool. In all honesty I never use it anymore. Once you master the key command to create your own curves, there really is no need to switch between the Pointer tool and the Automation Curve Tool!
1. أولا تمكين التنفيذ من القائمة ترتيب المنطقة المحلية : عرض
2. خلق الزوجين من العقد. أنا أعمل مع خلق يتلاشى حجم السلس على هذا المسار.
3. Hold down the Shift and Control keys and position the Pointer tool over the line between the nodes.
4. Drag to the right or left to create an S-curve or up/down to create concave or convex curve.
ملاحظة : لإعادة المنحنى إلى خط مستقيم ، اضغط ببساطة باستمرار التحكم Shift ونقرة واحدة على منحنى!
الخطوة 2 -- ضبط وأتمتة بيانات عكس المسار
بذلك ، لقد اتخذت لك وقتا طويلا لرسم بشق الأنفس في بعض أتمتة حجم المعقدة (على سبيل المثال) ، والآن تريد بسرعة ضبط مستويات العام للمعلمة العقد متعددة....
1. الاستمرار على مفتاح Shift واسحب منطقة التحديد على كافة العقد التي ترغب في تعديلها.
2. اسحب على عقدة أو خط لنقل كافة العقد صعودا ، نزولا ، يمينا أو يسارا.... أو
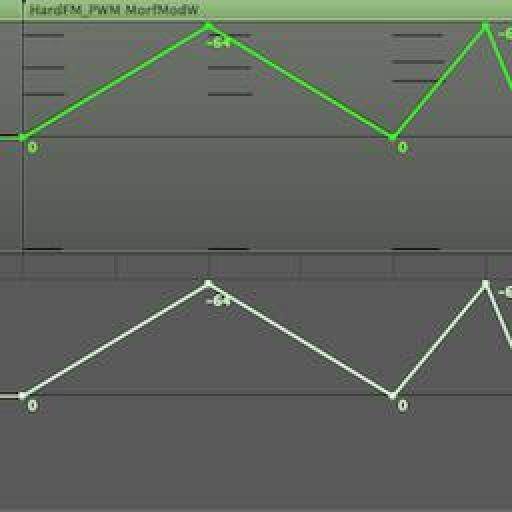
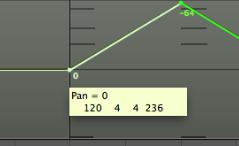
3. اسحب داخل منطقة الضوء (ولكن ليس على عقدة أو خط) لعكس قيمة الأتمتة. يحتفظ هذا العقد على أي صفر ثابت والتحركات العقد على أكثر تطرفا / -- القيم.
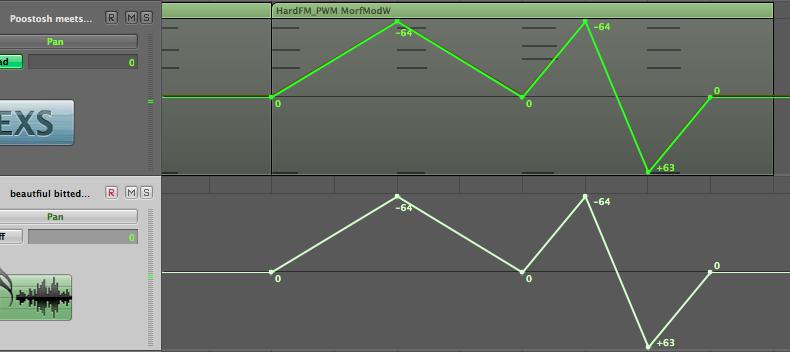
انها محاولة لمعرفة الفرق! في الصورة أدناه اعتدت على أنها وسيلة سهلة لعكس إعدادات عموم على المسار.
الخطوة 3 -- بيانات أتمتة نسخة الى أخرى معلمة
في كثير من الأحيان قد تجد الأتمتة التي تقوم بإنشائها لمعلمة واحدة وصوت إما على نحو أفضل عندما يطبق على مقياس آخر أو إذا كنت ترغب في نسخها إلى معلمة أخرى... في هذا المثال ، لقد وجهت حجم التشغيل الآلي على هذا المسار ، ولكن أود أن بنسخه إلى عموم الأتمتة على المسار نفسه.
1. حدد التنفيذ.
2. الضغط باستمرار على الأوامر أو خيار (بديل) الرئيسية ، وانقر على أتمتة القائمة معلمة في رأس المسار.
3. اختيار بان (أو المعلمة التي ترغب في نسخ البيانات الموجودة لأتمتة) ثم حرر مفتاح الخيار.
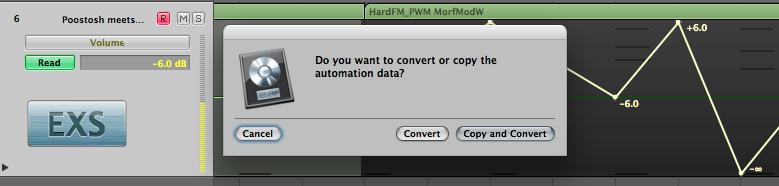
مربع حوار يمنحك خيارين. إذا كنت ترغب في الاحتفاظ بالبيانات الموجودة الآلي وكذلك بنسخه إلى المعلمة التي اخترتها ، واختيار نسخ وتحويل.
الخطوة 4 -- نسخ المسار أتمتة بين المسارات
فمن السهل لنسخ البيانات أتمتة المسار الصحيح لقسم آخر من نفس المسار. ببساطة حدد الخيار بين العقد واسحب التحديد إلى الموضع المطلوب.
العديد من المستخدمين يعتقدون أنه من الصعب جدا لنسخ البيانات أتمتة المسار بين مسارين. في حين أن هناك العديد من التقنيات للقيام بذلك ، وهنا هو أبسط (وربما الأكثر التغاضي) وسيلة لتحقيق ذلك.
1. حدد مسار التنفيذ واختيار تحرير
2. اختيار المسار الذي ترغب في نسخ المسار للأتمتة.
3. اختر تحرير
الخطوة 5 -- انطباق على الشبكة وأتمتة المقاصة
ويمكن رسم في التشغيل الآلي لمواقف محددة تتصل الشبكة من المنطق أن تكون خادعة إذا لم تكن تريد استخدام الخيارات الإضافية التنفيذ.
من قائمة أداة إضافية في مجال تنظيم ، اختيار انطباق التنفيذ.
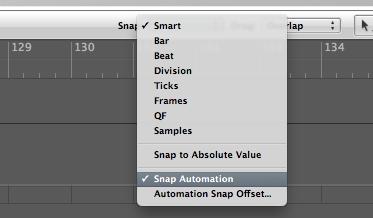
خلق ، نقل أو نسخ فقط حصلت على العقد من الاسهل لالتقاط إلى الشبكة!
ومع ذلك ، قد تلاحظ أن يقابل موقف من العقد بواسطة القراد قليلة. فوق ، وعقد على عقدة. في حالتي ويقابل موقف العقدة التي -5 القراد.
لتغيير معادلة لقيمة أخرى أو إزالته تماما بحيث الآلي الخاص يحدث بالضبط على قيمة الشبكة المطلوبة ، انتقل إلى المنطق برو
هنا يمكنك تغيير القيمة إلى 0 التقط أوفست أو قيمة أخرى تستند القراد.

مهتم لمعرفة المزيد حول أتمتة؟ راجع

Discussion
I wonder why there is an automation "snap offset" and why it isn't 0 by default? Seems a bit weird to me.
The offset is there in case of latency caused by audio hardware or plug-in delays. There's also the case that if the project uses a lot of CPU power then it may have an affect upon Logic reading the automation in time.
Thanks for the kind words! If you have any topics you'd like covered in these blog posts do let me know :)
Rounik
Thanks for the useful tips.
Just wanted to precise that the inverting automation work only with the pan. I tried with plug-ins where there's a 0 value at the centre and still it brings all the nodes up/down but doesn't invert them like it works with the pan.
Also for some reasons, I often get inverted converted automation data depending what and where I'm copying. But that must be an issue on my side. :)
Cheers.
That is another great automation tip - and one of my faves. Thanks for sharing it!
There's even a way to edit, copy, move, stretch, etc track based automation without converting it to Region based automation, while treating it like a region!
Steve H has done a very cool TNT video (videos 29-31) on this here:
http://www.macprovideo.com/tutorial/logic9303tnt2
Thanks!
I've just tried to replicate this and it doesn't work with Mute or Solo (which are essentially either On or OFF only.
In fact, I only use it for Pan settings or parameter values where 0 is common...
I wonder if you convert the Track Automation data to Region Automation data (Hyper Draw) you should have more control over the Mute data in the Event List... it'll make it easier to edit...
Can you pop by the Logic forums here and post a new thread with this question? I'll be able to help out there more easily with pictures etc.
http://www.macprovideo.com/forum/
Thanks!
Want to join the discussion?
Create an account or login to get started!