
The art and science of mastering audio has often been shrouded in equal parts mystery and danger. Mastering engineers are often highly regarded professionals with a completely different set of gear and tools that sets them apart from standard 'tracking' studios. Visions of Professor Snape in his potions lab chanting incantations while listening to Beethoven from magical speakers always used to spring to mind when I prepared to send a project to a mastering house. For this reason, it can often be very intimidating to get your feet wet in the field of mastering. Mastering shouldn't be feared, though… just respected.
The mantra I heard repeated throughout my education was always “Don't EVER master a recording you mixed!” I have tried to live up to that advice with a slight modification of “Don't charge clients to master a recording you mixed or suggest that you should be the mastering engineer too.” Sure, the new mantra is a mouthful—but how will you learn what mastering is about if you don't try it? What better way to learn about mastering techniques than to try your hand at it as much as possible?
When you send your project out to a mastering house, one of the biggest benefits you are getting is a set of fresh ears. Mastering a project that you've just spent the last month recording and mixing will likely give you skewed results. You can't possibly be objective about your decisions unless you are some kind of superhuman audio machine. However, the realities of the changing climate of home studio production and the use of music in all forms of media have forced many of us to gain at least a rudimentary knowledge of how to finalize music that we create. There are many times where the client or budget simply won't permit sending the music out to a mastering house, and we are forced to jump into the world of mastering feet first. For this reason, it's good to be prepared.
Step 1 - Creating Your Session

New Session—Choosing the right sample rate and audio format is key.
Thinking about your delivery format before you get started is key. Video projects may require a different sample rate than a master file that you're going to send to iTunes. CD duplication houses may require the files in a certain format and bit rate. Setting this properly ahead of time will save you a lot of aggravation later on.
Does the client need the files delivered in split stereo? Are they mixing the music with 96 kHz audio for a film? All of these questions come into play and setting up your project file properly will help you stay consistent throughout the project. The more times you have to convert your audio to a different format, sample rate or bit rate along the way, the more chance there is for error.
Step 2 - Arranging Your Windows

Window Setup—The window configuration you use for mastering will be significantly different than the one you use for tracking.
Arrange the windows in a way that puts your audio front and center. You're not dealing with a ton of tracks here—likely only one stereo track. When mixing, I'll often provide the mastering house with a 'vocal up' and 'vocal down' mix just in case their dynamic process makes the lead vocal a bit too loud—so at most you'll have 3 tracks.
Step 3 - Trim the Start

Trim Beginning—Zoom in to get a closer look!
Hopefully, with your audio front and center you can get close enough to accurately pick the start point of your song. It's best to avoid the end for now—after we've added processors and effects there may be a tail of reverb at the end of the file. We'll add a fade-out further on down the road.
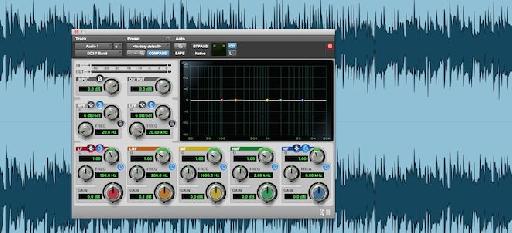
Step 4 - Set Up the Chain

Set Up The Chain—Every song you master will require different tools, but it's good to have a starting point!
When mastering, subtlety and control are key. If you find yourself using an EQ and cutting 20 dB of something, you've got a problem in your mix. Every song will need a different approach, but it's good to have a starting point. My typical starting point is EQ -> Compressor -> Limiter. Pro Tools has a wonderfully useful 7-band EQ and the stock presets for limiting on the D3 Compressor/Limiter are actually quite subtle.
The concept of the brickwall limiter is simple. You have a volume point that you set just below 'zero' so that you don't allow any clipping. The limiter will utilize an extremely high ratio to stop any audio that might 'peak' directly in its tracks. You then slowly raise the gain compensation to bring up the overall volume of the track to a higher point while the limiter prevents it from clipping.
Keep your eyes and ears open. When the limiter kicks in, you should see it and you should hear it. If your limiter is activated constantly, then you are now contributing to the wrong side in the battle of the loudness wars. Using a compressor with a smaller ratio before the limiter can help to smooth out the overall track and keep you from hitting your limiter's wall too hard or too often. The only way to learn is to experiment, and you should experiment a lot. Take frequent breaks to keep your ears fresh.
Step 5 - Additional Plug-ins

Additional Plug-ins—UAD has a wonderful suite of plug-ins specifically tailored for mastering.
If you have experience with a multi-band compressor or harmonic exciter and the track calls for it, now is the time to add it into your chain. A multi-band compressor used conservatively can be a bit more transparent than utilizing EQ to remove unwanted frequencies. A multi-band compressor used improperly will make its nickname clear to you ('maul-the-band compressor').
Step 6 - Not Fade Away

Create Fade—Pro Tools has a wonderful fade engine that is easy to use and intuitive.
Now that all of your processing is out of the way, it's time to give the song an ending! The fade engine in Pro Tools is wonderfully intuitive. You can create a fade based on a selection of audio, or you can put the play marker where you want the fade to begin and choose 'fade to end'. A variety of fades are available including straight, S-curve and parabolic.
Step 7 - Bouncing and Dithering

Bouncing—Bouncing your mix in Pro Tools allows you to export the audio in a variety of formats.
If you are moving down from one bit rate to another (such as from 24 to 16) you will have to put a dithering plug-in at the end of your signal chain. Pro Tools provides several options including the POW-r series of plug-ins. Dithering will add some random noise to smooth over the quantization process and mathematical operations that we're applying to the audio. It will essentially reduce distortion in the low end of your sound spectrum.
When you're ready to send your audio out to the world, use the bounce command. You'll be able to pick the location, format and sample rate of your final audio file. Pro Tools also will allow you to provide an MP3 companion to your full resolution audio. This is great for emailing people previews of the master, but keep in mind it will sound different from the full-resolution AIFF.
Step 8 - Listen. A lot.
Much of what sets mastering engineers apart is their room and gear. A neutral, acoustically treated environment is key. Several sets of speakers to listen on will also help to provide a consistent listening experience for your client. What good is a mix that only sounds good on the studio speakers on your shelf? I'll often spend a few days listening to the final masters in the car, on the train with headphones, at other locations, on computer speakers… all the typical places people listen to music. Part of the mastering engineers' job is to make sure the mix sounds good wherever it's being played.
Keep Practicing!
Well, those are our eight steps! They won't turn you into a mastering engineer, but hopefully they will take some of the intimidation factor away. You really can't beat sending your project to a fresh set of ears and gear specifically tuned for mastering audio; but perhaps after trying your hand at it a few times, you will decide that those 'fresh ears' could be your ears and start to learn more about mastering. The wonderful courses on the topic at AskVideo.com are a great place to start.

Discussion
Want to join the discussion?
Create an account or login to get started!