
So you've written some great music tracks in Bitwig, and now you want to use these tracks in a live performance. That's where Bitwig really shines. Not only is it great for music production but it has tools to help you take your music on the road to perform. So, let's look at five quick tips that will help improve your live performance with Bitwig Studio.
Tip 1 - The Clip Launcher
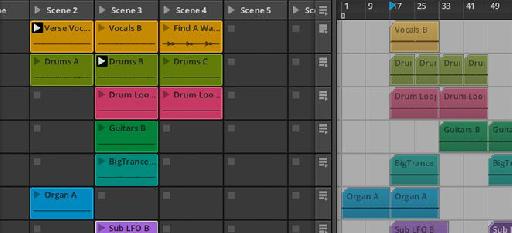
The Clip Launcher is a feature that allows you to add clips and then trigger them on the fly in a live performance. To view the Clip Launcher click on the icon below the Arrange area that looks like six small white squares.

You can add audio to clips by simply dragging them from the browser. Or if you have a Bitwig song you could open it up, and then view both the Clip Launcher and Arrange area. You can now drag clips from the Arrange view onto the Clip Launcher.

Functionality wise this is great as you can drag the clips onto the Clip Launcher, and then launch the clips at different stages giving you the ability to change up the way you perform your song. Each clip has a play button, and when clicked, a white playhead moves through each clip.

Tip 2 - Using Scenes
Like how each clip has a play button, each Scene has a play button. So you could set up various Scenes with a variety of different clips. You can then trigger which scene to play and it will trigger playback of all the clips within that Scene. So maybe you want to add all your verse clips in a verse Scene, and your chorus clips in a chorus Scene. That way you can trigger the verse, and then follow that with the chorus Scene. But you still have the flexibility to play back any other clip in the Clip Launcher while the chorus scene is playing.

Now that gets me thinking about Next Action. Let's chat about that next.
Tip 3 - Next Action
The Next Action feature allows you to specify how the clip sequence will follow after a specified time. So you could set them up so that each drum clip follows on from each other after a bar for example. This way you trigger playback of one clip, and the following clip actions will play out the rest of the drum loops in sequence. But I also find that this a super handy feature to use to add some randomization into your live performances. It all depends on what sequence you want the clips to flow. Let's say you're after some randomization, here's how it's done. Select your first drum clip, then under the Launch Clip Inspector on the left under the Next Action section, set the Do field to Play Random (you'll see other Next Action options here). Under After set the length to 1 bar. So after a bar of playback another clip will be randomly be selected and played back.

Follow the same steps for your other drums clips. Then select a drum clip and press play and see what happens.
Tip 4 - Stretching Clips
If you pull in clips that are not the same tempo or length to your samples in the song, you can use stretching to alter them. Select a clip and double-click it to open it up in the Clip Editor window and make sure the Stretch tab is selected on the bottom left.

The stretch markers are the blue markers on the bottom. You can create you own anywhere by clicking on the bottom. And then you can drag these markers to edit or manipulate the timing of the audio clip. By default, they will snap to the grid, or you can override this snapping by holding down the Shift key.

I find it's great pulling in vocals or dialogue from other sources and then stretching the audio to fit your current live performance song.
Tip 5 - EQ3 For Filter Effects
My favorite effect device for live performances is the EQ-DJ effect. This is a very simple effect but can very easily change up the tonal quality of your tracks on the fly. Especially in a DJ-style performance where you will be mixing tracks into each other.
The EQ-DJ has three faders for three different EQ bands: Low, Mid and High. You can Mute each band by clicking on the M icon. This works really well to mute specific frequencies when in a live performance. For example maybe you want to mute the Low band of a track. And under this you can set the split frequencies between the Low and Mid, and the Mid and High. You could assign these Mute and fader parameters to a MIDI controller so that you have further EQ control in live settings.

Conclusion
These tips have hopefully given you a better idea about how you can set up audio clips in Bitwig Studio for use in a live performance. The Clip Launcher helps give you control over how your songs play out, and with tools like the Next Action, the Stretching audio, and EQ-DJ you can further enhance your songs in a live setting.
Discussion
Want to join the discussion?
Create an account or login to get started!