
The advent of wireless-capable handheld devices like the iPhone, iPod Touch and latterly the iPad has led many DAW developers to release apps that partner with their desktop software to perform various different tasks. In the case of DAWs like Cubase these are usually remote controllers, as one of the main things musicians have always wanted to do is to be able to control their recording software remotely from across the room or even, thanks to Wi-Fi, from another room. Imagine you're sitting at a drum kit or a piano, or standing with your guitar. Rather than having to walk over to your Mac and press record, wouldn't it be great to be able to activate recording and other tasks remotely? With the Cubase iC app, you can! There's no native iPad version yet but it runs perfectly in half or doubled screen mode.
Step 1
Firstly you'll need to be running a recent version of Cubase, then go to www.steinberg.net and go to the downloads section and locate the Steinberg SKI Remote extension. Download and install this and then boot up Cubase.

Step 2
Now go to the Devices menu in Cubase and choose Device Setup. This opens the device management window. Go to the top left of the window and locate the plus button. Click on this to add a device and from the list, choose Steinberg SKI Remote.

Step 3
In the resulting window you might want to add a password to the system, which will prevent any unauthorized use. Choose a password if you like and tick the Enable Authentication box.

Step 4
On your iOS device, go to the App Store and run a search for Cubase iC. The app is free so you will be able to download it for nothing!

Step 5
With Cubase still running on your Mac, start up the app on your iOS device. Click on the Connect tab then the Connect button and if both devices are on your Wi-Fi network, your Mac should appear:

Step 6
if you had enabled a password you will need to enter it. Once this is done you should see confirmation that the two devices are linked:

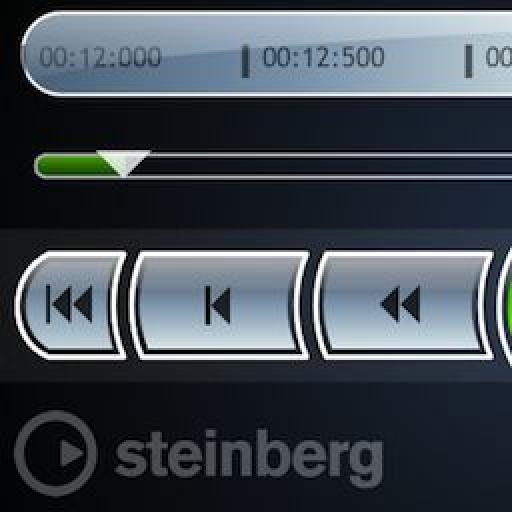
Step 7
In the iC app, go to the Transport tab and you will find that the transport controls should now control your Cubase project. Try pressing play and using the fast forward, rewind and marker controls to navigate. If you swipe and drag in the time display in the app you will be able to zoom around a project's timeline.

Step 8
There are additional controls along the bottom that can turn the click, pre-count, looping and Arranger mode on and off.

Step 9
If you have an Arranger track in your project with Arranger blocks drawn in, they will show up in the arranger tab in the app. Trigger any one of these to play it and tap the 'jump' menu at the bottom to change how quickly Cubase will jump to the next part – bars or beats are available. This makes it possible to DJ sections of a track remotely in realtime!


Discussion
Want to join the discussion?
Create an account or login to get started!