
Cubase has always been one of the most advanced DAWs around, and the new version 7.5 adds some important new features like re-record, new plug-ins and VST Connect SE 2 for remote collaboration. It also brings a couple of nifty new workflow enhancements that can really help your day-to-day sessions. TrackVersions is a new tool that lets you capture and manage multiple versions of a track without having to create new tracks or duplicate existing material in the sequencer, and this greatly cuts down on the amount of clutter you have to deal with especially in larger projects. On a similar theme, the track visibility features that were previously only available in the MixConsole view have now been brought to the Project view and these too can make light work of managing big projects. Read on to find out how these new tools can help you!
Step 1 – Get started

You will need a copy of Cubase 7.5 or Cubase Artist 7.5. Here we have taken an existing large project with plenty of tracks, but TrackVersions works even if you're just using one track in a project. Select the track and then in the Inspector panel on the left, go to the new TrackVersions tab. You can also mouse over the track's name to get quick access to the same controls if you prefer.
Step 2 – Create a new version

From either location, choose the New Version option and you will see the data on the track seem to disappear. Don't worry though, it's just been hidden. Your new track is marked as the track name suffixed by (v2). Record a new version of the part into the new track: it can be MIDI or audio, and TrackVersions works with audio, MIDI, instrument, chord, tempo and signature tracks.
Step 3 – Repeat the trick

You can repeat this trick again if you like to add a third or fourth version of the part and you will notice that each time, the previous version is hidden and the new one becomes active. Luckily all the tools you get with a regular track still apply to each version of a track, they're not limited in any way. So if for example you have used the multi-take tool to add several passes and then comped together an audio or MIDI part using lanes, those still work just as expected for each version of a track. The lanes will simply appear with their associated track version.
Step 4 – Toggle between versions

To toggle between track versions and thus make each one audible or active, either select them from the TrackVersions section of the Inspector panel or use the drop-down menu on the track name to select one. Helpfully you can rename any version which is great because it means you can identify them much more easily. So if you choose the Rename option with a version selected, you can call it “best take”, “minor key” or whatever helps you recognize it at a glance.
Step 5 – Duplicate a version

To duplicate any version, use the Duplicate menu option. This can be great for making tweaks to a part, for example trying a beat without the crash cymbals, or duplicating a guitar part that you slice up differently to the original. It's the same as duplicating a whole track, except that it doesn't take up extra space in your track list or duplicate plug-ins. Any effects you have inserted or EQ settings on the channel remain in place and affect all versions of a track equally.
Step 6 – Delete track versions

You can delete any versions using the Delete command, and also select any tracks with the same version ID. Version IDs help to differentiate between racks even if you have manually assigned them the same name, which can get confusing. Note also that you can copy and paste any compatible data from a track into a track version on another channel.
Step 7 – Toggle visibility

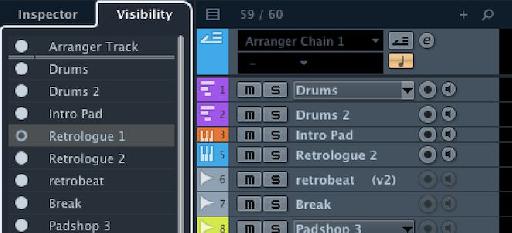
Now let's look at managing track visibility with the new visibility features. Click on the Visibility tab at the top left of the Inspector panel on the left to see a list of all tracks in the project and using the buttons, turn any tracks off that you don't want to see. They will still be heard since they are not muted, just made invisible.
Step 8 – Filter track types

Now click on the Filter Track Types button just to the right of this menu to see a list of track types that can be toggled on and off en masse. This is really useful for example if you have a bunch of instrument tracks that you have finished editing and you just want to see your audio tracks and focus on those. Or, temporarily hide all your group tracks.
Step 9 – Count your tracks

Just to the right of this menu is a small dual digit display that shows the number of tracks in the project together with the number currently visible. If you have turned off any tracks' visibility using the main list (though not the track type filter) you can click here to immediately restore visibility to all tracks, which is much quicker than going through and turning them on again one by one.
Step 10 – Get more advanced

Above this is the Configurations menu. Click on the Track Visibility Agents button on the right to perform various actions such as showing only tracks containing data, tracks between the locators containing data or to show only the currently selected tracks. This is a really powerful way to customize your view of the Project.
Step 11 – Get really advanced!

In the Advanced Agents submenu here, you can access even more specific commands like only showing tracks with “drum” in their name or only tracks that contain track versions. You can see that between all these new visibility options you can really get a grip on even the largest project.

Discussion
Want to join the discussion?
Create an account or login to get started!