
One of the things that many producers feel has been lost in the transition to digital recording technology is the warmth that resulted from the old techniques of recording and mastering to tape. Modern mastering plug-ins are powerful but also tend to be very clean and while for some kinds of music this is great, for others, the slightly more hazy, softened sound of tape is more desirable. You can go out and try to find a tape machine, then deal with actually maintaining the thing. But plug-ins like Yamaha Steinberg's Vintage Open Deck can do a good job of providing the sound of tape, using in this case the company's VCM technology to model vintage machines.
Step 1 – Fire it up

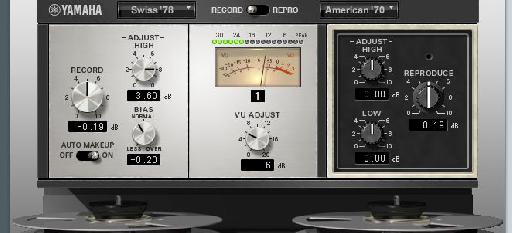
It looks and sounds good… and the reels even move.
Load up an instance of the Vintage Open Deck. You can do this either across the master outs during mixdown or, much more preferably, across a single mixed down stereo file in your DAW or wave editor. Separating the mixing and mastering processes is almost always advisable.
Step 2 – Mix and match machines

Choose matching or different models for the input and output stages.
Before you start, be aware that the effects of this plug-in are fairly subtle. You won't get insane hard limiting or crazy stereo width from it – it's about warming the signal up. Try a preset; there are four models to choose from. In fact the Record and Repro decks can each use a different model if you like, meaning you can mix and match in ways that are much harder in real life.
Step 3 – Drive the signal

Apply gentle warming and drive with the input stage.
The Record dial to the left controls the input level, allowing you to determine the amount of tape compression that is applied. Push this a little and after a while you will start to hear some warm distortion. Trust your ears here, you'll probably want to dial it back a bit when you hear any distortion, but equally to drive the signal a little. The Bias knob controls the level of any distortion that does appear. By balancing the two you can find a trade-off of squeezing the signal but not letting it get crunchy. The High Adjust dial can boost the top end for a little extra sparkle. By activating the Auto Makeup switch the audio level of the reproduction deck will reflect changes on the recording deck but maintain the same relative output level.
Step 4 – Monitor the sound

Use adjustable VU metering to keep an eye on your signal levels.
The Repro deck on the right has dials that let you alter the high and low frequencies of the signal as well as the overall output level. By flipping the switch in the center of the plug-in, you can choose to monitor either the input or output signals. In either view, the VU meter can be adjusted from 0 to 20 dB to help you account for mastering different kinds of material.
Step 5 – Tweak the tape

Change tape speed and type to further alter the character of the master.
Last but not least, at the bottom of the plug-in you'll find tape controls that alter the characteristics of the virtual tape. Switching speeds between 15 and 30 inches per second will change the character of the sound, and selecting Old over New tape will impart a slightly softer and more muffled quality to the signal. Use this plug-in correctly and you should find it easy to add some gentle, warm drive to your tracks, lending them greater punch and clarity but without the hard limiting common to many mastering plug-ins.
Find out more about Steinberg's Vintage Open Deck here:
http://www.steinberg.net/en/products/vst/yamaha_vintage_plug_in_collection/vintage_open_deck.html

Discussion
Want to join the discussion?
Create an account or login to get started!