
Tip 1
It might seem obvious, but you can always save a new version of any project and you end up with two copies of the same thing. From there you can make any modifications to either and they will stay separate. Be aware however that they will initially share the same project audio folder so any audio you have recorded will be accessible to both. Although Cubase's audio edits are nondestructive it can be a good idea to manually duplicate the project folder and thus any audio inside it, and point each project individually at its own project folder.

Tip 2
Cubase lets you add an Arranger track (just one) to any project, from the Project > Add Track menu. This is a really useful track type that contains playback instructions and has its own setup window to control the playback order of any track. It allows you to create multiple arrangements nondestructively and without moving anything on the timeline until you decide you want to.

Tip 3
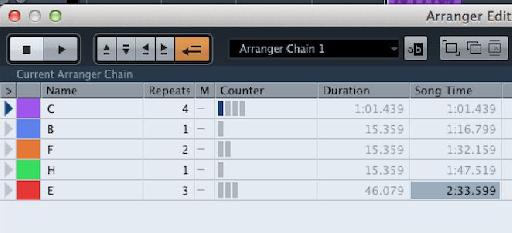
If you click on the Edit button on the Arranger track, you will open its controller window. On the right, you will see all the sections you have defined in your project by drawing Arranger blocks in using the Pen tool. Drag any of these to the left hand column to place them into the current Arranger chain. Now when you play back with the Arranger active, the sections will play back in this specified order.

Tip 4
Manually enter numbers into the Repeats column for any section and set how many times in a row that section will play back before moving on to the next section. So to add two instances of a middle eight, define the area, add it and enter 2 in the Repeats box. The columns to the right helpfully show you how long these repeats will take to play back.

Tip 5
Click the “ab” icon to name an Arranger chain. Then click the New Chain button to create an alternative, blank arrangement and name it too. Keep going and you can create multiple arrangements, each of which can be completely different. Naming them makes keeping track of what's going on much easier.

Tip 6
Click on the tiny arrow to the right of the Flatten button on the right hand side of the menu bar and you reveal a “flatten with options” window. You can choose to render each chain out in a number of different ways. Flaten the current chain down to the existing project, or one or more chains out to a whole new project file, complete with naming options. You can choose to keep the arranger track active in the rendered project or remove it, make copies of events for greater data security and also open and cascade the new projects. So you could leave your original project intact and split off one or more of the new ones as new projects and work on them separately.


Discussion
Want to join the discussion?
Create an account or login to get started!