
FL Studio has some hidden gems for processing your MIDI data. Let's look at how to get to these tools and what you can do with them. I'm going to focus on the Strum, Flam, Randomize and Arpeggiate MIDI functions.
Tip 1 - The MIDI Tools Menu
First up you need to know where to find the MIDI Tools. Double-click a Pattern to open it up in the Piano Roll Editor. Then click on the wrench tool icon to reveal its drop-down menu. This shows you the MIDI actions that can be used to process your MIDI. These will alter either all the MIDI notes in the pattern or only the selected notes.

Tip 2 - Strum
The strum option is a great tool to use to add some human feel and variation into your chords. It works very well with piano, synths and guitar-style sounds. If you program in your MIDI chords and quantize them, the notes will sit flush on the grid. But sometimes it's nice to move these notes off the grid to give movement and realism to the chords played, much like how a guitarist strums strings or how a pianist plays through their chords. Select your MIDI notes in the chord (hold down the Control key and then lasso around the notes you want to select) and then open the Strum MIDI dialog window. You can set the times for the Start and End of the notes. The strength parameter is measured in time and the tension parameter in percentage. You can also alter the velocity strength and tension of the notes to further enhance the strumming sound of your MIDI notes.

Tip 3 - Flam
The Flam tool is a great tool to double up the sound of your MIDI. A flam consists of two closely placed notes, one with a stronger velocity or accent than the other. It works well on percussive sounds, especially snares and hats. Let's work with a snare. Select your Snare pattern of MIDI notes, and then open up the Flam tool window.
The Time parameter will adjust where the flams sit. At halfway the time will be 0 ms, and if you move to the left, the flam will be before the main snare. Moving it to the right will mean that the flam will fall after the main snare note. And the Velocity dial will change the velocity amount of the flam. Try out small amount times between 0'"20ms and hear how it adds a doubling effect to the snare. Then try longer times both on the left and right and listen for a drum roll effect sound with your snare pattern.

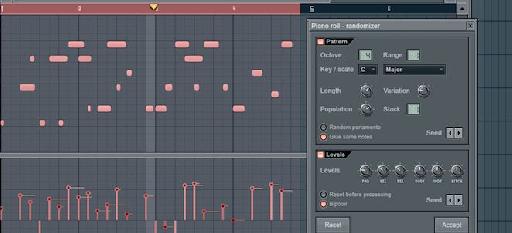
Tip 4 - Randomize
I'm a huge fan of randomizing parameters, and FL Studio's MIDI tool does exactly that. Take a MIDI pattern in your FL song, select your MIDI notes and then from the MIDI tools menu select the Randomize option. There are quite a few parameters in here, and each one has an effect on your MIDI data.
Your part gets randomized immediately when you open the box, even before you have tweaked any of the parameters. The first option sets the range within your MIDI notes. An octave is set, and then a range within that octave is applied. Next you can choose the key and scale that you want to set your MIDI notes to conform to. And there is quite a selection here for all the scales and mode options, which is great if you want your randomized notes to fall within the same key and scale as the song.

Then there are parameters to randomize the note length, the variance of the note lengths, and how many notes are populated within the range set.
There's further parameters to randomize under the Levels section such as Pan, Velocity, and Pitch. So you can really take a simple MIDI pattern and change it up completely with these randomize options.
Tip 5 - Arppegiate
The Arppegiate tool takes your MIDI chord and turns the notes in the chord into arpeggiating sequences. Select your MIDI chord pattern and then choose the Arpeggiator tool. You can choose from some presets under the pattern selection by clicking the default folder icon. Or you can set your own arpeggiation pattern with the options below this.
You can set the pattern to sequence normally through the chord pattern, or it can flip or alternate between normal and flip directions. Then with the Time multiply parameter (Time Mul) you can speed up or slow down the arpeggiation. You can set the range of how far this arpeggiation pattern is going to extend. And then you can sync the pattern to either the time, block or chord shape. The Gate parameter can be used to shorten the length of the notes, which works really well with arpeggiations giving it a more staccato sound.

And under this you have the same Levels parameters like in the Randomizer tool to further enhance the arp pattern.
Conclusion
That's how to use the MIDI tools to process and change up your MIDI patterns. I find these tools can be very creative and often can spur on other ideas when used. Try them out in your songs and see if they help you with your MIDI programming. For further FL Studio tips and tricks check out the following tutorials:
Discussion
Want to join the discussion?
Create an account or login to get started!