
Guitar Rig Pro has had seen some pretty heavy updates recently. Most notable of these tweaks has to be the introduction of the 'Producer Effects'. Some of these new devices represent pretty traditional effects and treatments, while others are a little more off the wall.
Here we'll take a look at how using Guitar Rig's modifiers in conjunction with the newly introduced Tractor's 12 performance effects. These are already really expressive processors but add some real time modulation and things get very interesting.
Step 1 - Applying Traktor's 12 Effects
There's no doubt that Traktor's 12 are some of the most tweak-able effects to be introduced into Guitar Rig's sonic palette. They may not be mastering grade production effects but they are a lot of fun!

The Traktor's 12 within Guitar Rig Pro.
There are the usual delays, reverbs and filters in the collection but the most interesting have to be the granular, time based processors. Reverse Grain and Transpose Stretch are the ones I'll be focusing on here and we'll be exploring the potential when they are coupled with Guitar Rig's Modifier system.
The dry loop we'll be using:

The Reverse Grain Effect.
You can hear that I've applied some Transpose Stretch to a musical groove here. The results were great but also quite static. To really get the most out of the device we really need to get some of the parameters moving. Of course, you could use automation but using the Modifiers gives you much more 'synth' like effect.

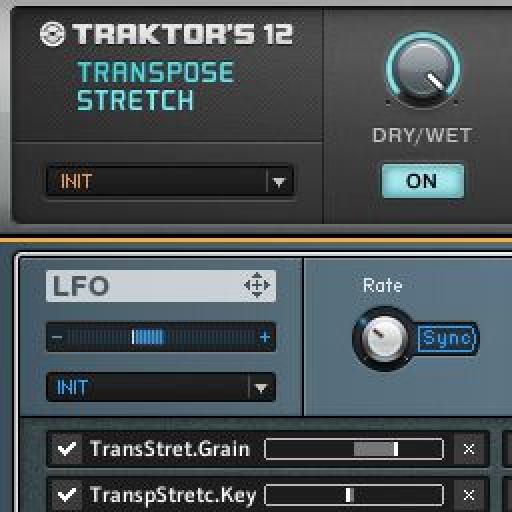
The Transpose Stretch we'll be using.
The dry loop we'll be using:
Step 2 - Assigning Parameters To The Modifiers
Assigning a modulation routing from any of the Modifier devices to other effects in your chain is really straight forward. Simply drag the crosshair symbol on your chosen modifier to the parameter you want to effect.

The Modifiers ready to be loaded.
Now unfold the lower section of the Modifier and you should see your parameter in the first slot. Here you can decide the amount of modulation that takes place and whether the effect is positive or negative. You can also delete the mapping here if you have made a mistake.

The LFO Modifier we'll be using.

The first parameter is assigned.
The LFO is assigned to the grain size parameter:
Step 3 - Fine Tuning For The Perfect Results
I find that getting the right balance between the position of the actual parameter and the amount of modulation is key. You can actually see the modulation in action, this is represented by a handy little animation on the knob or fader you are effecting.
Go back and forth between the mod amount and parameter to get the perfect balance and sweep. Once you have this right you can move onto the serious stuff.
Now use the Modifiers control to get exactly the type of modulation you want. In this case I am using the LFO so I was able to alter the speed, waveform and other key parameters. Some of the other modulators such as the Envelope are even more feature rich so you can spend quite a bit of time tweaking here even if you are modulation a fairly simple effect.

Multiple parameters are assigned.
The LFO controlling multiple parameters:
This is a a great combo and certainly something I never thought would be possible in Guitar Rig. Some of the effects that are produced using this technique are almost synth like in nature. I'd certainly recommend giving it a go!

Discussion
Want to join the discussion?
Create an account or login to get started!