
Databending is an interesting technique you can use to manipulate your digital media in very alternative and visually aesthetic ways. And by digital media I mean anything from images and audio to video. The idea with databending is that you use software to manipulate the data in the digital media, and in the process you output a new edited version. But the trick? You use other applications not associated with the digital media to manipulate it. In a way you're corrupting the digital format, but you can get really interesting results that you may not get in your conventional digital editing media applications, and it's very quick and easy to get these interesting results. I'll warn you up front that this technique can be a bit hit and miss, as the methods used apply an element of chance to manipulate the digital media. But there's something very pleasing about corrupting a file, and seeing what unique results you get. Let's take a look at how databending is done. I'll be demonstrating with images, but the same techniques can be applied to digital video and also to audio formats.
Step 1 – Bending Images with a Text Editor
The primary aim is to break a digital media format down into a raw format. The easiest way to do this is to take the media and open it up with a text editor. On the Mac you have TextEdit and on Windows you have Notepad. With images, different formats may affect how the image is databent. This technique can be done with any image format such as JPEG, PNG, TIFF etc. But I recommend using BMP images as this format works much better when you convert the media to a raw format. You can change the format of the image file in Photoshop or GIMP to convert the image to a BMP file. Just save the files as a new file and change the format.

Before doing anything though, make sure you make a copy of your file, and then manipulate the copied version as this process is destructive. So I don't want you taking your only image of your wedding day and databending that, as you won't be happy when you can't get it back to its original state. Now, with your copied image, right-click on it and choose to open it with your text editor. When the application opens, you'll be presented with a string of gibberish ASCII characters. This is the raw format representation of the image.

Now to databend this image you need to input, change or delete a selection of these gibberish ASCII characters. So your options are to cut, copy, or delete selections of text. Now here is a very important piece of information: the header and footer contain important data related to the file, and this information resides in the first few lines of the top and bottom of the ASCII text. So scroll down past this area to somewhere in the middle and start editing the text from here as you don't want to delete the important bits. You'll probably notice a line space at the beginning and end of the body of text. This gives you an indication of where the separation of the header and footer is from the main body of text.
Each time after you edit the text, save the file out to a new version then preview it to see what changes where made. Sometimes you can go too far to the point where the file is completely corrupted and can't be previewed. If this happens, you can simply jump back to a previously saved version of the file.

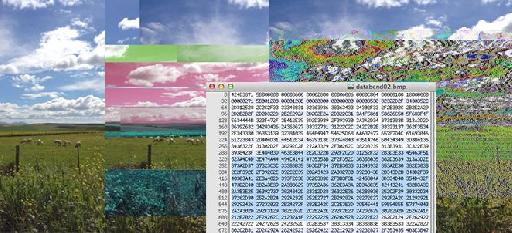
Here's our original image...

And the databent version.
Aren't you amazed at the interesting results that can be achieved? You'll notice how the position of sections of the image get moved and distorted, and how the colors can be manipulated. Try to work with images that have a lot of different colors. If you work with just a black and white image, it may not get distorted as much as a color image. What I also find really works well is to cut sections out, and then move somewhere else in the body of text, and paste the text there. So the same text and data remains in the file, but it has been swapped around.
Step 2 – Using a Hex Editor
Another way to databend your digital media is to use a Hex Editor. Instead of ASCII characters it uses hexadecimal characters. This can look a little less gibberish than ASCII. For Mac there is Hex Fiend or 0xED, and for Windows you can use HxD. There is also a Hex Editor in Gimp if you want to edit the hexadecimal characters there. In the Hex Editor go to the File Menu, then to Open File and navigate to your image. With the Hex Editor, the characters are split into hex blocks. This way you can cut, copy, move a specific hex block, or even replace hexadecimal characters through the Edit menu.

Step 3 – Applying Audio Effects with Audacity
Now onto something really interesting. You can use an audio application to manipulate and corrupt your images and video. That probably sounds quite backwards but it's possible. The audio application needs to be able to import raw data, and Audacity is a great audio app that allows you to import digital media as raw data and then apply audio effects to the digital media. You can grab Audacity here: http://audacity.sourceforge.net/download/
To add the file into Audacity, go to File > Import > Raw Data. Navigate to where your image file is, and click Open. Now it's important to make sure you set the correct settings in the Import Raw Data dialog box.
- Encoding: A-Law
- Byte Order: Big-endian
And you can set the channel to Mono or Stereo, but let's work with Mono for now. Then click Import.

I wouldn't suggest playing back the audio representation of the image file as you'll probably hear very loud white noise. So this digital file isn't something musical, it's just an audio waveform representation of the file. The beauty is that you can now apply audio effects to this raw data file to manipulate it. Remember that the very beginning and end contains the header and footer, so make a selection in the middle and then go to the Effect menu and select an effect.
Let's try this out with a reverb effect. Add the Reverb, tweak some of the parameters, and then click on OK.

Now save out the file so that you can see the results. To do this go to File > Export. Under format make sure Other Compressed files is chosen, and then click on the Options… dialog box. Select RAW (header-less) for the Header, and A-Law for the Encoding, and click on OK. You can leave the Metadata fields blank and click OK. Now preview the picture and see what result you have. Try out some other effects.


Maybe a Phaser, or add a Graphic Equalizer and change the band amounts. You can really go crazy here. But I find what works really well is to only tweak the effects slightly. If the effect has a Dry/Wet percentage parameter, drop this down so that it's only applying a small amount of the effect on the raw data file. This way you'll still be able to get an idea of what the picture is, but with some slight data bending. A little tweaking goes along way.

Audacity works really well with databending video files as well. Import a video the same ways with the same settings. Then when you export it out, you'll have a really unique databent video. Shorter videos work better, and it'll take shorter to apply the effect to the raw data of the video.
Step 4 – Bending Audio formats with Text and Hex
With audio, you can use the same steps with the text editor, and the hex editor, but obviously it won't work the same way in Audacity.
Drum Loop Before Databending:
Drum Loop After Databending:
But be careful with audio, if you corrupt the file too much, you'll just have white noise. So just make subtle tweaks to the text and it'll make a big difference to the file. I found it imparted a sort of bitcrushed, glitchy effect to the audio that was quite random and unexpected.
Conclusion
That's how to take your digital media and manipulate and corrupt it in interesting ways for unique effects. You might start noticing how some of these techniques have been applied in other digital art forms such as visual arts, video games, and all sorts of other creative avenues. So try this out, you can really have some fun with it and expect the unexpected with the databending. So get in there and start corrupting your digital files… creatively.
Discussion
Want to join the discussion?
Create an account or login to get started!