
“Plosives” in your vocals can make or break the recording. Even with a pop filter, they still have a tendency to sneak their way in! There's a letter in the alphabet that puts fear in the hearts of home recording engineers ...P! The other is B to a lesser extent.
In this article, I'll show you two ways to remove them without simply stripping away the lows with a high pass filter. I've included a vocal sample so you can experiment with it, or just load up a track you know that has them. If you'll be listening to these samples through an iPad or mobile phone speaker, you most likely will not hear the difference between the samples. Plosives are almost always in the low frequency range, and most of these devices built-in speakers can't replicate frequencies low enough. Use headphones.
Download: audio sample “Plosives Before”
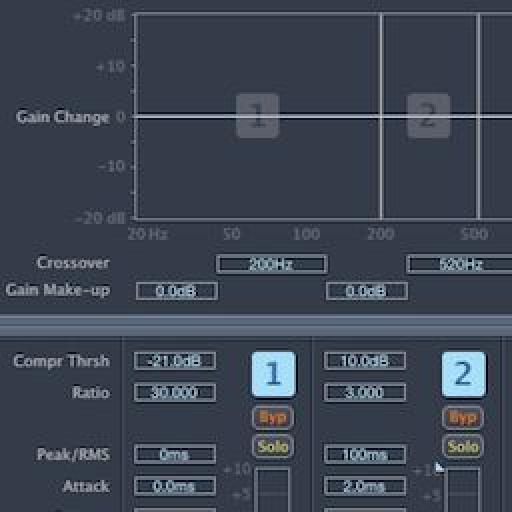
Step 1 - Multipressor: Set band 1 frequency range
Let's first try a method using Logic's Multipressor. This is a multi-band compressor. I'm using this instead of a single band compressor because I want to dynamically lower the volume on the low frequencies only. By default, the Multipressor's band 1 crossover is set to 100Hz, but we need to pull in some higher frequencies. I'll do this by pointing my mouse directly between band 1 and band 2, then clicking and dragging to the right. I'll set it to around 200Hz.

Step 2 - Multipressor: Raise threshold on bands 2, 3 & 4
Since we only want to lower the volume on the plosives, set the other three bands' threshold settings all the way up to 10.0dB.

Step 3 - Multipressor: Peak/RMS, Attack & Release
We want the compressor to respond as fast as it can. Plosives happen very quickly, so set the Peak/RMS to 0ms, the attack to 0.0ms, and the release as far down as it will go to 2.0ms.

Step 4 - Multipressor: Threshold & Ratio
Set the Ratio all the way up to 30 so the plosives will be lowered as much as the Multipressor possibly can. Start to drag band 1's threshold down now. For my sample file, about -21.0dB seems to work fine. The idea is to set the threshold high enough so the areas without plosives can play out naturally, but low enough to capture only the plosives. You'll be able to “see” that it's working too. Watch the graphic on the band. It should drop only when the plosives hit.

Step 5 - Multipressor: Lookahead
Push the Lookahead as high as it will go (20.000ms). It's subtle, but this will anticipate the plosives slightly before they actually happen so the compressor responds even quicker.

Here's a before and after sample in case your not following along:
Audio Sample “Plosives Before” :
Audio Sample “Plosives After Multipressor” :
This method works pretty good for medium to light plosives, but for more extreme ones, we need something better...
Step 6 - Sample Editor: Make a backup
Let's fix the plosives in Logic's sample editor now. Double-click the audio file you'll be editing, or select it, then press W on your keyboard. Either way the sample editor will open. If you're editing your own recording, make a backup now. You can do this easily by clicking on the file menu and selecting "Create Backup." If you've edited the file beyond your undo steps and want to revert back to the saved copy, simply go back to the Audio File menu again and select Revert to Backup.

Step 7 - Sample Editor: Pencil Tool
Scroll to the area with the plosive. Hit the escape key on your Mac's keyboard and switch to the Pencil Tool.

Step 8 - Sample Editor: “Erase” the plosive
If you haven't zoomed in far enough, the Pencil Tool acts as the Zoom Tool. Once you've zoomed in far enough though, you'll literally be able to draw out the plosive. Try to follow the natural curve of the waveform before and after the plosive for the best result.


Here's the final result with both the Multipressor and the Pencil Tool:
Hope this quick tip helps you get control over you're P's and B's!

Discussion
The final audio sample is fixed.
Enjoy :)
1. Select the plosive in the Sample Editor.
2. Choose Functions > Change Gain and lower the gain of the selected plosive.
Want to join the discussion?
Create an account or login to get started!