Sample-based Instruments are ubiquitous these days—we take for granted the ability to call up a realistic drumkit or piano, or a full orchestra’s worth of sounds, not to mention the availability of sample-based loops, and sampled effects for post-production. Most of us tend to simply open up preset virtual instrument patches and play, without ever having to give much thought to how the sausage is actually made.
But every once in a while someone may want or need to create a sampled instrument of their own, or it may become necessary to tweak or edit an existing sampled instrument—for playability or to customize the sound—to a degree that requires a little knowledge about how sampled instruments are put together. So to that end, here’s a brief overview of the architecture and construction of sample-based instruments.
The Root of the Matter
A sampled piano instrument will serve as a good example for discussing the basics of how sampled instruments are put together. At the most basic level, a sampled instrument consists of one or more recordings of notes from a “real”—acoustic—instrument, which are arranged to be played back from a MIDI keyboard. If an intrepid sample instrument creator had, say, access to a nice grand piano—maybe in a club—with a distinctive tone, and wanted to capture the unique sound of that instrument for use elsewhere (for recording or touring), they might decide to go about recording the sound of that piano for a sample-based instrument in their sampler of choice.
The simplest approach would be to record one note—perhaps Middle C—and then load that recorded sample into a new, empty sampler instrument. The sampled note would be assigned to play back from a particular key on a MIDI keyboard—in this case, obviously, Middle C. When that key is played, the sample is heard just as it was recorded, at its original pitch. That key is called the Root Key—the key that plays the sample as is—and it’s the basic building block of a sampled instrument.
But samplers, of course, will let players play other notes above and below the Root Key, and when they do the sample will automatically be transposed appropriately, sounding the correct pitch for each key, even up to the full range of an 88-note piano. But if that was all that was needed to create a realistic sampled piano patch, then sample libraries would be tiny and cost next to nothing in labor to create. What actually happens is that a single sample transposed up and down the keyboard only sounds natural when the Root Key is played, and maybe for a couple of notes above and below that—playing much higher and lower notes results in decidedly unnatural sound quality, exhibiting the same artifacts you hear when a turntable or tape recorder is sped up or slowed down.
Chipmunk Hell
The sample does transpose to the correct pitches, but the natural envelope of the note is unnaturally sped up or slowed down, and the instrument’s formants are transposed as well. In an acoustic instrument, formants are the specific resonances that give that instrument its unique tonality, and they are fixed-frequency resonances which don’t change when different notes are played. But when the sample is transposed, they do change—in this piano example, higher notes will sound overly tinkly, like a progressively smaller toy piano, and lower notes will sound boomy and muffled, like an impossibly large instrument. This artifact is referred to as Munchkinization or the Chipmunk Effect, referring to the technique of transposing tape used to create squeaky cartoon voices or the Munchkin voices in the old movie The Wizard of Oz.
Multisampling
So to create a sampled piano that sounds natural across its full range, multiple samples must be taken. Ideally there’d be a separate sample for each note on the original instrument, but to save on disk size and CPU/RAM overhead in playback, sampling every third of fourth note is often acceptable—each of the samples will only be transposed one or two notes above and below their respective Root Keys, and the result is usually acceptably natural sounding.
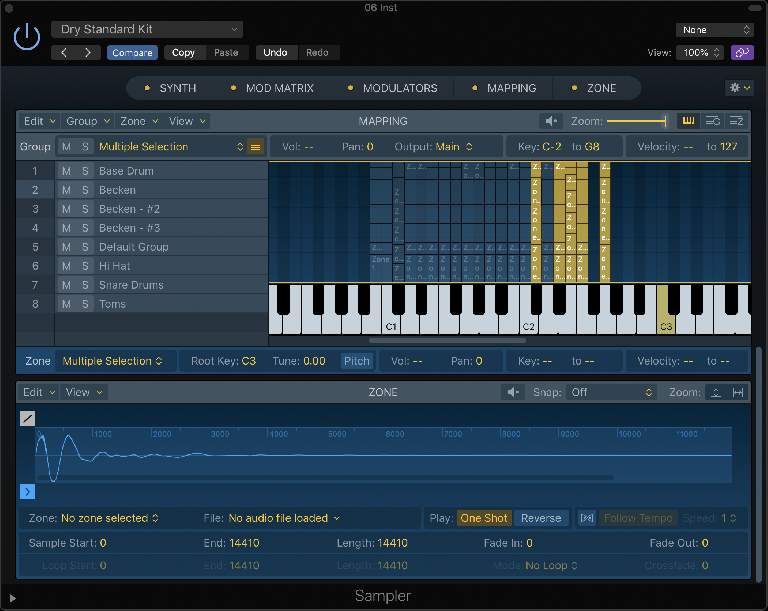
This approach is called Multisampling, and it’s the basis for the vast majority of playable sampled instruments. Of course, multisampling is done for reasons other than transposition artifacts, as well—a sampled drumkit that consists of several different drums and cymbals will have to multisample each kitpiece, even though there's no transposition going on. The kitpieces will be assigned to different keys for realtime playback of the full kit.
Zones and Groups and Maps, Oh My
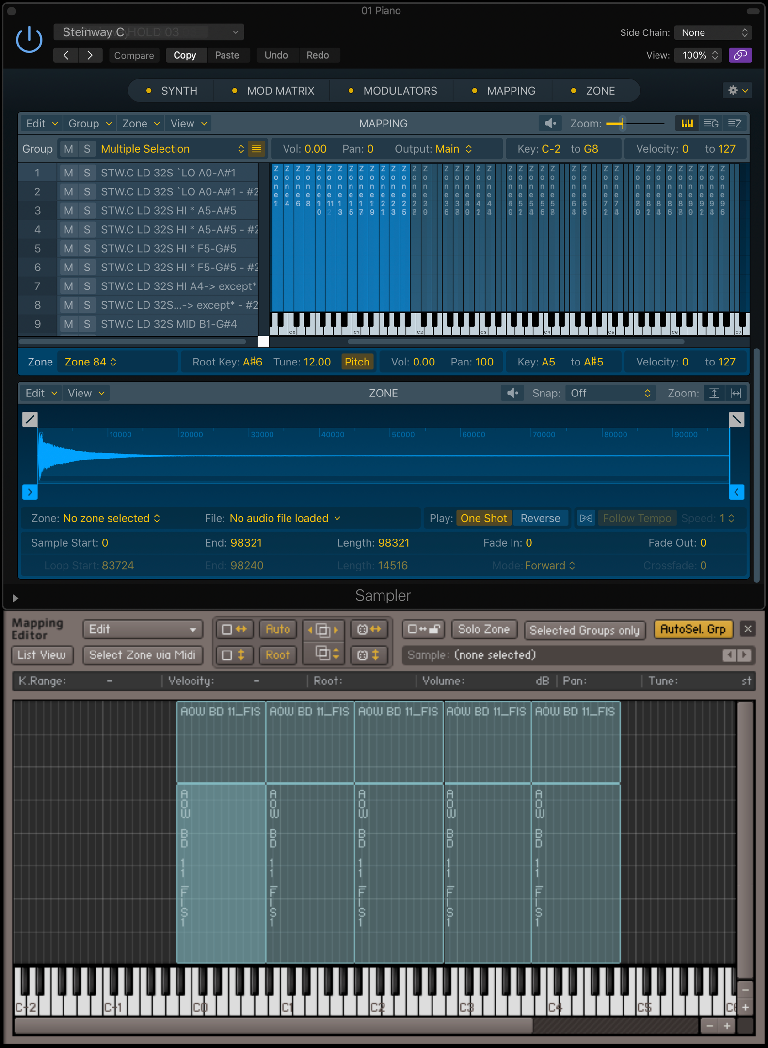
A typical sampled instrument consists of a collection of multisamples, with appropriate Root Keys—the keys that match the original pitches of each of the samples. If individual samples will have to cover several notes—as is typical—then Key Ranges are set, determining the high note and low-note limits (above and below the Root Keys) for each of the samples. The Key Range and Root Key settings together form a Key Zone for each sample, and a multisampled instrument is made up of a collection of Key Zones arranged across the keyboard to cover the full range of the instrument.
Sometimes Key Zones are grouped together for easier editing or to enhance playability—a typical example would be a sampled drumkit’s hihat samples (closed, tight, loose, splash, open, foot)—those Key Zones might typically be combined into a Key Group. So a full instrument would be made up of a collection of multisample Key Zones, optionally arranged into Key Groups, all combined into a Key Map—the Key Map is the finished sound source for that sampled instrument.
Sampling + Subtractive
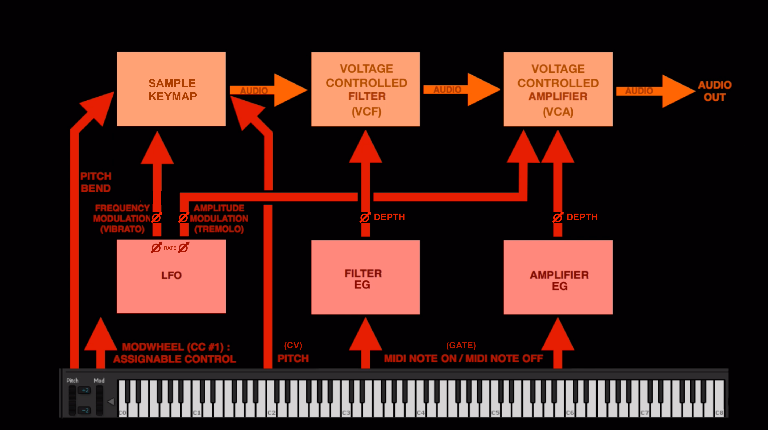
At this point, the sampled sound source—the Key Map—is usually run through some familiar processing. Most sampled instruments employ subtractive synthesis processing—the same processors and modulators found in analog synthesizers. With the Key Map taking the place of the VCO(s), the samples are run through VCF and VCA stages, which are modulated by ADSRs and, optionally, LFOs.
But while these are the same sound-shaping tools as in analog synths, the way they’re applied in a sampled instrument will, of course, be different. An analog synths starts with a steady, static tone—a bright, buzzy wave—the usual Lowpass Filter is need to mellow the electronic buzzy quality into a more natural, musical tone, and ADSRs are required to give some volume and tonal shape to what would otherwise be all bland on-off organ-type notes.
But the samples in a Key Map already have both a natural musical tone, and natural envelopes that need to be preserved. So instead of shaping the notes, a sampled instrument’s Filters and Envelopes are more likely to be employed to alter the natural tone and envelopes in response to MIDI Velocity. Again, our sampled piano is a good example—if the samples are all of loud, bright, hard-played notes, then besides the obvious Velocity-based change in level dialed up in the VCA, the LP VCF can be set to mellow out the tone to simulate softer played notes at low MIDI Velocities, and the Envelopes can be set (slower attack) to simulate softer attacks at low MIDI Velocities. The result can be a much more playable instrument, with a natural-sounding dynamic response.
Velocity Zones
But companies that create and sell sample libraries to users of various different samplers don’t want to have to program all those parameters separately for every different sampler engine that might host their instruments, so they employ a different method. They record not just multiple samples for multiple Key Zones, but also multiple samples for individual Key Zones—the recordings would include samples of the same key being played soft, medium, and hard—sometimes at dozens of performance levels for a single key. These samples are then layered on the same Root Key, and set to be triggered alternately at different MIDI Velocities, providing a natural dynamic response—these are Velocity Zones. This approach makes for huge sample libraries, but has the advantage of being adaptable to any sampler.
The use of Velocity Zones can sometimes make it more difficult to tweak the dynamic response of a sampled instrument—a common tweak often requested by players. Instead of just adjusting, say, familiar LP Filter parameters, it could be necessary to rearrange the transition points of layered Velocity Zones for multiple Key Zones. Better sampled instruments will provide more straightforward ways to make these kinds of adjustments, but that’s not always the case, and a little knowledge of the inner workings of sampled instruments can come in handy at times, even with finished patches.
The Wrap
Of course, samplers are used for more than just realistically replicating familiar musical instruments. Long before Ableton Live introduced their unique realtime loop-based performance environment, loops could be loaded into a sampler and triggered from different keys for realtime playback and/or special effects. But that’s a topic for another day. For now, hopefully the inner workings of sample-based architecture may be a little less mysterious, for anyone who might want to dig deeper into their favorite sampled instruments.
Take your production skills to the next level: AskAudio Academy | macProVideo


 © 2024 Ask.Audio
A NonLinear Educating Company
Discussion
Want to join the discussion?
Create an account or login to get started!