When I first saw a demo video for BeatEdit I was immediately intrigued. It is an extension for Premiere Pro which seemed to add Ableton Live style warp markers to audio clips right inside Adobe’s Premiere Pro. My mind started racing about the possibilities. So, I reached out to Mamoworld Tools to see if I could give the extension a test run. They obliged.
URL: http://aescripts.com/authors/m-p/mamoworld/
Now, a bit of a disclaimer. I went at this extension with an extremely heavy background in Ableton Live and my expectations were way too high to ever be met by a $99 Premiere extension when it comes to warping audio. However, I think my that same background helped me see what this plug-in is capable of.
What BeatEdit Does
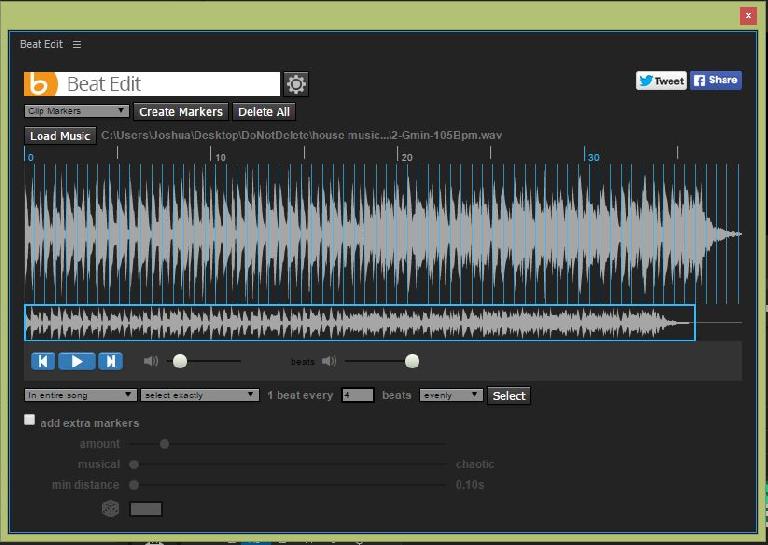
When you load a track into BeatEdit the extension runs its algorithms and detects the beat of the audio. It then creates “beat markers” which can be applied to the track as clip markers or the sequence as sequence markers. There are a number of other features when it comes to where and how often beat markers are applied. It can be done automatically, randomly, more frequently at more busy sections of the music or just you standard 4 x 4 or every bar, etc.
Making Video Cuts on Beat
This is the focus of the extension and it works like a charm. Talk about a time saver! After you add the beat markers to the audio clip it is extremely easy to add video cuts on the beat using the shift button to snap to the markers. You can even use Premier Pro’s Automate to Sequence feature which does almost all the heavy lifting for you. Then you can go in and do any fine tuning that you feel needs to be done. I certainly won’t miss having to zoom all the way in on an audio clip and trying to guess the transient crossing for every cut I want to make on the beat!
Beat Matching in the Sequence Time Line
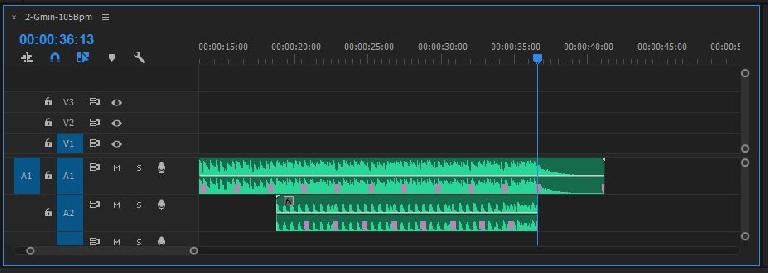
This is where things get interesting. If you import two tracks at the same BPM, lining them up in time with each other is a breeze using BeatEdit. Again, after applying clip markers and using the snap to marker function. However, you can actually beat sync and successfully mix tracks with different BPMs too. If you add the clip markers to the audio clips like normal, then drop them both into the sequence on separate tracks you will be half way to getting the coveted beat match!
You need to line up the last beat marker of the first track with a beat marker on the second track. I suggest only trying to beat match 4 – 16 bars as this isn’t Live and you don’t have complete control. Some drifting is bound to happen, especially the longer you try to mix two tracks together. I have found that the shorter the distance in actual mixing time the better the results.
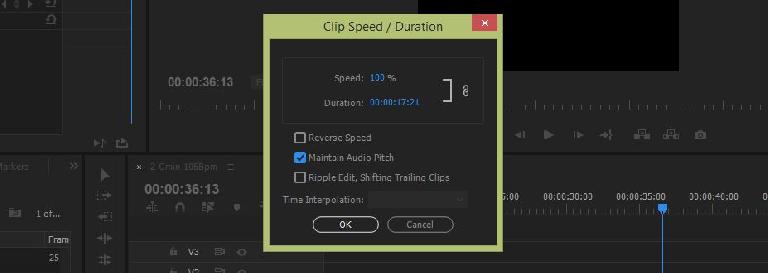
Before moving on to time stretching the track, right click the second track and go to the “Clip Speed / Duration” options. Then check the “Maintain Audio Pitch” option.
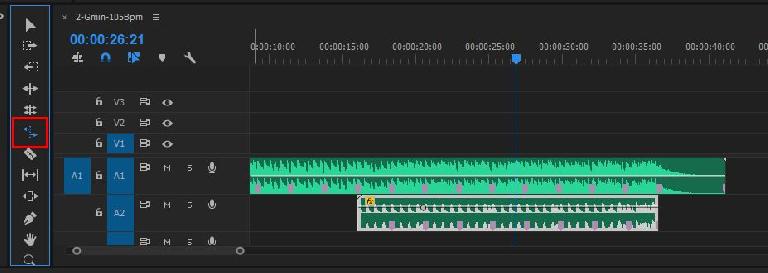
Next select the “Rate Stretch Tool” (R on the keyboard). Hold down shift, which is the snap to markers control, and slide the end of the second track over until you have the markers for both tracks lined up.
That’s it! Just grab your regular pointer tool (V on the keyboard) and drag the second track out. Now you can use the standard keyframe automations to fade one in while the other fades out and so on. You have just matched beats in Premiere!
Limitations & Managing Expectations
As I said in the beginning, my expectations were way too high after living inside Ableton Live for the past 10 years. So, the following list is coming from that experience and is meant to help you, the reader, better manage your expectations and maybe help Mamoworld with possible improvements to an otherwise great extension.
- The ability to manage the beat markers is limited as compared to Live.
- There is no undo (ctrl-z) when using the GUI.
- There is no way to zoom in on the track in the BeatEdit module.
- Space bar doesn’t start-stop the track when using the GUI.
- You can’t move individual beat markers.
- You can’t set the first beat marker with user based precision.
- The add/delete/edit markers menu is a bit slow to work with.
- Double clicking a beat marker doesn’t remove it
- Double clicking on the waveform doesn’t add a beat marker
Conclusion
The extension is great. Especially for making edits in time with the music, which, of course, is what it is made for. So if you are a video editor into making edits in time with the music this extension is perfect for you! A serious workflow enhancement you won’t want to be without after using it a few times.
In the beat matching department; there is plenty of room for improvement, but that, again, is coming from an audio engineer using the extension beyond its main purpose. However, it is light years ahead of trying to do such things just using the zoom and stretch tools without beat markers.
PRICE: $99.99
Pros: Increased workflow for beat synced cuts, decent beat matching capabilities without leaving Premiere Pro.
Cons: See list above.
Learn more about Premiere Pro at AskVideo here.


 © 2024 Ask.Audio
A NonLinear Educating Company
Discussion
Want to join the discussion?
Create an account or login to get started!