
What I like about Studio One is its clean interface and its support of drag and drop functionality throughout the application. And these design features are carried through when working with video. We'll look at adding a video file to a Studio One song. Plus, how you can use markers for transitions points in the video to help you either write or add better sound effects and music reference points to your video. Let's see how this is done.
Adding a Video Clip
It's very easy to add a video clip to a Studio One song. Like most features in Studio One, it supports drag and drop functionality. So to add a video clip simply drag the video file onto the arrange area in the song. This will add a video to the Song, and open it up in the video player. When you hit play on the transport, it'll play back the video. Let's look at what else Studio One's video player can do.

The Video Player Options
Let's navigate around the video player and see what we can do. At the top left is the video name header with the name of your video clip. On the top right is the maximize icon to maximize your video to full screen. If you have a second monitor setup, you can move the video player across to this screen and make it full screen. And next to this is the icon to close the video player window. If you do close the video window and would like to open it again, click on the Video Player icon located on the toolbar.
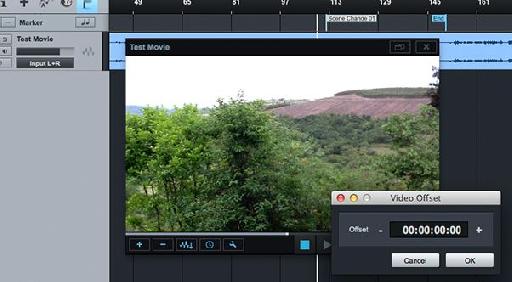
Now, let's look at the options that run along the bottom. The plus sign allows you to import another movie. This will remove your current video and replace it with the new one you choose. The minus sign removes the video from your song. The extract audio icon I will explain in the next section. After this is the offset'"click on this if you wish to offset your video by a specific time. Maybe the audio in your song is about .5 seconds too late. You can then offset the video by this amount so that the two are now in sync. Notice when you offset the video how the playhead stays in the same position but the video position changes.

After the Offset button is the wrench icon. This allows you to alter the video display size. The options are half size, default size, and double size. Also, if you drag the bottom right corner of the video player, you can resize it to fit how you want it to on your display.
Play and stop icons are found in the middle, on the bottom. And on the lower right you have your offline/online activation button to toggle between putting your video online or offline, and lastly you have a mute button. By default, the audio is muted when you add a video. So you can click this to unmute the audio in the video.

Extract Audio from Video
The extract audio icon does exactly what it says. It extracts the audio from your video clip and places it on an audio track in Studio One. This is handy if you want to enhance the original audio with Studio One's audio tools and effects. Maybe you want to apply a low cut EQ to remove some of the low rumble in the video. And then add a compressor to even out the levels in the audio.

Another trick you may also want to try is changing your transport control to read back in seconds instead or bars. Sometimes it makes more sense navigating the video with seconds in mind, instead of bars and beats. Right-click on the bars and beats and choose seconds.

Adding Markers
I like to add notes while I play through the video, like, for example, where there is a scene change. I find it works well using markers for this. Play through the video until there is a scene change. Then open up the Markertrack. This is the flag icon above the track list. Then simply click the + sign to add a marker. You can the double-click the marker to open up the marker edit dialog and then give the marker an appropriate name that will help you with the edit.

An even better way is to give the insert marker a keyboard shortcut. Navigate to the Studio One menu, and then Keyboard shortcuts. In the search bar type in marker, and then under Marker select Insert. On the right give it a keyboard shortcut. I have used the letter Y.

Now when you play back the video, you can simply press the keyboard shortcut to insert the markers while it's playing. This is easier than having to click the + sign each time.
Conclusion
That's how to add video clips into your Studio One songs if you're going to be working to video. The drag and drop functionality makes it easy to add the video, and the video player is laid out very clearly. And by making use of markers you can really start fine tuning your songs to the video with transition points and music cue changes. I hope this helps kickstart your introduction with video in Studio One. For more tips and tricks with Studio One, check out the following tutorials:
Discussion
Want to join the discussion?
Create an account or login to get started!