
Social Media platforms are definitely the way forward for musicians as it give you, the musician, the means to market and promote your music. What's great about Studio One is that it's taking advantage of these platforms and has built in extensions for both SoundCloud and Nimbit, so that you can easily export your songs and compositions straight from Studio One. This integration makes sharing your music much more fluid – a smoother process to get your songs up and out there on the Internet straight from the DAW, which for marketing your music, and getting it to a wider audience, makes sense. Let's take a look at how this is done in Studio One Professional.
Step 1 – How to use the Integrated SoundCloud Client and Extension
First let's look at how to integrate Studio One with SoundCloud. Studio One has two components that allow you to integrate with the social music platform. There is the SoundCloud extension and the SoundCloud client. This integration allows for a more streamlined process to get your songs from your machine and DAW up onto SoundCloud. You don't have to export your song, go to the SoundCloud website, log in and then upload your songs, instead this can all be done from within Studio One. So let's set up the SoundCloud Extension. On the Mac go to the Studio One menu, and then down to Studio One Extensions. On the PC go to File > Options > Studio One Extensions. A dialog box will come up showing you the extensions that have been installed. The SoundCloud extensions is usually set up when you first install Studio One Professional. If not, you can click on the Install button at the bottom and install the extension manually.

Now to view the SoundCloud Client go to the Studio One menu (Mac) or the File menu (PC) and choose SoundCloud Client. When this dialog box comes up you can choose to authorize a SoundCloud account with the Client. To authorize an account click on Connect with SoundCloud.


This will navigate to the SoundCloud website where you will authorize SoundCloud to communicate with Studio One. Click Connect and it'll provide you with an authorization code. Now input this into the SoundCloud Client in Studio One, then click Authorize. You'll now see in the SoundCloud Client dialog box that the user account is now authorized with Studio One.
Step 2 – Exporting and Uploading straight to SoundCloud
Now let's look at how to export and upload a song straight to SoundCloud from Studio One. To do this, go to the Song Menu > Export Mixdown. Under the publish tab, choose Upload to SoundCloud. SoundCloud supports most of the audio formats so choose which format you want to use. Also, choose the Export Range you want to use. Click OK, when you are ready to begin the process. Studio One will first render out the audio file. After this, the SoundCloud client will pop up.

The neat thing is that you can input all the track information into this client and this will be added to SoundCloud as it uploads the song. For example, you can add an artwork for the track, a description, and the track type can be specified. Maybe your song is still a demo work in progress, if so under the Track Type options choose Demo.

Under The More Info tab, further options can be added such as keywords, release date, and if you wish to make the song downloadable from SoundCloud for users. When you have input all the details necessary click on the Upload button to begin the upload process to SoundCloud. You'll see the upload process percentage next to the track name. Now when you go to your SoundCloud user online, you'll see the song there.

Step 3 – Further SoundCloud Integration
If you click on the Browse Panel and then expand the servers you'll see a SoundCloud Icon. This gives you access to your SoundCloud account. What's nice about this is that you can pull audio from your SoundCloud account straight into a Studio One song or project. Expand this icon and navigate down to Tracks. Maybe you want to remix one of your tracks: Select the song, and drag it straight into your current project and then begin the remix. Or you can use Studio One to build up a DJ set. Drag your songs from SoundCloud into the Studio One project and arrange their order along the timeline.

Step 4 – How to Access Nimbit in Studio One
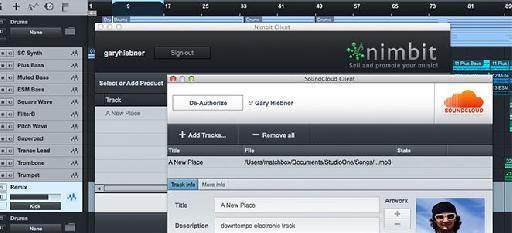
Nimbit is another social media tool that is gaining attention with musicians as it's a great site to use to promote and sell your music. You can find out more details on Nimbit on their website. Nimbit works very similar to the SoundCloud extension and client. When you open the Nimbit client, you need to add your Nimbit username and password to sign into the service.

Or you can create a new account straight from the client. If you click on Create New Account, it'll take you through to the membership page where you can choose a plan option and sign up.

Once the account is set up you can go into your Nimbit Profile and start adding details about your music and songs. It's a great site to use to sell your music directly to your fans. You get to determine a selling price for your songs, giving you control over your songs and how they are sold.
Now let's look at how to use the Nimbit client. It has a very similar look to the SoundCloud client. You can add songs to the track area. The important thing to know is that Nimbit currently only supports WAV files that are 16-bit so make sure you export out your song in this Nimbit-compatible format.
To Export the song go to the Song Menu and choose Export Mixdown. Now under Publish choose Upload to Nimbit, and make sure you've set the format to WAV with a 16-bit resolution.

Now click OK and it'll begin the export. Afterwards, it will bring up the Nimbit client to allow you to upload the song straight to the platform.

In Nimbit the song is called a 'product' so make sure you give the song a product name. Then click Upload to upload the song to Nimbit. Once the song is uploaded the Nimbit Dashboard page will open where you can edit the song/product. You can add artwork for the product, set the price and give the song a description.


Step 5 – Quick Stats to SoundCloud & Nimbit Profiles
Once you have integrated your SoundCloud and Nimbit profiles to Studio One a great way to get a quick overview of them is in the Studio One Start Page. This is normally displayed when you first start up Studio One. But if you are busy in a song and want to go back to it, you can click on the Start button on the right side of the transport panel or you can use the shortcut Option-Home (Mac) or Alt-Home (PC) to get to it. You can also navigate to it by going to View-Start Page.
Next to your Artist Profile are the Soundcloud and Nimbit tabs. Click to these to have a quick view of your statistics on each profile. This was integrated into Studio One 2.6, so if you don't see these tabs make sure you have upgraded to the latest version.

The Soundcloud and Nimbit Tabs.
The SoundCloud tab displays your number of followers, playbacks, downloads, favorites, and comments. Really keeping you update with your SoundCloud profile while working in Studio One.
On the Nimbit tab you can see the number of fans, your sales over the last 30 days, and the number of active promotions going on in your profile. You also get snippets of feedback from the Nimbit tab on how to keep promoting your profile. So this is really a great way to keep in touch with your fans, and how to better promote your music through Nimbit. And this is all while you're in Studio One.
These tabs are scrolling displays, so you can scroll through them to go back in your timeline to view comments, when your tracks were added as a favorite, and so on. So each time you start up Studio One, make sure to have a look at these tabs to view any new feedback.
Conclusion
Studio One is really taking advantage of the current digital social media tools, and giving the artists control over uploading their compositions straight from within the DAW. This simplifies and streamlines the process, which always helps to make things easier for musicians wanting to share their music for sale, awareness or feedback. It's also nice that you can access these social media tools under the server tab. You never know when you want to quickly grab a song form SoundCloud or Nimbit and then remix it into another song of yours in Studio One. So make use of these tools for your music production and music promotion and get social with your media.
Discussion
Want to join the discussion?
Create an account or login to get started!