
In the last article, I showed you how you can use the Arpeggiator MIDI FX on your software instruments to create more pace and interest to your songs. In this article let's take it a step further and see other ways to incorporate arpeggiations into your productions
Exporting the Arp Pattern
So you've programmed in a great arp pattern for your synth with some randomization of the Note length, Velocity, with an increase octave range, with some variation. While it's great having variations with your arp patterns, sometimes you want to have a fixed pattern where you can choose which notes to tweak.
If you want to do this then the best way is to export this pattern out to a software instrument track. You'll see a big play button at the top left of the interface. Notice that when you play back your arp pattern that the little box next to this play button goes from grey to white. This is called the Capture Button.

Now do this while your arp is playing back. Drag this box onto a blank area on your instrument track, and see how it converts the arp pattern to a MIDI region.

The only problem is that it only exports out a small region of the arpeggiation. So for example if you're playing a triad over two octaves, it'll only export out a small MIDI region of about 10 notes, depending on what note order you selected. To get a longer MIDI export, switch the Pattern from Live to Grid mode.
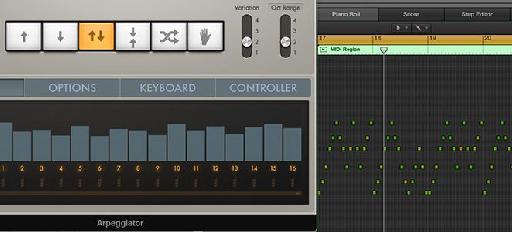
Using Grid Mode
With Grid mode it gives you a 16-step pattern (you can have more steps but will get to that a bit later). Click on a step and see how it draws in a vertical bar. The height of this bar determines the velocity, so you can draw in different velocity amounts for each step.

And if you click on the number, it disables that step. Maybe you want some rests within the pattern. Draw in a pattern that you want, now play back the pattern and now drag the MIDI block to your instrument, and see how it now exports a longer MIDI region.

If you want a pattern longer than 16 steps, you can drag the right handle on the bar that runs in line with the Custom button to extend the amount of steps. Before playing back the MIDI make sure to bypass the Arp MIDI FX.

Editing your MIDI Arp
Now if you double-click the MIDI region it brings up the Piano Roll editor for this region. You can now manually tweak the arp pattern further. This way there is less randomization, and the pattern is fixed, so you know each time this pattern plays back it'll be exactly the same. Maybe you want to tweak some of the note placements. Also looking at the MIDI pattern gives you a good indication of how the arp works. Try a different variation on the Arp MIDI FX, and then export out the MIDI Region and see how it differs.

Using More than One Arp
So that gives you a good idea of how to use an arpeggiator in your songs. But that doesn't stop you from using more than one. The more the merrier! Try this out. Set up an instrument with an arp MIDI effect. Use a 1/16th note rate and then program in a step pattern in the Grid mode. Pan this instrument to the left.
Now create a new instrument and add another Arp MIDI FX onto this track. I've used a similar software instrument, but tweaked it slightly so it sounds slightly different to the other instrument. This time use a 16th note Rate again, but use a different variation pattern. Program in another step pattern in the Grid mode. Then pan this instrument to the right. Now play back and hear how the two arps play off each other creating an interesting rhythm effect, plus stereo panning effect.
One arp:
Two arps:
Conclusion
That's how to integrate arpeggiations into your music productions for an extra added layer of interest and complexity. I find that they can really help increase the intensity of your track. So you could use them as a build up to a big section in your song. And by using more than one Arp you really start getting some crazy stereo results. So try out some of these arpeggiation techniques in your next productions and see and hear how it takes it up a notch.
For further Logic X tips, check out the following articles:
http://www.macprovideo.com/tutorial/logic-pro-200-midi-fx-the-arpeggiator
Discussion
Want to join the discussion?
Create an account or login to get started!