
Logic's Arpeggiator MIDI effect allows you to easily create arpeggiation patterns with your software instruments. I find that using arpeggiations in your music productions is a great way to add some extra intricacy and pace to your songs through the different arpeggiation variations, octave ranges and interval changes.
In this article I'll show you how you can build up an arp pattern as an extra layer of interest in your songs. Let's first take a look at the user interface and how to program arpeggiation patterns. From there I'll show you how you can incorporate these into your music productions.
Step 1 '" Adding the Arp
The Arpeggiator is a MIDI Effect, so this needs to be placed on a software instrument. In a song of mine I have created a new software instrument. You can use the shortcutCmd-Option-N to bring up the new add tracks dialog box and then choose a Software Instrument. On this track add an instance of ES2, and choose the preset Vintage Mix. I like this sound as it is a lead synth sound with some nice harmonic content, and sits well in the higher registers, especially if you play in around the C3-C4 region.
Now above the ES2 instrument tab on the channel strip, click on the MIDI FX box and choose the Arpeggiator. This will bring up the Arpeggiator plugin user interface. It might look a bit daunting at first but it's very easy to navigate.

Adding the arpeggiator in Logic Pro X.
Step 2 '" Choosing Your Arp Settings
Let's start with the middle Note Order section. Here you can choose a rate or speed of the Arp. This will sync up with your Logic project tempo. You can go from a 1/1 slow rate on the left all the way up to a rate of 1/128 (this also includes triplet and dotted interval rates in between). So as you can see you can increase the rate quite drastically.
Set this Rate to 1/16. Next is the direction you want to Arp to sequence in. The upward arrow will sequence the notes from the lowest note to the highest note. And how the Arp works is that whatever notes you are holding down it'll sequence through. Try this by playing a C major triad (C-E-G), and hear how it cycles through C-E-G in that order. Now click the downward arrow it reverses the direction. The next one is the Up+Down pattern, and it repeats the lower and higher notes as it cycles through the chord you are playing.

The note order settings in Logic X's arpeggiator.
The fourth note order is the Inside to Outside pattern. It'll play the outside notes that you play with your chord, and will move in towards the inside notes of the chord. Following this is the random pattern, and as you can guess this will play a random pattern within the chord notes. And lastly is the Hold pattern, it will play the pattern in the sequence that you lay down the notes. I'll leave the pattern choice up to you. Try them out, it can be real fun experimenting with them.
Step 3 '" Adding Some Variation and Range
Now let's jump over to the last two options on the right of the Note Order section. With Octave Range you can determine the number of octaves the notes are going to cycle over. Set this to 2. This will cycle thee notes over a 2 octave range. You can always change it later. And the Variation dial has a set of ways that it works, the further you go up the variation dial the more complexity and variance it adds to the Arp pattern. I'm going to set mine to Variation 2.

Using Variation and Octave Range.
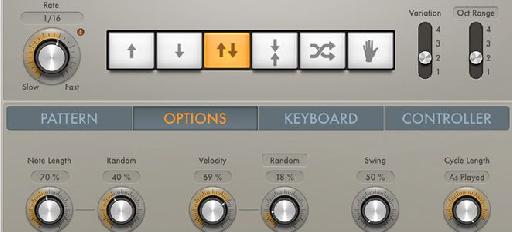
Tip 4 '" Note Length, Velocity and Randomization
You can add in some further randomization by clicking on the Options tab on the bottom. You can change the Note length of your individual notes. Let's set a short note length short of about 70%. And the dial next to this let's you randomize the note lengths so that they are not exactly the same length each time its played, giving some humanization to your performance.

Changing Note Length and Velocity.
You can also randomize the Velocity by pulling down the amount from 100%, and randomize this even further by changing the random amount on the Random dial next to this.
Tip 5 '" Arps in Songs
Let's hear this in the context of a song. I have an EDM track, which has quite a straight feel, but I want to add some more pace and complexity to it. So I have added in an Arp pattern.
Here is the song without the Arp:
And here it is with the Arp. Hear how it adds more interest and pace to the song. It's sitting quite far back in the mix, but just enough is present to add some tonal pace to the track.
Conclusion
Arps really work well to add an extra layer of rhythm and complexity to a song. Depending on the Rate, Note Order, and Variance you add to the settings these can really spice up your tracks. So try them out in your next productions and hear how they can add some extra complexity into your songs. In the Next Part of this article I'll explore how you can further tweak these Arps and edit them in your projects.
For further Logic X tips, check out the following articles:
http://www.macprovideo.com/tutorial/logic-pro-200-midi-fx-the-arpeggiator
Part 2 of this mini-series will be available tomorrow here on AskAudioMag.com...
Discussion
Want to join the discussion?
Create an account or login to get started!