
Logic's Enveloper dynamic plug-in is often an overlooked tool. But I have found that it can work very well to modify the dynamics of a vocal part, or any other dynamic material for that matter. The Enveloper combined with the Compressor can really spice up the dynamics in your tracks. In this article I will explain how to use the Enveloper/Compressor combo on vocal material to really bring that vocal up close and personal.
Step 1 – First, Some Heavy Compression
The trick to this dynamic process is to first apply a heavy compression setting to the vocal. I have used Logic Compressor and have dialed in the following settings:
- Threshold: -18.5dB
- Ratio: 9.8:1
- Knee: 0.7
- Attack: 10.0ms
- Release: 48.0ms
You may need to alter some of the settings such as the Attack and Release for your vocal material, but make sure you have set a low Threshold with a high Ratio for heavy compression.

Hear the heavily compressed vocal:
Step 2 – Insert The Enveloper
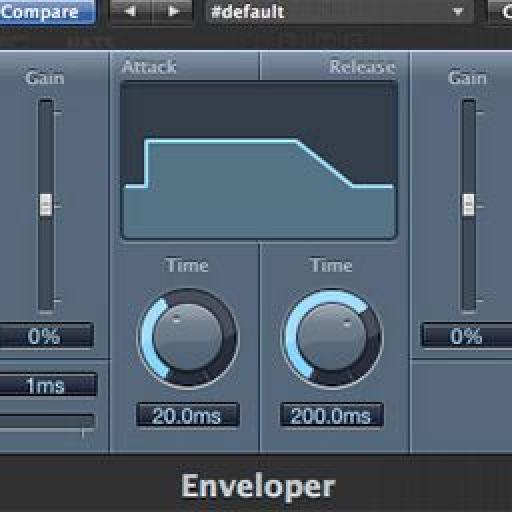
Next, insert the Logic Enveloper after the Compressor. Draw the Threshold down to -68dB and dial in a Lookahead of 29ms. Next to the Threshold is the Attack Gain. The Gain on the other side is the Release Gain. Tweak these a bit and you will see how these change the Attack/Release display window.

The real important parts on this plug-in are the Attack Time and Release Gains. I'll be using these parameters to intensify different sections of the vocal part. You'll notice this Attack/Release window looks very similar to the ADSR displays on synth plug-ins, which is absolutely correct. I am going to be using the Attack and Release parameters to really tweak this vocal part. I'll be be using really high Attack and Release settings to illustrate the effect, but in a real mix scenario you would use more minimal settings, and you'll still get a dynamic up close sounding vocal part. Let's jump in and see how these settings can alter the vocal part.

The Logic Enveloper Attack Parameters.

The Logic Enveloper Release Parameters.
Step 3 – Bring in Some Attack
Let's bring in the key elements, the Attack and Release. I am going to take a listen to my vocal part, and make note of areas where I want the vocals to be more punchy. They can be right down to a syllable. The more accurate, the better the result. The next step is to automate this Attack Gain so that on these sections it really pop out. Click the Automation button (or press A) to bring up the Automation lanes. On the vocal track, select the Enveloper > Attack gain lane. Either draw in the automation or use a MIDI controller to write in the automation while the audio plays back. Another parameter that you can automate is the Attack Time parameter. Take some time creating this automation. Take numerous listens back to see if the resulting automation adds to the vocal audio. Increased Attack settings will push this vocal up front.

The Attack automation.
Listen to the vocals with the Enveloper:
Step 4 – …And Bring in Some Release
You can also automate the Release Gain and Release Time settings to maximize the vocal part. You may want to bring up the release times on parts that you wish to draw out for longer. Parts that work with this are normally the end lines of the vocal part. When you add other processing to this vocal, you'll find that these automated release parameters will add to the effect. Processing that I can think of that will benefit from these release changes are reverb and delay effects. After you have automated the release parameters, add some reverb and a subtle delay to hear how they change the overall effect.

The Release automation.
Add some Reverb and Delay:
Conclusion
As you can see, the Enveloper can really bring in some dramatic dynamics to your vocal parts. By automating it over the course of a region you can fine-tune the dynamics and bring in elements that are missing in your productions. You will also notice that this dynamic combination of compressor and enveloper really brings the vocal parts to the front of the mix and gives them the attention they deserve.
For further tips and techniques on Logic take a look at the following tutorials:
Logic 401 - Logic's Mastering Toolbox
Discussion
Want to join the discussion?
Create an account or login to get started!