
Logic's Drummer Track is an excellent tool to use to help you spice up drum parts in your songs. I especially like the way that it creates drum fills in the track. I'm not a drummer myself so when I program in a drum fill, it initially sounds like I've programmed it in with a computer and sounds less like a real drummer. This is where Drummer Tracks come in handy. You can use Logic's Drummer to help you create interesting drum fills for your drum programming. Let me show you how.
Adding a Drummer Track
I have a simple 2-bar drum beat pattern that I have programmed using an instance of Logic's Drum Kit Designer on a software instrument track. I've used the Factory default preset, and I'd like to create a drum fill for the end of the drums.

First create a Drummer track by going to the Track menu and New Drummer Track.

Choose a drummer you want to use, I'll stick with the default Drummer, good ole Kyle. The Drummer Track by default creates a fill at the end of the Drummer region. Play through the Drummer audio and hear how the fill is created in the end.

Testing the Fills
Now test this out. Make some slices within the region using the Scissors tool, and then playback the audio and hear how at the end of each region, there is a drum fill.
Now click on each region and change the Fill dial amount in the bottom panel. The lower the Fill dial, the shorter the fill, and the more you increase the Fill dial the longer and more complex the fill gets. Change this dial and then hear how your fills change. A very short fill amount might have a quick snare fill, but as you increase it, you'll get longer fills with a combination of snare, kick and toms.

Now let's look at how these drum fills can be used in the Drummer Track and how to move them into your drums.
Moving the Fills to Another Drum Instrument
Create a new instrument track under the Drummer Track. Then drag the audio region(s) from the Drummer Track down onto the instrument track while holding down Option. See how the audio region is copied down to the software instrument track and is converted to a MIDI region.

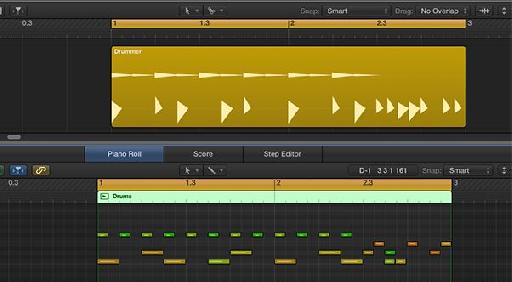
If you double-click the MIDI region you'll see the MIDI notes assigned to the drums, and then at the end of the region the MIDI notes for the drum fill. You'll also notice how different velocities have been used on the notes. Plus if you zoom in very close you'll see how some of the notes on the fills have been pushed or pulled off the grid to add to the feel of the drum fill. These little details really add to making the drum fill feel more real and like it was played by a drummer.

Editing the MIDI Drum Fill
You can now edit the MIDI by deleting the MIDI notes that aren't associated with the drum fill. Make a note of where the drum fill starts. On my 2-bar drum loop, the fill starts at bar 2.3 in the MIDI region.

Now go to your instrument track with your drum pattern that you programmed. Double-click the MIDI region to launch the Piano Roll Editor, and on my side I'm going to delete the MIDI notes on and after bar 2.3.

Now the trick is to join these two MIDI regions. Select your original drum MIDI region and then select the new MIDI region with the Drummer drum fill. Sometimes it's easier to move the instrument track with the drum fill under the original drum MIDI region and then use your pointer tool to lasso around both regions to select them.

Right-click on one of the regions selected and in the contextual popup menu scroll down to Bounce and Join, and then Select Join. Now the two MIDI regions will be merged, and it'll include the new drum fill. How cool is that! When you playback your drum instrument, it will have the newly created drum fill.

Using Other Drum Instruments
Even better yet, you could use this MIDI data that you've created for your drum pattern and drum fill, and copy it to another instrument. For example let's say that you'd rather use a different electronic drum kit in your song. Then simply create a new software instrument track, add the electronic drum kit to the instrument track and then copy the MIDI region onto this track. Now your electronic drum kit will play back your drum pattern, plus with the drum fill that was created with the Drummer Track. So that's how you can progressively move from using the Drummer Track as a source of inspiration for your drum parts, to using the lifelike sounding drum fills in other drum instrument tracks. Be it Logic's other drums instruments like the EXS24 and Ultrabeat through to external 3rd-party drum instruments.

Conclusion
That's how to use the Drummer Track to help improve your drum fills in your MIDI. It's a versatile tool to spice up your drum programming. Dial in a drum fill that you like in the Drummer Track and then, convert it to a MIDI region and add it to your drums tracks. And the Drummer Track adds extra complexity in the fills with varying MIDI velocities and slight MIDI position movements off the grid to add more lifelike realism to your performance.
For further Logic tips and tricks with audio, MIDI and Drummer check out the following tutorials:
http://www.macprovideo.com/tutorial/logic-pro-202-drummer-and-drum-kit-designer
Discussion
Want to join the discussion?
Create an account or login to get started!