
Third-party Audio Unit Arpeggiation and Step Sequencing plug-ins for use with Logic are difficult to set up, and can be buggy too. But it's not that developers are writing bad software, it's because the Audio Unit plug-in standard Apple has created does not yet allow for plug-ins to directly communicate. All is not lost though! In this article, I'll be showing you a fantastic iPad Step Sequencer/Arpeggiator called StepPolyArp from Laurent Colson that has excellent timing and latency when used with Logic over a fast wireless network or hardware MIDI interface. The App can be purchased directly from the iPad App Store for $11.99 (at time of writing).
Setting up StepPolyArp
The manual on the company's site describes very clearly how to get StepPolyArp connected to your Mac wirelessly through Audio MIDI Setup, and with an iPad MIDI Interface... so I won't spend any time talking about that. Once you have established this initial connection though, you'll still need to configure StepPolyArp's MIDI options. I'm connecting through Wi-Fi, so I simply choose “Network Session 1” for both MIDI Out and for the Sync Source. If you're using an iPad compatible MIDI Interface, choose its name from this lists instead.

Setting up Logic Pro
Now we need to send MIDI Clock from Logic, so StepPolyArp can lock to it. From Logic's Settings menu, select the synchronization tab, then onto the MIDI tab. Here, you click the Transmit MIDI Clock button, then select the interface or virtual MIDI session StepPolyArp is connected to. Since I need to send MIDI Clock over my Wi-Fi Network, I'll choose “Network Session 1.” By doing this, StepPolyArp's sequencer can now be locked to Logic because we chose the same Network Session 1 for the Sync Source in StepPolyArp. Remember Settings information in Logic is only saved with the Project itself, so consider saving a Template with this enabled.

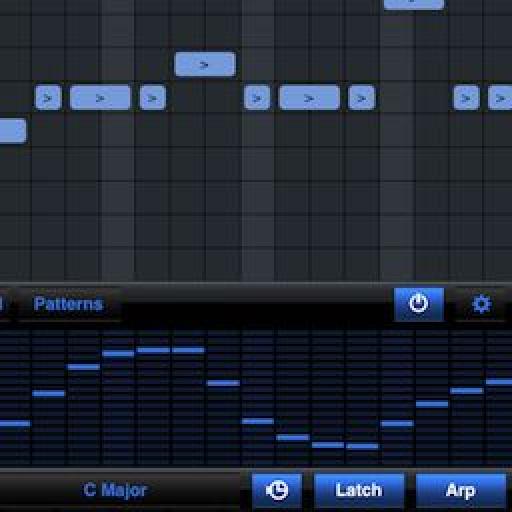
StepPolyArp's Grid Editor
StepPolyArp gives you several nice built-in presets, and you can create new patterns from scratch and save them. Every preset contains up to 16 patterns you can switch between. Every pattern has a grid where you can enter the pattern the arpeggiator will play back, or you can even step in entire sequences that will play back on a single note. You don't actually choose specific note values on the grid however. Each of the 11 lanes can be set to positive or negative musical intervals, ranging from a single half step, to 2 octaves. This seems odd, but this is how arpeggiators work... they transpose by the intervals you've selected, so that whatever key or key combination you hold, will be arpeggiated accordingly. Also, each entered event in the Grid can have a separate note repeat with acceleration and velocity curve for cool stuttered sounds. Each of the lanes in the Grid mode can be set to independent MIDI channels... try that with a Logic Environment Channel Splitter wired to different virtual instruments for an insane experience!

StepPolyArp's Step Editor
The real fun begins when you create patterns in the MIDI controllers area called the Step Editor. You literally draw in shapes with your finger to send various MIDI CC data. For example, if the virtual instrument you're controlling has Modulation set to its filter cutoff, creating patterns in the Modulation Grid will open and close it. You can also create Pitch Bend, Velocity, Pan, Volume and Aftertouch patterns. Actually you can use this alone to modulate existing sequences by removing all the note data from the grid.

Functions Menus
The small settings gear on both the Step and Grid editors is filled with fun stuff too. You can Copy, Paste, Randomize, Reverse, and move everything forward or back in time.

Playing and Recording StepPolyArp
Once you've created something you like, the keyboard at the bottom of the screen is used to trigger the pattern(s). The notes can be displayed chromatically, or you can choose a root key and scale so you'll never hit a bad note. When you're ready to record, simply press the Sync button in StepPolyArp's keyboard, the record button in Logic Pro, then play some notes on StepPolyArp. Since you sent MIDI clock from Logic, you'll be in perfect sync! There's also a “Latch” button that will hold the note down for you. You can press the note(s) ahead of time, then when you press play/record in Logic, the note(s) are triggered automatically and in sync.

Tips for Stability
Even though StepPolyArp has “MIDI Over Wi-Fi Latency Compensation,” its timing can become unstable on occasion. It seems to be an AMS issue though... you can watch the latency meter within AMS going haywire when this occurs, even when no other network activity is happening. The problem can be fixed immediately though by reconnecting in AMS, and closing and re-opening StepPolyArp. Try setting the iPad so it never sleeps/goes to the lock screen. Also, switching Apps can cause this too, so try not to (LOL) while working with it. Using it with an iPad-compatible MIDI interface is your best bet, especially if you'll be performing live with it. When you're not using StepPolyArp, turn off the sync button above its keyboard.

Discussion
Want to join the discussion?
Create an account or login to get started!