
Reason's inclusion of audio inputs in its later versions has opened up possibilities that were not available easily before. If you're an old school Reason user, I'm sure you're more than familiar with having to record audio in another program, import said audio in to a Reason sampler (NN-XT or NN-19), and then trigger the audio via MIDI recording.
Thankfully, this tedious and tiresome method for using external audio is gone. That being said, this should remind us that there are many things all of us are forgetting we can do now. It's like Stockholm Syndrome (funny, Reason is made in Stockholm!): we're so used to being a slave to one way of working, that we forget that we have a lot of the options we always wished we had before.
Join me in my run out into the streets of possibility!
One of the things that I was most excited about was being able to really make use of the vocoder with external audio signals now! Yes, you can actually do realtime vocoding! But, what's even more striking is that you don't necessarily have to use a Reason device as the carrier wave (the synth that's being modulated by a voice, etc), you can also use an external carrier, like a hardware synth!
Let's give this a shot!
Step 1 - Set Up Your Carrier!
Let's start off by creating an audio track. To do this, simply hold down Command and then press T. An audio track device will appear in your rack, in the Mixer, and in the sequencer.

Extend the device by pressing the small arrow on the left of the device, so you can see it fully opened. Then, on the audio track device, select the input that your hardware synth is connected to.

At this point, play your hardware synth (I'm using an old Roland XP-50 for this) to make sure that you have signal. After all, no sound will end this trip real quick, right?

Step 2 - Set up your Modulator
Now, I need to set up an audio track for my voice, otherwise known as the modulator. I'll do a Command-T again, and this time, choose the input that my mic is going in to.

I'll go ahead and label these now to keep things simple and understandable.

Now that my tracks are setup, it's time to bring in the vocoder. I'll insert the BV512 vocoder as an insert on my Carrier Audio Track.

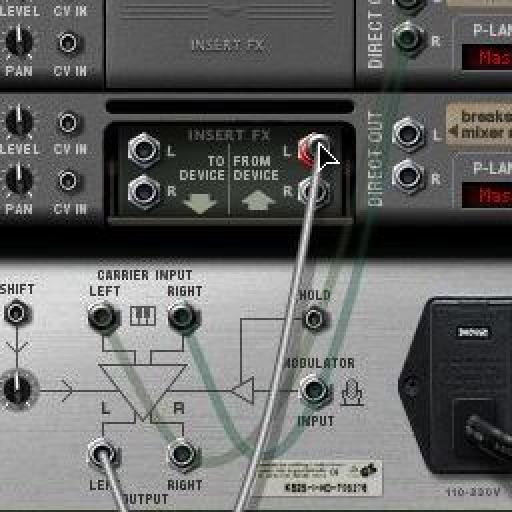
Step 3 - Patching your Vocoder
Normally, Reason's auto patching works perfectly, and makes sense. This is not the case with the auto patching that happens for the vocoder. Remove any cables from the back before you begin this part of the exercise.

Now, drag the direct out from your carrier in to the Carrier input on the vocoder.

Then drag cables from the Carrier Output to the From Device Insert inputs.

Finally, drag the Left output from the 'To Device Ouputs' to your Modulator Input.

By choosing only the left inputs and outputs, you'll keep the vocoder in Mono mode. You can always use Right channels as well; just know that the modulator input can only ever be Mono. Because... Vocals are, by default, vocal.
Step 4 - Realtime Vocoding
Now for the fun part. Enable Monitoring for both audio tracks in the sequencer. These are the green buttons in the picture below.

While playing your hardware synth in realtime, sing into your microphone: Vocoding in realtime.
If you decide you want to record this, remember: You'll need to record both tracks at once, or separately. In the end, you'll need both tracks playing audio, or in real-time at once for this to work.
You can also use Reason as a vocoder, and send your computer's output to another DAW, or even through Soundflower. You can even use this setup live!

Discussion
Want to join the discussion?
Create an account or login to get started!