
For years, I've been using the Combinator as my main live instrument of choice. It affords me a method for combining several instruments, and then mapping these instruments across different key zones. And, while this sounds terribly basic, having a complex arp on one octave, a thick lead on another that's been stacked a few times over, and a huge pad on another octave, built of several synthesizers is actually no joke.
Step 1: A Little Planning Goes a Long Way
Generally speaking, people are usually in a hurry when preparing for a live show. Performers, and keyboard techs are often looking for software that is going to be simple and reliable, as well. Reason does it all. But, I will say that one simple practice can keep you from getting sucked in and doing endless tweaking, ahead of time.
This practice is jotting down what you really need when you perform live. Do you want to play bass, lead, pads? What kind of modifiers would be helpful on this song, or that song? Once you've determined what Combinator patches will be on each specific song, begin building Combinators song by song.
Step 2: Establish an Internal Mix
Let's use an example song: I have a song where I'd like to play a light synth bass, and a pad. I'll start by bringing up a Line Mixer 6:2, otherwise known as the MicroMix. Since the bad ass SSL-ish mixer was added in Reason, mixers aren't used as much as they used to be. But, in Combinators, you want them! They allow you to patch multiple instruments easily within the Combinator. I often start with this device because it keeps you from having to do any extra rewiring later.

Once the mixer is created, I'll right-click on it and select Combine. Because the MicroMix is the first device, anything that I add to this Combinator will automatically patch to the MicroMix. No extra routing!

Step 3: Turn Up the Bass
Now, it's time to actually add in an instrument. Right-click on the MicroMix and select Instruments > Thor.

Thor is an excellent all around synth, and will always deliver. But, if you're limited on processor, I'd advise going with a Subtractor. Now, let's choose a preset. I'll click the Browse Patch button on Thor...

And, go Reason Factory Sound Bank > Thor Patches > Bass. Within this directory, a slew of well done bass patches are just waiting for us. A few of which, I made myself. Shameless plug! I'll choose Industrial Bass. But, note that you can play patches on your MIDI Controller while in the Browser. Just select a patch and start playing. You don't even have to close the Browser during the selection process. I would suggest having a recording of the song around, while you're choosing a bass patch for the set. This way you can hear how well it works before you commit.

Now that we've established the bass for this Combinator, we need to map it to the keys on a MIDI controller that will be most comfortable for me, and my playing style. Keep in mind, there is no rule for this. Map instruments in any way that you like! Though, I'll make one small suggestion. Remember that you normally don't need access to several octaves of a bass part. As this is the case, I'm only going to map the needed octaves. I'll open the Combinator's programmer to begin this part of the process...

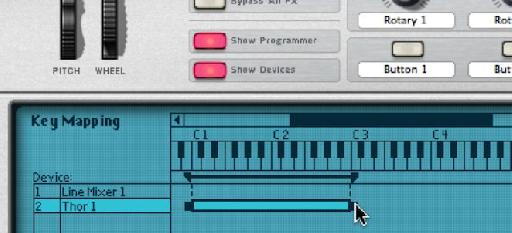
Next, I'll select Thor, within the Programmer, and begin decreasing the visible key range by dragging this range indicator to where I'd like it to begin and end for this patch. I would highly recommend having the keyboard that you'll be using for the show when doing this. Nothing like making a patch, only to discover it won't accommodate a smaller keyboard.

I'll set my Thor's range from C1 to B2. This gives me two octaves of bass synth, which is plenty.
Note: If your selected bass patch sounds better in octaves lower than what's available for your desired patch physically, use the Transpose parameter in the Programmer to go up, or down an octave without changing your mapping.

Step 4: Seal it with a Lead
Next, I'd like to set up the lead that I'll be using on this particular song within my set. I'll right-click on the Thor, within the Combinator, and create another Thor. Once created, I'll go to the Lead Synths directory within the Thor patches directory of the Factory Sound bank, and select 70s SciFi. Feel free to browse and play through the patch browser again.

Alright, let's map the lead, now. In the programmer, I'll select Thor 2 (Though, I would strongly suggest labeling as Lead. Never forget to label!). I'll set the key range of my lead from C3 to B4. Remember, these ranges are by no means rule of thumb, just personal preference. Experiment!
Step 5: Mod
Currently, each Thor has a Mod Wheel assignment. As a result, when I raise the Mod wheel on my controller, both Thor Mod wheels are activated. I like the Bass Thor's Mod wheel assignment, as it will allow me to get nice dynamic, fat, bass line bursts because of the filter assignment it's got going on. But, I don't want the lead to be affected.
To fix this, I'll select Thor 1, and then uncheck Mod W. in the Programmer. This disables the Combinators control over Thor 1's mod wheel. Now, when I move the Mod Wheel up, only the bass is affected.

Going Forward
From here, I would probably start playing with the performance modifiers on each Thor, to see if they could be useful assignments for my live controller mapping. I would also map parameters and effects changes to my expression pedal. In a future article, I'd like to go into some of the ways I set these mappings up. Until then, have fun making some nice performance Combis of your own!

Discussion
Is there would not be a mistake in section 4 (Mod) from your tutorial ?
The rather must uncheck the box Modwheel being on Thor 2 Combinator so that it is not modulated and not Thor 1 .
Regards _
The only work around I've found so far is to either do it manually with a mouse or use a touchscreen and drag each of the files (with large icons) into each combinator :|
Since there was no way to do this the fast way, I have someone making me a max for live device in ableton to turn on and off multiple groups of combinators depending on my song of choice. The I would have to use rewire (which I think disables multicore processing). This has been such a task to figure this all out, I wish someone knew a better way but I'm stumped.
Want to join the discussion?
Create an account or login to get started!