
For a long time, Reason's sequencer was pretty straightforward. You'd record notes into a sequencer track, play about with velocity and maybe some automation and that was it. In newer versions and especially the latest Reason 7, you have much more flexibility thanks to the introduction of Lanes. These are, put simply, additional tracks connected to the main sequencer track for any device which let you perform additional tasks. This could be quantizing different parts of a MIDI-triggered beat individually using ReGroove, or recording multiple takes of an audio part then comping them together to get the perfect take. It's easier than you might have thought, so read on to find out how to become a master of lanes in Reason!
1. Record MIDI into new lanes
We're all used to recording MIDI into sequencer tracks but using the “New” buttons on the Transport panel you can record more creatively, especially when making beats. Set the project tempo and set up a loop with the markers, then make sure looping is switched on. Start recording and when the loop finishes, press the New Overdub button, located just to the right of the Record button in the Transport. This creates a new note lane while leaving existing takes audible so you can build up a beat but keep each lane separate. You can record as many notes as you like into each lane.

2. Try the Alt button
Instead of the New Dub button, try using the New Alt button next to it. This creates new lanes too when pressed but it mutes existing takes so you don't hear them. As such it's great for trying new beats or melodic variations as you go round in a loop but without the pre-existing parts piling up and confusing things. It also keeps every take on a completely new note lane for much easier editing.

3. Quantize different lanes differently
All the notes on a lane can be treated individually. So for example you might want to select a clip and route it through its own ReGroove channel which you can do by assigning it in the ReGroove dropdown menu for any lane. The idea here might be to process the same beat using several different types of groove quantization until you decided on the one that worked best, or have different parts processed through the same groove. You can always drag a clip elsewhere on the timeline so that it can be heard.

4. Explode MIDI parts
Imagine you have a MIDI clip that's been recorded more conventionally as a single part. Double-click on it to open it in the Note Editor and then select one or more notes. Right-click on the selected notes and you will see some new options. You can choose to select all instances of the same note, move the selected notes to a new lane or duplicate them to a new lane. This is an excellent way for example to identify all the hi-hat notes inside a beat and quickly split them off to a new lane so they can be quantized differently to the rest of the beat.

5. Merge note lanes
You can do the same in reverse. Let's say you have a sequencer track with multiple note lanes and you want to blend them all into one for easier arrangement. Select all the parts on the lanes and right-click on them at the left hand edge of the sequencer. Now you will see an option to Merge Note Lanes on Tracks, which would have the desired effect. You can also create a new Note lane quickly from this menu.

6. Use audio lanes
Lanes aren't just for MIDI, they work with audio tracks too, though the approach is a little different. Here, we have repeated the Dub and Alt tricks and added new tracks to an audio recording loop, though Reason will also automatically create multiple takes when you record audio in a loop even if you don't manually create new tracks as well. These aren't new lanes but new sub-tracks related to the original, even if the approach is similar.

7. Work with comp edit mode
When audio has been recorded in a loop you can double-click it to open it in comp edit mode and use the comp handles to make certain parts of each clip audible and others not, and with a little skill you can create a great take from the various different attempts. These are not technically lanes but they work in much the same way, holding different versions of a part that exist at the same point in time in the sequencer.

8. Use automation lanes
When you automate any parameters in Reason, the automation data is stored in automation lanes that appear underneath the sequencer track for a device. These work much like MIDI lanes except they store numerical data and can be edited using the Pen, Line and Razor tools. Automation data can be made to “stick” to clips so even when you move them on the timeline, the automation stays intact as it related to any note data.

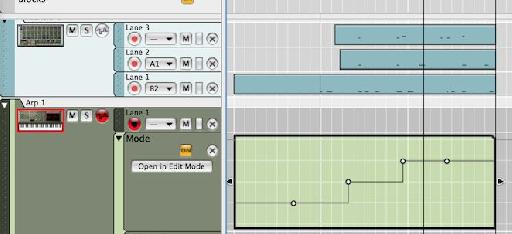
9. Investigate pattern lanes
Automating devices with Pattern capability like the ReDrum, RPG-8 and the Matrix uses Pattern lanes and these are even simpler, holding clips that trigger specific patterns in a device. So by creating clips and then assigning each one to a pattern in a device you can automate pattern changes easily. This also works with the new MIDI out device in Reason 7, allowing you to send patch, program change and MIDI CC instructions out to your MIDI hardware.

10. Use the Block lane
Blocks are Reason's tool for creating different arrangements on the fly without having to copy and paste lots of data in the sequencer. These also use lanes and they are similar to Pattern lanes, letting you change the playback order of a project with a few simple commands.

Discussion
Want to join the discussion?
Create an account or login to get started!