
The lowly Audio Track module in Reason's rack might seem an unlikely candidate for exploration but it's actually crucial to managing how audio tracks are processed and controlled in any project. Due to Reason's modular nature, you can think of an audio track as having several components and these are viewed using the different parts of the Reason application.
The sequencer shows you a list of your tracks with the data they contain, and the mixer shows those same tracks but with their faders and channel strips. The Rack is different. You will be used to synths and drum machines appearing as modules but audio tracks do as well. This is partly to keep everything consistent but also because having a special module just for an audio track lets you manage its routing and insert effects as well as a few other vital things. So read on to get the lowdown on how they work…
Step 1: Create a track
If you add an audio track to a project or import an audio file, an Audio Track module is created in the Rack. By default it will be shown in minimized mode which still provides you access to mute, solo, level and pan controls as well as a level meter and shortcuts to view the track in the sequencer and in the mixer. Double-click in the name field to rename any track.

Step 2: Check ins and outs
Now click on the arrow at the far left of the module to expand it. Assuming you have your audio in and out set up correctly in the global Preferences, you will see Audio Input and Output sections from which you can choose a source and a destination. The inputs are fairly self explanatory: simply match up your desired input channel with the same one here. Under Outputs you will often want to fire sound to the default Master Section though you also have the option of creating a new Bus. This is useful for grouping specific tracks together and processing them en masse, or routing them out to an external hardware mixer independently of other buses and the main master output.

Step 3: Master your frequencies
Click on the EQ button to reveal a nice big EQ window in which you can easily create specific EQ curves for any track. This is rather more precise than using the EQ dials in the mixer, though they remain available to you too of course. Using the track select button at the base of the EQ window you can move between tracks without having to first close the EQ window.

Step 4: Add an effect
Now click on the Show Insert FX button and a new area appears below the module. Click inside this and it is outlined in red, meaning that any effect you now load will be created as an insert inside that area and this will be applied to that audio track. Try creating a compressor and a reverb module while clicked here and then hit Tab to spin the rack around and check out the routing. Note that the effects are routed only to that track, in a Combinator-style arrangement.

Step 5: Expand the Programmer
You can make settings on the effect modules themselves of course, but to get into more detail you can click on the Show Programmer button for any audio track module. If you do this you will see various new sections appear. In the center is a list of the insert effect devices you currently have loaded. If you select one from this list you will see some new options appear in the modulation routing section to the right.

Step 6: Choose a source
These slots let you assign any available effect parameter to the four buttons and dials on the left as well as some other input sources. Click on a slot in the Source section to see the available sources, which also include wheels, controllers and CV inputs.

Step 7: Select a destination
In the second column, click to see a list of available destinations. In the case of reverb this includes sizes, types, delay levels and so on. It's different for every type of effect. Pick a destination and the source control you chose in the previous step is mapped to it. In the final column you can set minimum and maximum values so a control doesn't have to go from zero to full: it could go from 30% to 80% for example.

Step 8: Get creative
You can layer up as many of these controls as you want and assign multiple sources and destinations to the same shortcut button or dial. So for example, button 1 could turn off reverb, turn on delay and also change an EQ value all with a single press. You can see that by setting up some parameters here you can build powerful effects shortcuts. These can be saved of course, and indeed you can load any preset included the many bundled ones using the patch browser section to the left of the audio track's programmer area.

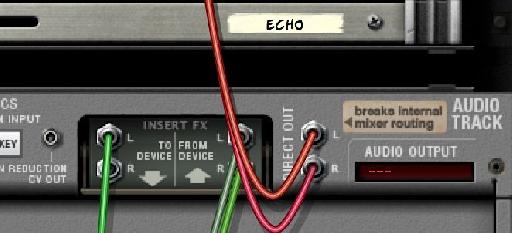
Step 9: Break the chain
To route an audio track module directly out to your audio interface – to break the link between the audio and Reason's mixer – spin the rack around and route the Direct Outs up to the main audio hardware outs at the top of the rack.

Step 10: Explore sidechaining
You'll also see on the rear panel a Dynamics section where you can use sidechaining. You might for example want to tap the signal from a kick drum channel and feed it to the sidechain input on a bass channel. This would allow you to get the famous “pumping” effect so popular in a lot of electronic music. The Key button is automatically activated when you use sidechaining and this forces a compressor to be controlled using the input signal rather than its own internal signal.

Step 11: Perfect your CV
Last but not least you'll see a comprehensive CV section on the rear panel of each audio track's programmer section. You can use this to make advanced changes to parameters, for example using the LFO from a synth to modulate a rotary control and thus affect the behaviour of an effect on a vocal channel. The sky is the limit!


Discussion
Want to join the discussion?
Create an account or login to get started!