
Sure FL Studio is a great tool to use to build up patterns for your samples and instruments, and then combine these up in the Playlist view to arrange your song. But how can you use FL Studio in a live context to perform your songs? Well that's where the Performance Mode comes in handy. With this feature you can convert you song into a format that can be used to perform your songs in an interactive way. The Performance Mode will break the patterns down into different pads that can be triggered so that you can change up the arrangement on the fly bringing new life to your songs in front of your audience. Let's check at how to use Performance Mode.
Step 1 – Playlist to Performance Mode
Before getting into the Performance Mode, save out your song as a new file or version as the Performance Mode will make changes to your song playlist and you cannot undo this.

Once you saved your song, it's time to convert your song. Go to Tools > Macros > Prepare for Performance Mode.

A dialog box will come up warning you that you cannot undo these changes. That's why it's best to save your song out as a new version. This version will be the Performance version of your song. You could even save out the new version with 'Performance' in the name so that you can distinguish the difference between the two files.

Then you are brought up with the new Performance Mode version of your song. The Playlist is broken down into two sections now. On the right of the playlist is your arrangement as you had it before. What's different is a box at the top stating the 'Start' of the song.

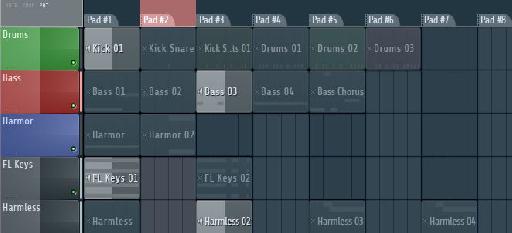
On the left is the performance mode section. At the top, you have these blocks labeled 'Pad'. These are reference points for the patterns that you will trigger. And then under these Pads is where you can add patterns to be triggered. Add the patterns in anyway that makes sense to you. But the best would be to lay them out in a similar fashion as your arrangement in the playlist.
Step 2 – Assigning Clips to Pads
When you add your patterns to the performance mode you may notice that your pattern is longer than the Pad. Don't worry about this. Just shorten the length of the pattern clip so that it sits in a pad area.

Now when you play back your song it will start from the start point on the right and play through.
You can trigger the pads by clicking on the pad header. This will start the playback of all the patterns under that pad. Or you can click on the play button on each pattern to just initiate that pattern. And if you click it again, it'll mute that pattern. On each pattern you'll see a progress bar as it moves through, and on the track is a circular progress bar showing you which tracks are being used in the performance.
What you'll notice is this can get a bit messy as you'll hear your song arrangement playing back plus you'll be triggering the different pads and patterns. What I find works best is to Start the playback of the song after the end of your arrangement. Or better yet, you can delete the patterns in the song playlist area on the right and just make up an arrangement on the fly by triggering the different pads and patterns.
Step 3 – Different Trigger Modes
You can set different trigger modes for the tracks. Right-click on the track and then under the Performance Mode are the different options you have available to you.

You can set some of the patterns as one-shot trigger hits. Maybe you want to create some sound effect one-shot hit patterns. Then you can play back your song as the normal arrangement, but trigger some one-shot sound effects as the song plays back. Or change the Trigger and Position sync length for different start points and lengths that the clip plays back for as you launch it.
Automation clips can also be added into the performance mode. They can be assigned to tracks and then triggered at specific points in the live performance. This gives you some great flexibility in a live context on changing up your song and the way it sounds with different automation clips happening at different times.

Step 4 – Using an External Controller to Trigger Pads
I highly recommend using an external MIDI controller to trigger these pads and patterns, such as the APC40, Launchpad, or MPC devices. Make sure you have set this device up under the MIDI options as a MIDI input device.

Now you can trigger these pads and patterns in a more tangible way than using a mouse and looking at your computer screen. You can really get into your performance now. So take note of how many trigger pads you have on your MIDI device. I have stuck with using 8 pads in FL Studio as I have 8 pads going horizontally on my Launchpad. Sure you can use the scroll keys to scroll around to see more, but I like to keep things simple especially when it comes to live performances where things can quickly and easily get more complicated. But I'll leave this up to you.
Try this out and see how it works for you, but I really feel that working with an external device in this way feels more like an instrument than an electronic device in front of my eyes.
Conclusion
That's how to convert your FL Studiosongs to the Performance Mode and use them in a live context. So get in there and convert your songs and play them out in a different ways at your next gig!
For further FL Studio Tips and Techniques check out the following tutorial:
http://www.macprovideo.com/tutorial/fl-studio-101-introducing-fl-studio
Discussion
Want to join the discussion?
Create an account or login to get started!