
If you're a Cubase user like me, a large-format mixing console (and the compulsory morass of wires and patchbays) is no longer a fixture in your studio. That's because all of that audio routing is handled with virtual wiring in the software. But the physical wiring of a traditional mixer helped you 'see' the path along which the audio signal was traveling, which is commonly called 'signal flow.' In other words, if you patched the insert from your mixer into a compressor, then fed the compressor output to the input of an equalizer, then fed the EQ back to the return of the mixer insert, that's the path the audio signal will take. Since you don't see the signal flow in Cubase, it can be challenging to understand how to make such a path. For example, is the EQ in Cubase in front of the compressor, or does it come after? Let me take you through that signal flow so that you can take advantage of its flexibility.
Types of Channels
The signal flow of an audio channel is identical to any audio-based channel, including VST Instruments, ReWire, Groups, and the Stereo (or multi-channel) Output. The only difference is the Stereo Output Channel, for it lacks the Sends section found on all the other channel types. With that in mind, be aware that all these channels have customizable signal flows.
The Channel Settings Window
Every audio-based channel in the MixConsole has a corresponding Channel Settings window. It can be accessed by clicking the 'E' button on the channel you wish to edit.

Figure 1. The 'E' button at the top of a MixConsole channel fader.
The Channel Settings window has several sections including the Pre, Inserts, Strip (aka Channel Strip), EQ, Sends, and Fader sections. (Spoiler alert: That last sentence is the signal flow in a nutshell, but as you'll see, it's more involved than that.)

Figure 2. The Channel Settings window.
Looking at this window, you'd assume the signal flows from left to right. While it flows left-to-right at a few points, it doesn't always travel that path. Another common misconception is that the audio comes through the Fader section first, but it doesn't. Actually, the fader is almost the last point of the signal flow. Let's go through signal flow from beginning to end.
1. The Pre Section
Whether the audio is recorded on an audio track, or generated from a VST Instrument, it first arrives at the Pre section. This section will look a little different depending upon whether you're in knob view or equalizer view (see The Equalizer Section). Either way, the controls are identical.
 and equalizer view (right).")
Figure 3. The Pre section in knob view (left) and equalizer view (right).
2. The Inserts Section
After the signal leaves the Pre section, it enters the first six of the eight slots of the Inserts section. (Inserts 7 and 8 are post-fader, and I'll go over those later.) The Inserts section allows you to choose up to six different effect processors that come either with Cubase, or from 3rd-party brands if you use any.

Figure 4. The Inserts section.
The first six slots are a lot like guitar stomp boxes, in that the signal flows from one slot into the next. In the example shown in Figure 4, the signal flows through a compressor first, then through a reverb (RoomWorks), then through a delay (PingPongDelay). Since there aren't any plug-ins in slots 3 through 6, it then flows to the Strip section.
3. The Strip Section
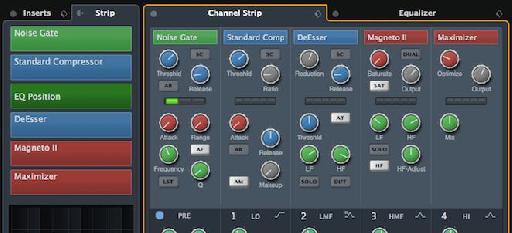
The term 'Strip' is short for 'channel strip', much like the vertical top-to-bottom cross-section of a traditional mixing console. It is comprised of up to 5 individual effects including Gate, Comp (compressor), Tools, Sat (Saturation), and Limit. The Strip has two different views in the Channel Settings window, and can be accessed by clicking the Strip tab (left) and/or the Channel Strip (right) tab, both found at the top of the window.
![Figure 5. The Strip section (Strip tab [left], Channel Strip tab [right]).](https://d29rinwu2hi5i3.cloudfront.net/article_media/a0f086a2-8ca4-4742-97ed-7d13fd07d05e/fig-05.jpg "Figure 5. The Strip section (Strip tab [left], Channel Strip tab [right]).")
Figure 5. The Strip section (Strip tab [left], Channel Strip tab [right]).
The signal flow is identical to the Insert slots (top-to-bottom), which is also represented in the Channel Strip tab from left-to-right. The order of the slots can be modified by clicking and dragging on any effect (or empty slot) in the Strip tab. But notice the EQ Position slot. Repositioning that slot allows you to customize the point at which the signal flows into and out of the Equalizer section.
To Strip First, or Insert First: That is the Question
If you look closely at the left corner of the Strip tab in Figure 5, there's an icon that resembles a half-circle with a dot. That's the Move button, and clicking it will move the Strip section in front of—and therefore, processed prior to flowing into—the Inserts section. The Move button then appears in the right corner of the Strip tab allowing you to reverse the order again, if desired. Customizing the order of the signal flow allows you to choose what which section processes the audio first. For example, if you want to use your own noise gate plug-in on an Insert prior to sending it through the Strip, make sure the Inserts section is in front of the Strip section.
4. The Equalizer Section
After the signal flows through the last populated Strip slot above the EQ Position slot (or the last of the first six populated Insert slots, depending on which section is configured to process the signal last), it enters the Equalizer section. You can get there by clicking the Equalizer tab next to the Channel Strip tab.
You can change the view of the Equalizer section by clicking the (very) small button that appears at the upper-right corner of the equalizer graph. That small button will change appearance depending on which view it will switch to when clicked.
What if I Want The Equalizer First?
As you've seen, the Cubase signal flow is highly customizable. If you wanted the Equalizer section to come before the Strip and Inserts, just make sure the Strip is in front of the Inserts, and that the EQ Position slot in the Strip is at the top of the order.
5. The Sends Section
After the signal flows out of the Equalizer section (or last populated Strip slot, depending on the placement of the EQ Position slot), it arrives at the Sends section, which consists of up to eight slots. The Sends slots can then be linked to any bus or FX Channel track.

Figure 6. The Sends section.
Note that in Figure 6, slots 1, 2, and 3 are linked to three FX Channel track effects: FX 1-REVelation, FX 2-StereoDelay, and FX 3-REVerence. You can have as many FX Channel tracks as you'd like, but address up to eight on any audio-based channel. Unlike the Inserts and Strip sections, the order of the effects assigned to the Sends slots don't affect one another. That's because the signal from each slot is not sent to the next slot. Rather, that signal is sent to the corresponding FX Channel in the MixConsole where it can be balanced during the mixing process. (Note: The Stereo Output (or other multi-channel) channel does not have a Sends section.)
6. The Fader Section
Since the signal from the Sends section is sent to the FX Channel, the signal that flows into the Fader section is actually that of the Equalizer section, along with any Strip or Insert FX, depending on the placement of the EQ Position in the Strip section, along with where the Move button of the Strip section is set.

Figure 7. The Fader section.
The easiest way to think about the Fader section is this: It's a volume and pan control for everything that's happening on that channel. Usually, after the signal flows through the Fader section, it is sent to the next channel destination like a Group channel or the Stereo Output channel. However, it's not necessarily the final output of the channel signal path.
Insert Slots 7 & 8
As I mentioned previously, Insert slots 7 & 8 are post-fader, which means that after the signal flows through the Fader section, it is sent to these specialized post-fader slots. Inserts 7 & 8 are where you would put brickwall-style limiters and dithering plug-ins. So if you want to insure that 0.0 dB is never exceeded at the output of a channel, or if you're dithering the bit-depth of a channel prior to exporting it, make sure to put those types of plug-ins into slots 7 & 8. (Note: Just like slots 1 through 6 of the Inserts section, the signal flow of slots 7 & 8 is top-to-bottom, so you'd want to put a dithering plug-in in slot 8 so that a limiter plug-in won't re-expand the exported audio file to the high resolution 32-bit floating point resolution of the Cubase audio engine.)
Decisions, Decisions
Do you prefer to have the EQ before the compressors, or vice versa? Do you want the EQ before the Magneto II saturation effect, or after. Now that you know how the signal flows through Cubase, you can put any effect or plug-in exactly where you want it.

Discussion
Want to join the discussion?
Create an account or login to get started!