
Lots of new devices replicating old devices are hitting the market. Whether you are a new enthusiast captivated by the romance of the vintage, blinking lights, and the sultry electronic thumps. Or, you're a seasoned vet that is just relishing the return of the analog drum machine into the seeming mainstream; sooner or later, nostalgia might be replaced by some frustration. Don't get me wrong, I love my Volca beats and new devices like Akai's Rhythm Wolf, but both beat boxes are monophonic! This means that all the drums are dead center in your mix, when you decide to do an actual studio recording.
Why Pan?
Sure, you can keep all drums center, in the mix, if you like. But, by panning out individual drums within your new vintage-esque, hardware drum device, you'll have a better chance of spreading out your mix and building a sonic landscape that is both vintage and pleasing to the ear. However, without pan pots on each drum, the ability to spread your drums out is impossible... Unless you track.
Tracking Analog Devices
In order to get your kick, snare, hi-hat, clap, etc., coming from devices like Volca Beats, you will need to solo individual drums within your analog-esque drum machine, and then get individual recordings of each part of your drum pattern. This practice is sometimes referred to as 'tracking' by MIDI-based artist, especially back in the day, before DAWs came in full swing. Tracking is simply recording each individual sound coming from your drum machine to its own separate track. It's tedious, especially when you're working with an artist that likes to have tons of percussive devices going at once! But, in this walkthrough, I'm going to show you an easy way to track each analog drum coming from a Volca Beats in Ableton Live.
Step 1. Sync!
In this demonstration, I'm going to use a Volca Beats that is being synced via its MIDI In port, and is connected to the MIDI Out port of my MOTU Traveler. Before this will work, I need to ensure that a few settings are in place on my Beats, and within Ableton Live.

In Ableton, within the MIDI Sync page of Preferences, I need to enable Sync coming from my MOTU Traveler.

And, on my Volca Beats, I need to hold down the FUNC button, while powering on the unit. If done properly, the unit will power on, with 'GLOB' displayed, as shown below. For Sync, you only need to ensure that the M6 is lit. If it isn't, simply press the button and the yellow light will light up above it. If you want to be able to trigger the Volca's drum from a MIDI controller, make sure that you enable M7. When you are finished with your settings, press the REC button on the Volca; your settings will be saved, and Volca Beats will reboot.

Step 2. Audio!
Now, I need to make sure that my Volca Beats is connected as an audio device, as well as a MIDI device. Remember, MIDI does not transmit sound! I'll send the output of my Volca Beats to the channel 5 input of my MOTU Traveler. I have to pull the 1/4” plug out, slightly, rather than inserting the 1/4” adapter into my interface all the way. This gives me a much louder signal from the Volca. Sometimes, you'll need to jiggle the cable, a little, till it's coming through clearly, with the full dynamic range. There is more to be written about this. But, for the moment, let's just stick with sync.

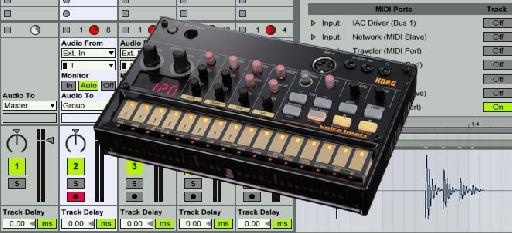
Once I confirm that I have audio coming into my Traveler, I'll create a new audio track in Ableton that is set up to receive Channel 5 of my audio interface, where Volca Beats is connected.

I'll also label this track as Kick, as this will be the first drum in my Volca pattern that I will be tracking.

Step 3. Record!
Alright, with all necessary connections in place, we are ready to convert this Volca Beats pattern into a stereophonic grouped, pattern. I'll hold down the FUNC button, on the Volca Beats, and press MUTE. This will cause the SOLO indicator to appear on the screen, and all of the different drums channels on Volca Beats to light up, as long as you're holding down the FUNC and MUTE buttons. I'll simply press the first, gold button on the control strip.

Okay, everything is ready! I'll press the first Record Clip button, after Arming the track, and now, only the kick is recording. Once I have two repetitions of the pattern, coming from the Volca Beats, I'll press the Record Clip button again!

After you've recorded, and go back to play back your work, you'll probably notice that if you bring up the Ableton metronome (click track) that the kick might be slightly, to highly out of time. This is common with the clumsiness of MIDI Sync. But, it is one of the charms of working with hardware instruments. Drift, with Ableton can be easily fixed. You'll notice below that my kick drum does not line up at all with the ruler above in relation where each note should be hitting.

To fix this, and bring proper timing back, I'll simply double-click above the waveform, to create a Warp Marker, indicating the first kick beat, and drag the first beat over to the first measure. Once the beat is moved over, I'll simply double-click the old, Warp Marker, causing it to disappear.

Next, I'll press FUNC+MUTE, again, and select the Snare drum. This will cause, of course, the snare drum to be the only drum audible coming from beats. I'll simply press the second Record Clip button, under the track Kick clip, I just created, and start recording the snare.

Once the snare clip is finished, I'll hold down the Command button on my Mac, and press T. This will cause a new audio track to appear. I'll drag the snare clip, over to the new track, and label it as Snare.

And again, I'll edit the warping of the clip, so that the snare hits start by falling on 1.2.

Rinse and Repeat...
From here, it's just an exercise of getting all of the elements of your drum pattern in, and then warped properly. Once all drums are in, and have their own tracks, it's important to group the Tracks...
Pan those parts!
Which will ultimately take us from sounding like this:
To give us more dimension, space and polish, use some third-party effect plug-ins... which makes Volca Beats sound like this:
Conclusion
Volca Beats is a powerful, tricky and inexpensive drum machine that is both great for live performance and studio sickness, just like all other old and new hardware drum devices. Don't let the limitations hold you back! And, don't get frustrated when things are out of time, due to clumsy MIDI sync. Remember: You can simply push the Play button on your Volca Beats to stop it, even while Ableton is playing, and restart it, on the beat. It will hold sync, now! Oh, and sync can be improved! Keep an eye out for future tutorials!

Discussion
Want to join the discussion?
Create an account or login to get started!