It is common practice for recording engineers to use dynamic processing while recording. This originates from the need to maximize the signal-to-noise ratio and exploit the headroom available when recording to tape. With 24-bit digital recording and analogue to digital converters giving better than 120 dB signal-to-noise ratio, this is no longer a priority. However, compressing "on the way in" and using a noise gate to maximize the potential of that compression is still seen as good practice. This is partly to control the dynamic range and prevent clipping of, say, an over-enthusiastic vocalist. The benefits are also felt when mixing: Applying severe compression at the mixing stage only because the performance is "too dynamic" can reveal the less than pretty sonic performance of cheaper plug-ins (such as those that come free with your DAW!). Light compression during tracking, followed by light compression when mixing can achieve a similar reduction in dynamic range without pushing either compressor into its red zone.
In Logic Pro
If you had enough money you could purchase hardware dynamic processing for every channel that you wish to record when tracking (or buy an SSL). Simply adding effects, such as a noise gate or compressor to an audio channel in Logic Pro will affect the audio you can hear, but not what is actually recorded. Don't forget that Logic's effects work in real-time and you will be listening to the output of each channel, not the signal that is being recorded. You can prove this by recording audio through an audio channel with plug-ins inserted and active then, after recording, bypassing them; the sound you hear will change.
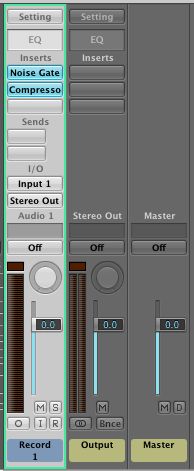
The plug-ins on this audio channel will have an effect of what you can hear, but not what is recorded
It's All in the Routing
To set up Logic's Mixer so that you can record the effect of inserted plug-ins follow these steps:
- For each audio track onto which you wish to record, create an auxiliary channel strip (click the plus button on the left hand side of the Mixer or press Option-Command-N with the Mixer in key focus)
- Connect the input of each audio channel to an available bus
- Connect the output of the auxiliary channel to the same bus.
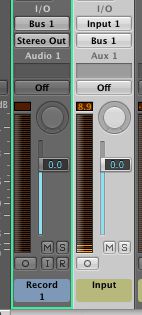
The signal enters the Aux channel and is then bussed to the Audio channel to be recorded
If you connect the output of the auxiliary channel before connecting that bus to the input of the audio channel, Logic will automatically (and confusingly, in this case) create an additional auxiliary channel. So make sure you do this in the right order!
One disadvantage to the way Logic adds channels to the Mixer is that the auxiliary channel is added to the right of the audio recording channel. For those who prefer their signal path to flow from left to right, this is the wrong way around. To swap the order of auxiliary and audio channels, right-click on the auxiliary track's header and choose 'Create/Select Arrange track'. Then reorder the tracks in the Arrange window, which will reorder the tracks in the Mixer.
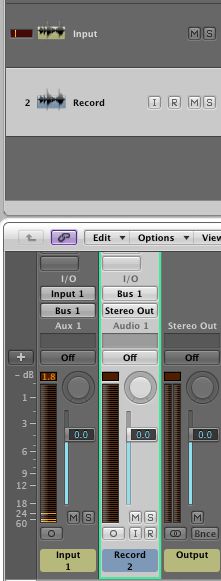
Re-ordering tracks on the Arrange page re-orders them in the mixer
Unfortunately, using Logic's 'Hide' feature to hide the auxiliary tracks on the Arrange window affects the order of the channels in the Mixer, so you will end up with quite a lot of tracks showing on the Arrange window!
Insert effects should be inserted in the relevant auxiliary channel. This way the input to the audio channel (the record channel) has already been effected and processing will be printed to the audio file.
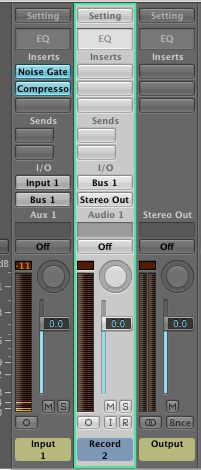
Effects inserted on the Aux channel
Of course this works really well with appropriate dynamic processing, but do remember that effects such as delays and reverbs will also be printed and cannot be removed afterwards in the mix! You can also use the auxiliary channel fader as an input level control to the audio channel where the signal is recorded.
Save as Template
As setting up this routing takes some time and care, it is a good idea to save any commonly used routing setups as a template so that every time you record drums (for example), you have a Logic Pro project ready to go with built-in dynamic processing (File > Save as Template...)
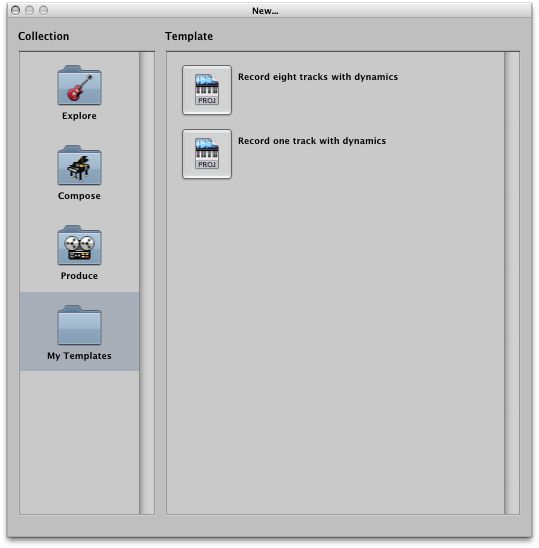
A template for recording with dynamics


 © 2024 Ask.Audio
A NonLinear Educating Company
Discussion
What exactly would you like to know? Specifics on the Mixer layer in the Environment (which is very similar to the standard Mixer) or more about the Environment in general?
:)
http://www.macprovideo.com/hub/logic-pro/custom-environment-layers-mixing-logic-pro-9
We've over 1,200 article on the MPVHub - so much stuff... so do use the search bar for The Hub (not in the search tutorials top bar, which will show video course results).
Enjoy!
Want to join the discussion?
Create an account or login to get started!