|
Previous articles are here: The Art of Mixing Rock, Part 1: Drums The Art of Mixing Rock, Part 2: Bass |
This final installment in the Mixing Rock series will cover vocals—the most up-front component of the mix, and, perhaps along with the beat, the element that gets listeners' primary focus. So the mixer's treatment of vocal tracks needs to be just right: level, tone, dynamics, ambience—all need to be carefully tweaked so the lead vocal sits just where it should in the front of the mix, and any backing vocals slot in appropriately behind, for the ideal blend.
Fig 1 The vocal, front & center.
The Singer's Place
Of course, the lead vocal is almost always (at least, 99.99% of the time) positioned front and center. It's one of the key elements that share that center placement, along with the (kick & snare) drums, and the bass. That other .01% might find the lead vocal off a little to one side for effect, like if the song features a duet, or the vocal is sharing the spotlight with an instrument, but in modern production, this is pretty rare.
Backing vocals—harmonies and choruses—are subject to a greater variety of positionings. A tight harmony might also be panned center, along with the lead, or maybe just a little off-center, for slightly more clarity. If there are two- or three-part harmonies, these could be panned tightly around the lead, or pushed further off to the sides, for a wider spread. Choruses with multiple voices can occupy more space, especially if they are stereo tracks. But even if a multi-voice chorus is made up of multiple individual (mono) vocal tracks, they could still be arranged from left to right, either clustered at the extreme edges of the stereo field, leaving room between for other mix elements, or spread out more evenly, filling up the stereo field around the lead. The latter approach would be good for a relatively sparse musical arrangement, where the voices will be a large part of the texture.
Double Your Pleasure
One of the most common treatments for vocal tracks—both leads and backgrounds—is Doubling. Even before the recording era, having two singers perform a melody was a common arrangement technique, to add some thickness to the part. And of course, the use of multiple backing singers—the whole idea of a vocal chorus—is based on the sweet sound of many voices combining.
It's common practice (as it is with many instruments) to have a singer perform several takes—not just for comping, but also to allow for natural doubling later on in the mix. Doubling is done for various reasons—to generally thicken up a voice, to smooth out any weakness of tone, to add that little tonal edge as the parts phase subtly against each other—in the days before auto-tuning, it was employed to smooth over any slight pitchiness, and it's still good for that. Many vocalists don't care for the sound of their own recorded voice, and as an alternative to slathering it with reverb, they like the extra depth that comes from doubling.
When extra takes aren't available, ADT—Artificial (or Automatic) Double Tracking—is employed. This by now well-known process consists of duplicating the vocal track, and delaying the copy by 15–20 milliseconds or so, simulating the slight timing difference you'd get from a different take. The doubled part can be panned center, mixed in right under the main vocal track, or it can be pushed a little off to the side. A pair of doubles, with slightly different delay times, could also be panned hard(er) left & right—the lead vocal would localize at center, with the doublings mixing in subliminally, for a subtly wider effect.
Audio Example 1 A lead vocal, doubled in mono (first); then with two doubles added, panned Left & Right (second):
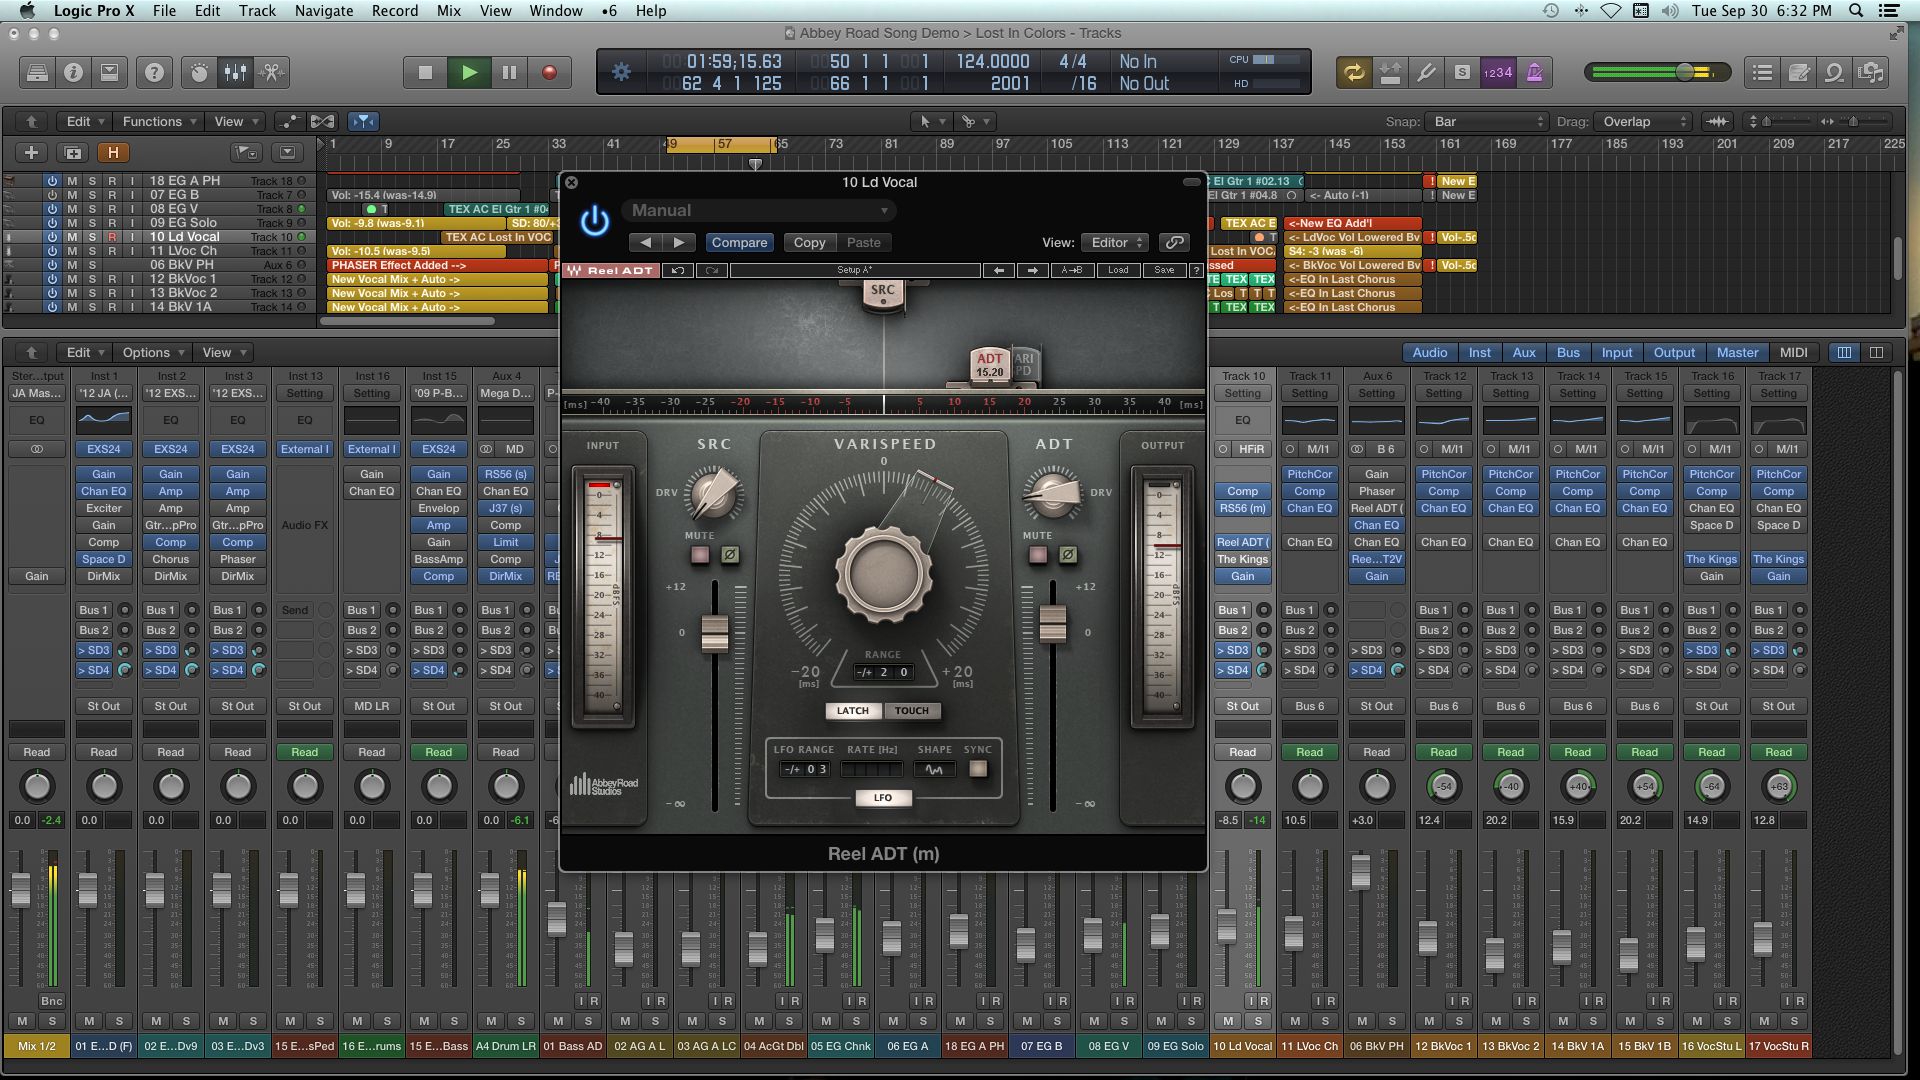
For a more natural sounding ADT—with more “human” variations in timing, an LFO can be used to modulate the delay time. But too much of this periodic modulation will produce a stronger Chorus effect than may be desired—if a random LFO shape is available, this would be a good choice. When this kind of doubling was done with tape machines, manual varispeed was applied to create the ADT—Waves' “Reel ADT” plug-in simulates this nicely (as it was done at Abbey Road, on Beatles recordings), adding the extra warmth of virtual tape saturation to the double. In fact, John Lennon was known to be so fond of the effect, that he insisted it be applied to all his vocals.
Fig 2 The Waves “Reel ADT” plug-in, which utilizes a random LFO (for a natural “human” doubling effect), and subtle tape saturation, for warmth.
Naturally, background vocals are likely candidates for doubling, with the implementation of wide-panned doubled harmonies a mainstay in vocal mixing. I know many engineers who like to build up a really dense backing vocal section, utilizing multiple “doublings”, panned across the stereo field. In fact, this is pretty common practice, especially in musical genres where tight, thick vocal choruses are a standard element of the mix.
Vocal Tone
Personally, vocals are one of the things I try to EQ the least. We are all so subconsciously attuned to the timbre and nuance of the human voice, that even small amounts of EQ can make a vocal seem overprocessed. If the vocal track was recorded with a good (studio condenser) mic, I prefer to leave the voice un-EQ'd whenever possible. Most studio condensers already have a presence peak built into their response, and this can be all that's needed to make the voice sit comfortably in (front of) the mix. If the mic was good, but maybe not the ideal match for a particular singer, then a dB or two up or down in that presence range (5–8 kHz) is usually all that's needed to even things out nicely.
However, if the vocal track was cut live, or for some reason utilized a typical stage mic (like the ubiquitous Shure SM-58), then a bit more EQ will be necessary. A little treble extension (~8-10 kHz) for air, and a dip in the lower mids (100–200 Hz), to counter the Proximity Effect (the bass boost from close-up use) should help smooth out the tone acceptably. And with any vocal track, if there's sibilance (harsh “S” sounds), then a notch around 6 kHz or so can tame it (though that's as much a topic for dynamics, which I'll cover next).
Audio Exampe 2 A vocal line with excessive sibilance (first); the sibilance tamed with a De-Esser (second):
On background vocals, EQ is often utilized much more heavily. That slick background vocal wash, that you hear on so many recordings, uses a combination of heavy compression and EQ, with strong treble boosts and a big midrange cut to give the voices that light “floating” quality. But even on lead vocals, EQ can be employed for effect. The most common example of this is the well-known “telephone voice”—a band-limiting effect, created by filtering out everything above 3 kHz and below 300 Hz, simulating the sound of a voice over an old traditional land-line phone connection (it's become a bit clichéd by now, but it still gets used plenty).
Vocal Dynamics
Compression is a very important aspect of getting a vocal track to sit just right in a mix. Many singers have a very wide dynamic range, and it's common for a vocal performance to sail way above (louder than) the music, and dip well below it, even within a phrase. Often, a dynamic vocal performance sits against a steady rhythm, and the vocal will need compression to even out its levels, so it stays comfortably above the mix at all times, without losing the varying tonalities that give the part its musicality.
To accomplish this with the least effect on the vocal tone, many engineers prefer to “ride the gain” manually, recording these moves with the DAW's automation (there are even plug-ins that do this now). When the performance dynamics are too much to follow, Compression is used. For the most transparent dynamic control, many people favor Opto compressors, like the LA-2A, or one of the many hardware and software versions of this kind of circuit. A typical Opto compressor's slow (≥10 ms) attack, long release, and moderate ratio (~4:1 or so) allow a fairly large amount of gain reduction to be applied, without the vocal really sounding processed, and without the “pumping” artifact that faster comps sometimes introduce when they're working hard. That said, sometimes you may want the compression to be clearly audible, as an effect, perhaps on a more aggressive vocal performance—in that case, other, faster compressor types, like FET or VCA designs, can also serve nicely.
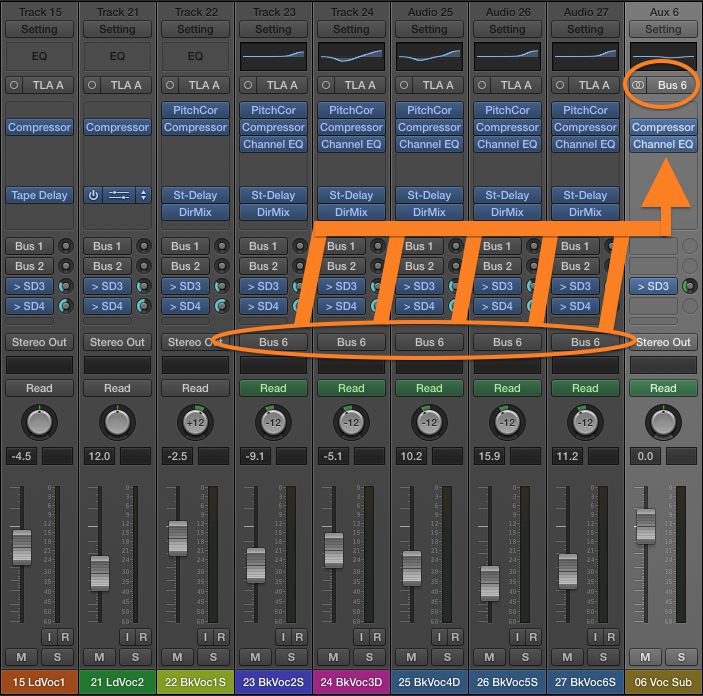
Background vocals can often be very heavily compressed, for that dense, thick wash of harmony I mentioned earlier. Subgrouping the backing vocals for processing is common—bussing all the backing vocals through an Aux track, with an aggressive compressor (along with appropriate EQ) in the Aux, can achieve that familiar vocal “sheen” so widely heard.
Fig 3 Vocal tracks subgrouped/bussed to an Aux, run through a single (Opto-style) Compressor (and EQ).
Audio Example 3 Some “wooly” backing vocals: first dry (as recorded); then (fairly) heavily processed with Compression & EQ for a tighter blend:
The Vocal's Space
When it comes to delay, ambience, and reverb effects, there are many options for vocals. In the early days of pop recording, a “slap echo' was one of the most popular effects for a vocal—a single delay of around 100–150 milliseconds or so, mixed under the lead vocal, was (and still is) a classic vocal treatment, adding a little bit of depth without really pulling the voice back, away from the virtual “front of the stage”. The gap between the original vocal and the echo keeps them separate, and as long as the slap isn't too loud, maintains good intelligibility. Other echo effects, like repeating echoes, are also popular—opening up the echo effect in an Aux track, and sending the vocal signal to it via a Send, can let you apply the repeating echo sparingly, like maybe on just the last word of a phrase, by automating the Send.
More typically, reverb is usually added to the lead vocal, but here, practices vary widely. Some mixes keep the lead vocal very dry, even if the instruments (and backing vocals) around it have a fair bit of ambience on them. In terms of the front-to-back depth of the mix, a drier track—in this case, a lead vocal—will locate to the front, and elements with more ambience/reverb will seem further “backstage”, behind the singer.
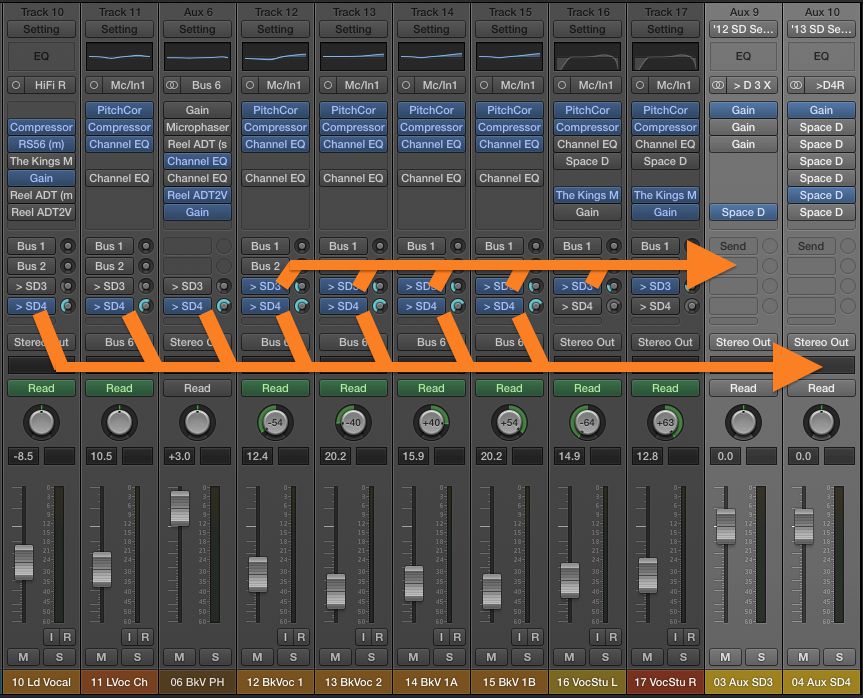
Reverb consists of three elements—the initial delay (after the main signal), a pattern of “Early Reflections” (ERs, which subconsciously define the size & shape of the (virtual) room), and the later reverberation “tail” (the part that hangs after the original signal, and dies away gradually). I often use two reverbs together in a mix (in separate Auxes), one that's just Early Reflections, and the other mostly just the later Reverb tail, and send signal to them separately from each track. This lets me adjust the front-back balance of elements in the mix, especially vocals. If you mix a lot of Early Reflections in with a vocal, it will push the vocal toward the back of the imaginary stage—having these earliest reflections underneath the vocal itself makes the vocal seem to be at that slightly greater distance. So if I want a lead vocal to be at the “front of the stage”, I'll dial up less ER, and more of the later Reverb—the tail—with a longer initial delay time. The resulting separation between the voice and the onset of reverb will let the vocal sound like it's closer, but the separate reverberation that follows it will keep it from being too dry. With backing vocals, I'll often use a greater percentage of ER, which will pull them back behind the lead, with a nice sense of slightly greater depth.
Fig 4 Vocal tracks feeding two Reverbs, in two Auxes—one for Early Reflections, the other for the later Reverberation ''tail”.
FX and Out
Of course, while my approach to lead vocals is usually “less is more”, there are times when a more creative treatment can be in order. If the situation suggests it, a little distortion on a voice can be a cool effect—sometimes I run a vocal part through a small guitar amp (sim)—the edgy band-limited tone is kind of like the “telephone voice” on steroids. And, ever since the '60s, the sound of a voice through a rotating Leslie speaker cabinet is (still) a popular effect—as long as you don't let it become too clichéd!
Audio Example 4 Some vocal effects: a vocal through a (slightly overdriven) small amp sim; a vocal run through a Leslie rotating speaker cabinet:
It's a Wrap
And so, on that note, I'll wrap up this article, and with it, this series on 'Mixing Rock”. Hopefully, some of these observations will be useful, providing some food for thought, or at least, remind people of some of the tricks and techniques that can help make for better mixes. Just remember, with all the dos and don'ts that are bandied about when it comes to mixing, the final decision on a mixing tweak is always based on the simplest of criteria—“does it sound good?” Happy mixing!
|
Previous articles are here: The Art of Mixing Rock, Part 1: Drums The Art of Mixing Rock, Part 2: Bass |


 © 2024 Ask.Audio
A NonLinear Educating Company
Discussion
What settings are you using in Space Designer to achieve this? Thanks!
Want to join the discussion?
Create an account or login to get started!