
Ableton is a great, versatile application, especially when it comes to live performances. In the Session View, you can easily jump between different clips and in the Master Track you can assign different tempos to different scenes, so the tempo can be changed by launching just once clip.
This is great, but in a live context these drastic jumps between tempos can be disjointed and jarring to the listener. A better way is to have a transition between tempos. You could take a 108 BPM track and glide smoothly into the next track at 14 0BPM. This can be done in Ableton by making use of MIDI Dummy Clips to ramp the tempo up. I'll show you how to achieve this in the Session View in Ableton.
Step 1 '" The Setup
To achieve these tempo transitions in Ableton, a bit of a setup needs to take place. So first the IAC MIDI Driver needs to be enabled. Go to the Audio MIDI Setup (Applications > Utilities) and select the MIDI Window (Window > Show MIDI Window).
Double-click the IAC Driver, make sure it is enabled and that Bus 1 is present under the Ports.

Launch Ableton Live, go to Preferences (Live > Preferences...) and select the MIDI Sync Tab. In the MIDI Ports section, make sure the IAC Driver Input Remote and IAC Driver Out Track are set to ON.

Next up is creating the Dummy Clip to trigger the Temp ramp.
Step 2 '" Dummy Clips
On a MIDI Track, create an empty MIDI clip. This will be the Dummy Clip that will send MIDI messages to the Tempo. On the Dummy Track under the MIDI To section, select the IAC Driver and Ch. 1.

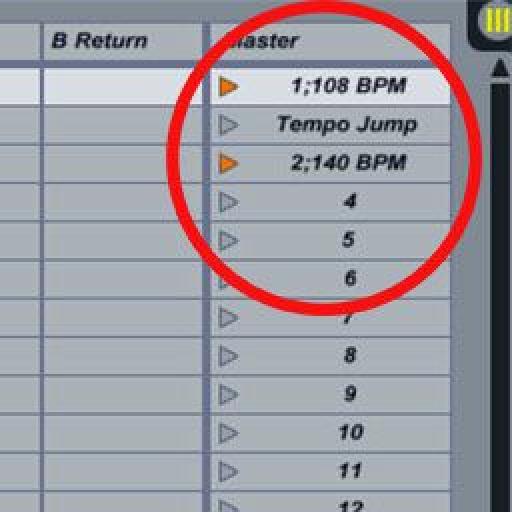
I have some stems tracks set up: Drums, Bass, Pads, Synth and FM8 tracks. But I have different Scenes setup. My first scene is set to the tempo 104 BPM (You can easily set the tempo to each scene by placing a ; after the name of the scene then type a tempo followed by BPM).
My next scene is at 140BPM. I want to make the transitions between the scenes smooth and seamless.
Insert a scene between these two. Create a new track. I have called this Tempo Jump. Add an empty MIDI clip to this Track and make sure it is on the scene between the other two. Remove the clip Stop buttons on the other tracks in this scene. To do this, select the clip area and press Command-E. If you don't remove these Stop buttons, then the above clips will stop when you launch the Tempo Jump scene, and you don't want this to happen. You want these clips to carry on playing when the Tempo Jump scene is launched.

Step 3 '" Assigning a MIDI Control
Next is to assign the Tempo to a MIDI control. Let's go to the MIDI Map (Command-M). You will see CC1 control in the MIDI Mappings section. This represents the IAC Driver. Click on the Tempo and then move a control to assign the Tempo to it.
Change the Min and Max to the tempos you require. The Min value will be the lower tempo (for me it is 108 BPM), and the Max value will be the higher tempo (mine will be 140 BPM).

Now when you move the controller you will see the tempo incrementally change.
Step 4 '" Drawing in the Tempo Jump Values
To get this to change automatically instead of relying on a MIDI control, we need to draw in an envelope for the control on the Dummy MIDI clip. Double-click on the Dummy MIDI clip to bring up the MIDI data. Make sure you have ticked the E to show you the Envelope section. On the Envelope section, check that it is set to the same MIDI parameter in the MIDI Map. I assigned mine to CC1.
I have drawn in an envelope that increases from the minimum to the maximum MIDI value over a course of four bars. The more bars that the tempo transitions over gives a smoother and less drastic sounding tempo jump.

Step 5 '" The Tempo Jump In Action
Now when I trigger the Dummy Scene, the tempo will start increasing from 108 BPM to 140 BPM. This gives a smooth transition between tempos, which is definitely desirable in a live situation when you want your live set to flow from track to track seamlessly without any big jumps in tempo differences.
Conclusion
As you can see these tempo transitions are really helpful for live performances. With computer music production, it is very easy to produce tracks in different styles and tempos. But when it comes to building up a live set with these tracks they may not transition between each other smoothly. With the above setup, one can easily move from one track to the next with tempo jumps/transitions. Try these out in your future live performances and see how much better your performances will flow.
For further Ableton tips and tricks check out the following tutorials:
Live 8 303 : Ableton Live 8 TNT Tips and Tricks 1
Discussion
Want to join the discussion?
Create an account or login to get started!