Logic Pro's EXS24 has the ability to switch between groups of samples while it's being played. This is used commonly in orchestral production. For example, playing chords with an orchestral string that changes from a sustained set of notes, to a shorter more staccato way of playing. After adding samples to different groups within EXS24 you "switch" between sample sets in various ways like via MIDI note numbers on your controller, or with what are called articulation IDs that are easily and individually set for each note in the Piano Roll.
Let's look at "Switching" with electronic dance music in mind. Wouldn't it be cool if you could change the sample you're playing on an instrument while you play it, or as it's playing back from the piano roll? In this intermediate to advanced article, we’ll make a playable EXS24 instrument that switches out the current sample by using lower notes on your MIDI controller. Think electro house for sure, but this is equally great for deep house, or any genre with held melodic parts. Using vocal stabs this method is great for Trap and Hip Hop too. This seems complex at first, but you'll be led to save a Library Patch so you can simply open a blank version and easily replace the elements with ones in use in your current song.
Step 1: Make (or Find) the Source Files
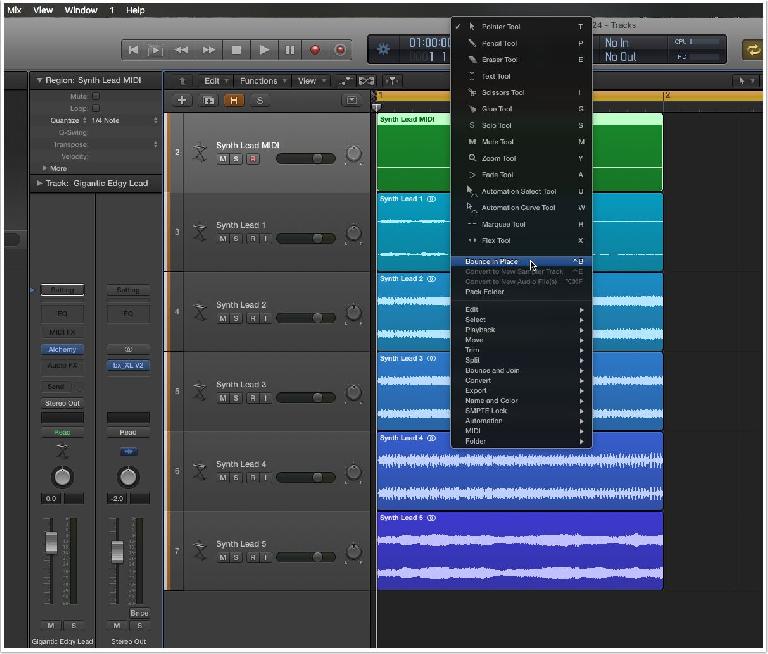
Pick your first lead sound, and either record or step in a one or two bar—single note—held out for the length of the bar(s). Quantize the region so the note is exactly at the start of a bar/region, and remember what note you held (you’ll need to know this later). If the sound you are bouncing is a single channel strip (not a track stack), right-click the region and choose "Bounce in place" from the bounce and join menu. If the sound you're bouncing is a Track Stack, then select the region, and from the File menu > Export Menu, select "Export 1 Region as Audio File" and click the Add Resulting Files to Project Browser button. Open the project browser and drag the file just created to the arrange window. Now simply change out the instrument/library patch and repeat these steps for as many sounds as you want in your instrument. You should end up with various 1 or 2 bar in length audio regions like in the image below.
When your chosen sounds are similar, the effect of this process will be a bit more subtle, but the real fun begins when you mix and match different types of sounds. Don’t want to make your own samples? Many sample packs have one-shot bass and lead sounds and will usually include the key note in the name of the file.
Step 2: Make the Sampler Instrument
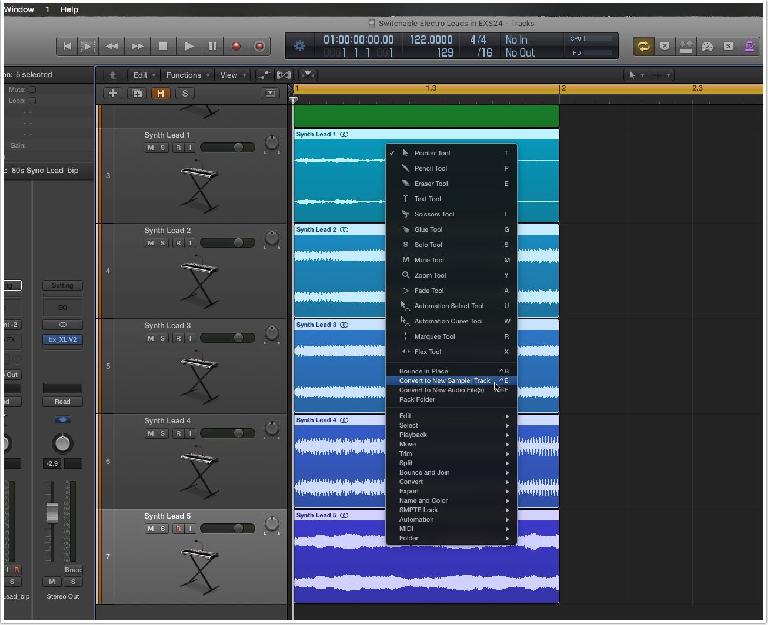
Highlight all the regions you want in your instrument, right-click and choose "Convert to New Sampler Track" from the Convert menu. When the menu comes up, make sure you "Create Zones by" region and not by transient markers. Also change the Trigger Note Range left value to C2 so the samples are placed higher on the keyboard... you can change this easily in the EXS24 instrument later however. Give it a meaningful name, and click OK to create the instrument. Delete the MIDI region created after making the instrument.
Step 3: Pitch Each Sample
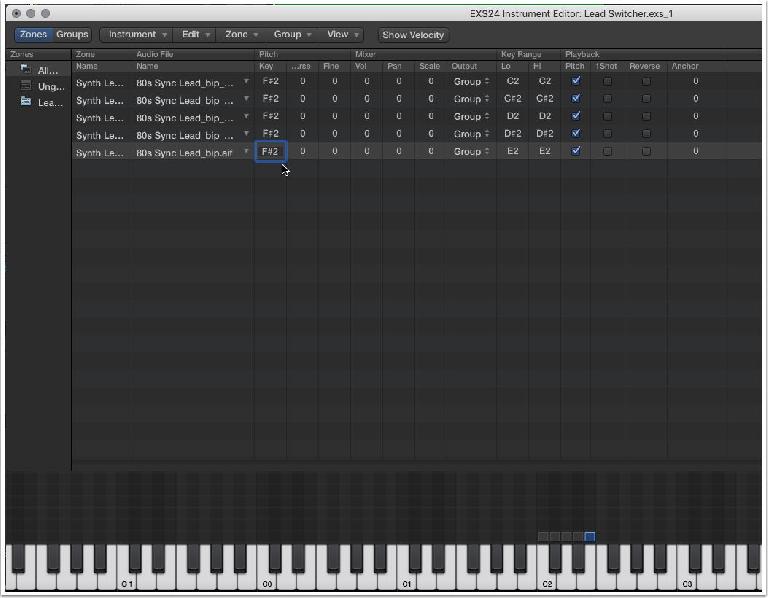
Open the EXS24 interface, and from the top right corner of it's interface click on the Edit button (next to the Options button) to open EXS24's Instrument Editor window. Each sample's key should be set via the "Pitch" menu. Simply set each key to the same key as your sample. In my case I played F#2 for all five samples so I've set F#2 for each one. If you think one of the lead samples would sound better higher or lower, you can change instead to (note value) + 1 or 3. Once the instrument is up and running, you’ll probably want to experiment with these values. Do not, however, change the pitch of a sample to something it’s not, or inharmonic mayhem awaits!
Step 4: Set Each Sample's Key Range
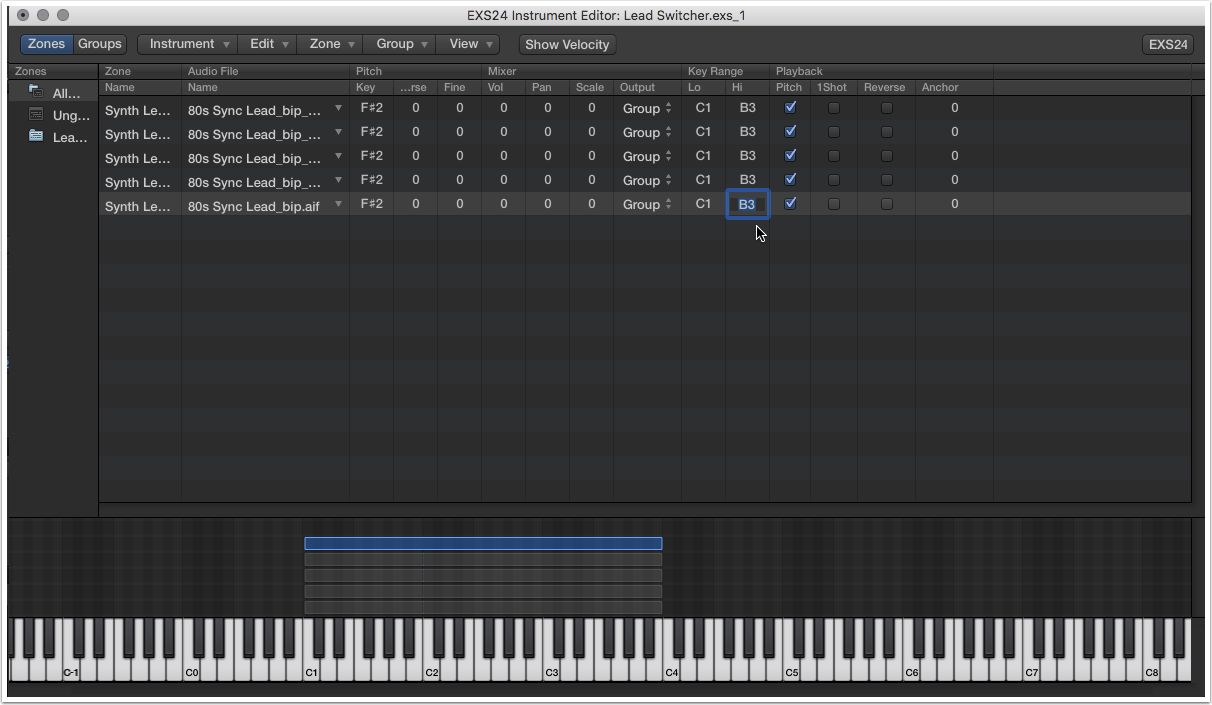
Adjust each sample's "Key Range" column. In step 6 we'll be using the 0 octave as the keys that trigger the different samples, so set each sample's "Lo" value to C1, and the “Hi” value two or three octaves higher as I did in the screen shot below. You don't want the trigger keys to overlap at all so this is an important step.
Step 5: Create a Separate Group for Each Sample
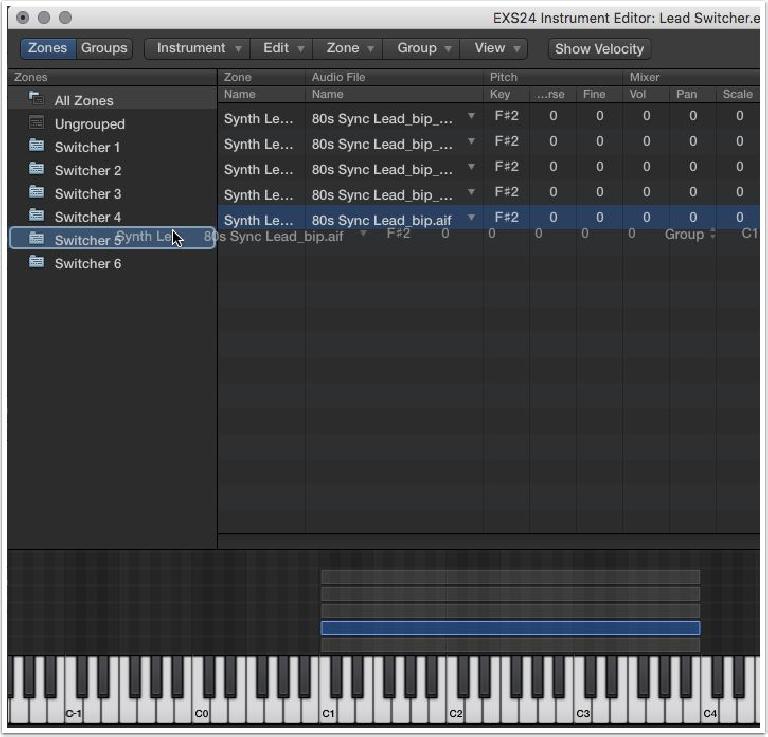
From the Group menu now, select New Group for as many individual samples as you made (or as many as you think you'll need for future songs). There’s one group already created by default. I made 6… one extra for future use. You’ll see the groups start to pop up on the left side column. I named each group to make it easier to see them. You can drag between columns to expand them. Now, make sure you’re selected on “All Zones” and from each audio file's name, drag and drop each sample into their own group (one sample per group).
Step 6: Select Groups by Different MIDI Numbers
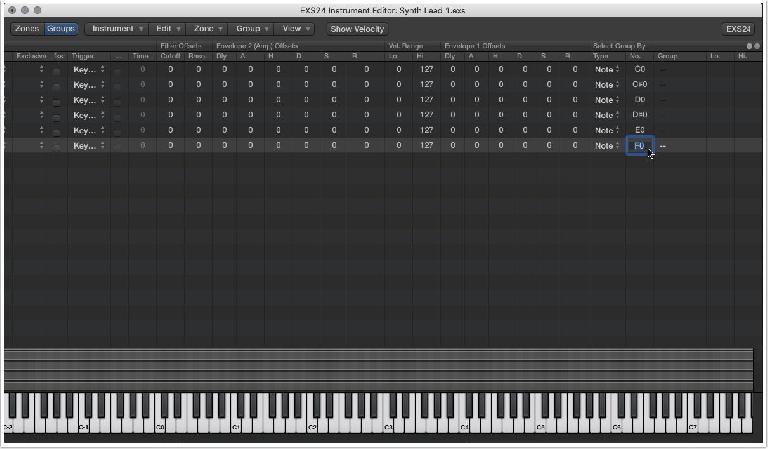
There are two main views in the Instrument Editor: the Zones view and the Groups view. Switch to the Groups view now by clicking the Groups button at the top left of the window. From the window's local view menu select "View All." Now scroll to the far right side of the window and look for the "Select Group By" column. From this column's type menu select "note" for all of the individual groups. From the "No." menu choose the MIDI notes on your controller you'll be using to switch from sound to sound. The default C-2 is too low for our use. Change the top group to "C0(zero)" and every sequential group the next MIDI note higher. In my example I used C0, C#0, D0, D#0, E0 and F0. These notes on your MIDI controller (or in the Piano Roll) are now used to switch between sample sets. Give it a try! Close the Instrument editor now and save when it asks.
Step 7: Playing/Sequencing a Part
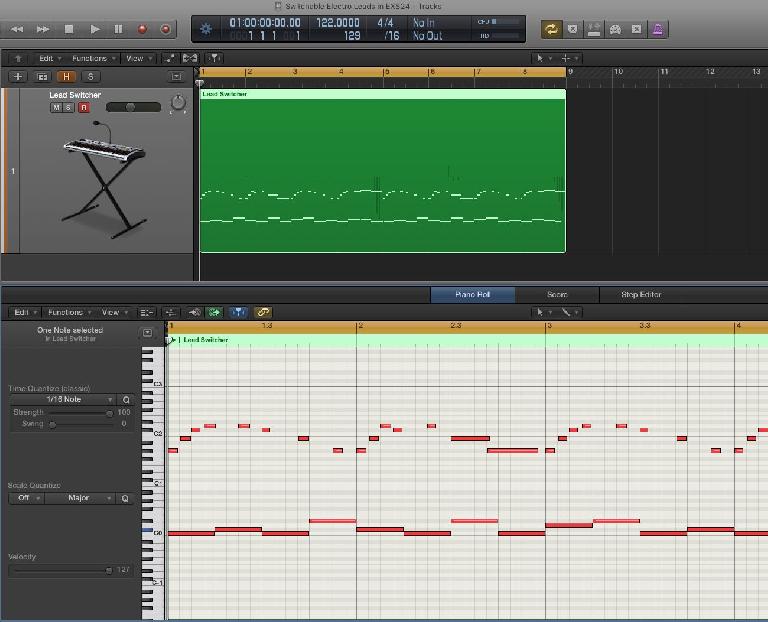
If you're a player, record a riff, or step enter a sequence. The 0 octave is used to switch out the sample. In my image below I played the part in on my MIDI controller, then simply hand drew the group select notes. Every time the timeline passes over a different note, the sample changes!
Step 8: Swapping Out Samples
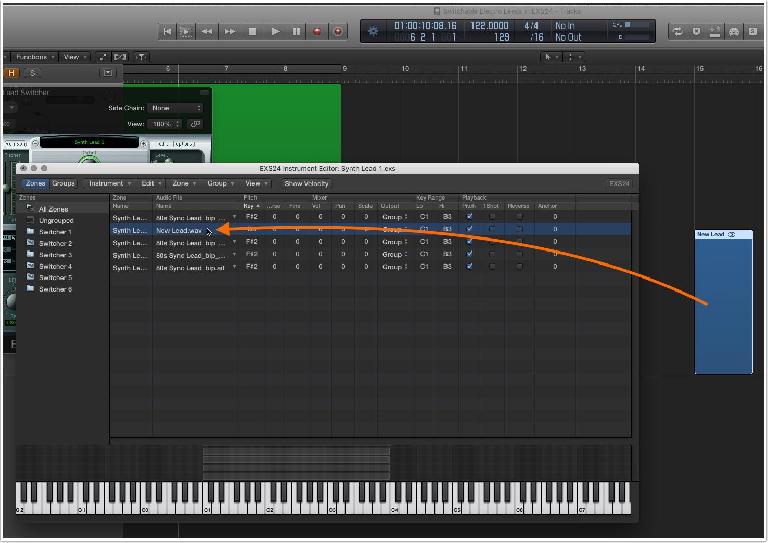
Samples can easily be swapped out! Simply drag the new sample directly to the name of the one you want to replace. You can do this in many ways... either directly from the Workspace, from the Project/All Files browser, or from the Finder/Desktop.
Step 9: Save the Instrument for Future Use
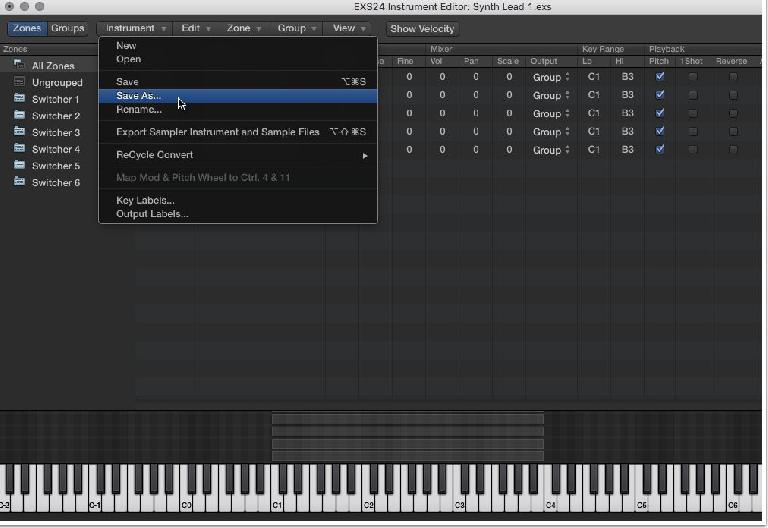
So you don't have to set this up from scratch every time, you'll want to save it to the Library as a recallable setting. First of all, save the instrument you've made now (if you like it) inside the EXS24 Instrument Editor. From the editor’s local Instrument menu, choose "Save As." Also remember to save the project itself or the samples you've made (that EXS24 are referencing) will be lost.
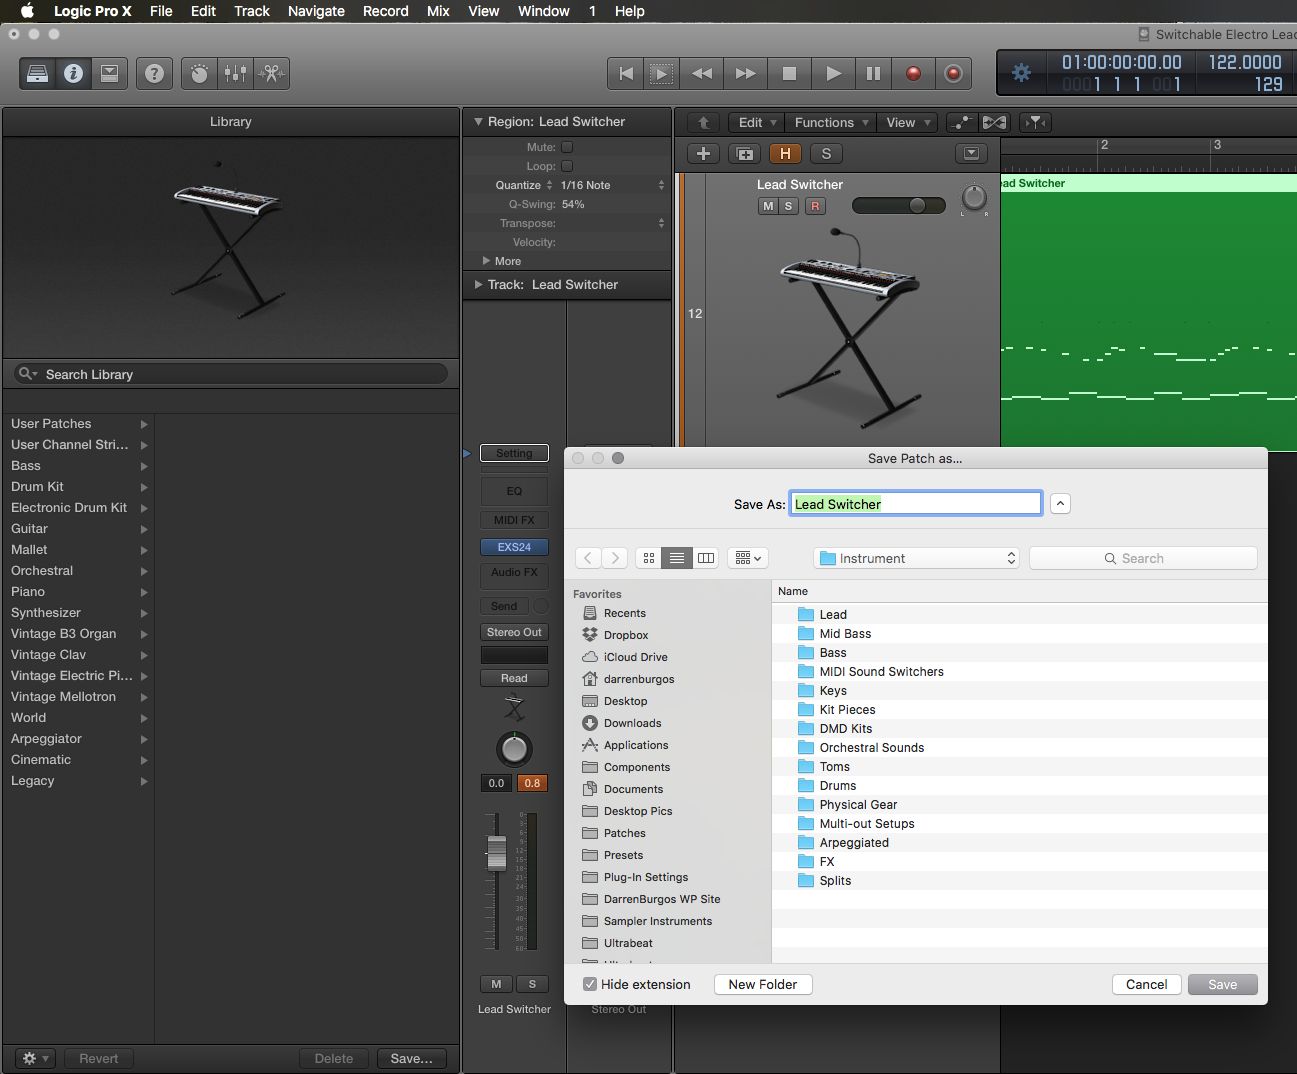
Now while on the Zones page, select all the individual zones and press the delete key (Don't worry if you made something cool already, you just saved it above and can reload it via the Instrument menu). Go back to the Instrument menu and again select Save As. Name the instrument "Lead Switcher" then close the editor and the EXS24 itself. Press Y to open the Library if it's not already opened. Make sure the tiny blue Library arrow is pointing to the very top of the channel strip, then simply press the Save button at the bottom right corner of the Library. Also name the Library patch Lead Switcher (or whatever you want) and you're done!
Now you'll easily be able to open a blank Lead Switcher instrument from any future project without a lengthy setup via the Library. When you're ready to use it, open it from the Library, then open the EXS24 and click the Edit button. In the EXS24 Editor simply drag and drop each sample to any of the empty groups (you made above) and pitch each sample correctly. From the Key Range column, make sure all the new samples you dragged in start above the trigger keys like you did in Step 4 above. Make sure you save as a new instrument via the Instrument menu for every song you use this in or your original blank instrument will be replaced when you close and save the EXS24 Instrument Editor.
Learn more Logic Pro tips, tricks & techniques in our video courses in the AskAudio Academy here.


 © 2024 Ask.Audio
A NonLinear Educating Company
Discussion
Want to join the discussion?
Create an account or login to get started!