
The Step Sequencer really does fill up fast, as you begin dropping in synths, drums and all other forms of music and mayhem. Thankfully, you've got an excellent tool at your disposal for keeping things tidy as the list fills up. The Channel Display Filter, when utilized, is a drop-down menu that will display tracks that have been grouped by pre-determined criteria of your choice, using the Group Selected function. Some groups are available by default, like Audio (For Audio tracks only). Let's take a look at how to create a Filter, now!
Step 1. Create Filter Group
Before I create anything else, I'll need to create a filter group. This is easily done! I'll simply right-click on the drop-down menu at the base of the step sequencer. When I do this, a Create Group option appears, in the contextual menu. I'll go ahead and select this…

I'll name this group Drums, as I'd really like to be able to have a dedicated grouping that shows all of my percussive instruments. Later on, I can create a filter for specific types of drums, like hi-hats. But, for the moment, let's create one that takes care of many, with one click.

Step 2. Add to Filter Group
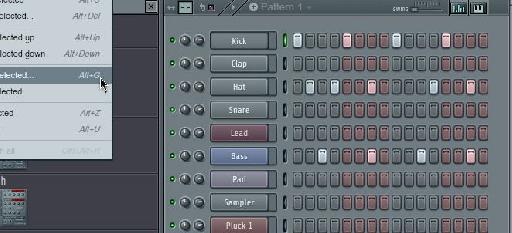
Now, as soon as I press the return button, the step sequencer is going to seemingly clear everything, and present us with a step sequencer that has nothing in it. Don't worry! I'll select the Channel Display drop-down menu, and then choose All. Now, everything is back! But, we need to get the drums into our filter group, now. I'll select the Kick and either select the Channels Drop-Down menu, and select Group Selected. Or, use the Alt-G shortcut.

After pressing Group Selected, you'll see another dialog box appear, letting you know that you need to enter a name for the Group that this drum will be assigned to. I'll enter in Drums…

Step 3. Add More to your Filter Group!
Now, I'll keep using the Group Selected function to add tracks to my Drums filter. This only take a few seconds.

Note: If you'd like to create a new filter and don't feel like going through the step of right-clicking on the Channel Display Filter, simply type in the name of a filter that does not exist, like 'Synths'. As soon as you hit the return button, then go over to the Channel Display Filter, you'll notice you now have a Synths grouping. Nice!

Conclusion
Once I'm finished, I just simply return to the All filter, within the Channel Display Filter, or utilize my new Drums filter, that shows me everything that I set up. Now, if I'm DJing, and need quick access to my percussive parts, I can switch to this filter and see exactly what's going on. Next, I can create a filter for my synth parts, then a filter for my pads, vox, and so on. And, by doing so, I'll always have quick easy access to all the elements of my song.

Discussion
Want to join the discussion?
Create an account or login to get started!