
One of my favorite features in Adobe Audition is its ability to edit audio with spectral displays giving you a lot of control over your stereo audio file. With the spectral display, you see how the frequencies dominate in the audio. This might sound confusing initially so let's first talk about the spectral view and then how to use it to edit your audio.
The Spectral View
In the spectral view, also known as spectral frequency analysis, the audio is analyzed by the application and then it will display a view that is very colorful. The bottom represents the low bass register, and the higher frequencies are represented at the top. The brighter the color, the stronger it is in that region. Left to right is the timeline like the standard audio waveform view.

So for example if there is a bright orange area at 500 Hz, then there will be a louder bassier sound at that point in the timeline.
Spectral Tools
Now let's see how you navigate to this spectral view. Add an audio file to the waveform editor by simply dragging it in. This will show you the audio waveform view for the audio file. Then go to View > Show Spectral Frequency Display or use the shortcut Shift-D.

To show less or more of the view, you can drag this up or down. When I'm working in the spectral view, I like to drag it all the way up so that I get a nice big view of the spectral frequency range. You'll see the Hz meter on the right, and there are two views if it's a stereo file.

The tools you can use to make selections on the spectral view are at the top. The best tools to use are the Time Selection Tool, the Marquee Selection tool, and the Lasso Tool. The Time selection tool selects areas from left to right. The Marque tool can select from left to right plus you can control the horizontal area you want to select as well. With the Lasso tool, you can draw in your own custom selections.

Editing Audio in the Spectral View
Now let's see how you can edit audio with the spectral frequency view. I have an audio file that has a bass part with a shaker. I want to remove the shaker using spectral editing.
When I pull this audio file into Audition and view the spectral view, I can see that the bass is sitting in the 0'"1 k region, and then the shakers occupy from 2 kHz up to 20 kHz.
Here is the included audio loop so you can follow along with me:
Let's see how we can remove the shakers. Select the Marquee Selection tool. Now drag in a selection from 2 kHz up to 20 kHz .

When you play back you'll hear just what is in the selection. Now on the floating volume level dial, dial this all the way to the left to reduce this selection's volume level.

Click somewhere else off the selection to deselect the region. Now play back and hear how the shaker has been removed. You can still hear a bit more shaker so let's reduce it some more. I'm going to draw in another selection going from 2 kHz to 1 kHz. But this time I'm only going to drop the level by 10 dB for a more natural sound between the two. It's getting closer. You can keep going and remove more. After a couple more attempts, here are my results:

Alternatively I could have also removed the bass. You can see the bass quite easily as it is the bright orange-yellow area in the bottom 0'"500 Hz region. I've removed everything from 0 Hz to 2 kHz. This removes some of the low midrange of the shaker, but has perfectly removed the bass.

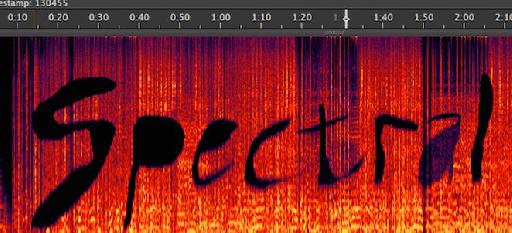
Lasso Editing
With the Lasso edit tool, you can get quite creative. I've used the lasso tool to draw in my name, and then have reduced these selections to remove alphabet looking spots in the spectral frequency view. Now listen how this has manipulated the audio

How cool is that? You can go wild with this tool and manipulate the spectral domain in interesting ways. You can imagine how helpful this tool can also be to clean up low hiss and noises in your audio recordings as well.
Conclusion
That's how to use the spectral view in Audition to do spectral editing on your audio. You see how powerful this tool. You can use it to clear out specific sounds in your recorded audio, or you can use it to manipulate your sounds as well. Try the spectral editing out and see how it can help in your music productions and audio editing.
Discussion
Want to join the discussion?
Create an account or login to get started!